Showing posts with label Phillipa jumper. Show all posts

11 Oct 2013

Phillipa jumper: 12. the pattern & 10 things I learned


1. choose your first pattern well
Simply said, for the first time make sure you choose something without intricate lacing, cables or fair isle patterns. The most important thing is to focus on the (approximately) right size and right construction of your garment. When you got that right, you can play around with more difficult details. The patterned part of the 'Phillippa' is simple enough to knit, but still looks pretty. You could also choose a jumper with the bodice knitted in stocking stitch in combination with another simple yoke pattern.

2. read the pattern instructions
Read the pattern instructions at least twice and make notes. You really need to have an idea of how the garment is constructed. Take notes and make sure you don't miss anything, especially when your gauge is different or you need to resize a pattern. Pay attention to what the instructions exactly instruct you to do! For example: K2TOG each end of row or K2TOG at beginning of every row or K2TOG every alternate row makes a huge difference!
(In the first round I missed a second moment of increase in the pattern which made my original stitch-count useless.... You also should know at which point you need to pay attention to shaping the armholes or neckline. If you want to adjust either one you should know where to start to decrease. Sometimes knitting goes so well that you might forget to stop in time...)

3. make a visual chart 
I prefer visual information to written when it comes to knitting patterns, so for me it is much easier to use a stitch-count chart instead of counting the stitches all the time. A chart makes it also easier to spot mistakes and printing errors in the original pattern description!
Note: a chart represents the right side of the pattern, so you should 'read' every other row backwards when not knitting on circular needles.

4. make a good swatch and wet block it!
This to prevent putting a lot of time and effort in making a garment which will be unwearable after the first wash. To make it easier, you can start out with a sock-wool for the first time. These wools are generally superwash-treated to keep their shape and not to shrink or stretch after (machine) washing.

5. check your tension
It is important to keep your tension correct. After the few inches of the patterned part with K and P stitches my knitting became too loose. I had to rip it out and restart the patterned part on smaller needles. The reason was that when knitting in round I only used K stitches which made my work go fast but my tension became tighter too.
Note: The tension or gauge swatch is usually for stocking stitch unless stated otherwise, for example if the garment is only knitted in pattern.

6. don't overcalculate
While it is important to have the sizing as good as possible don't think calculating everything automatically results in the perfect fit. If you are not satisfied with your garment, the neckline or other details it is better to rip it out and start over.

7. use stitchmarkers and count often
First when casting on the stitches and then to mark the sides or middle of the piece you are knitting. Re-count your stitches every now and then. The easiest way to do this is to place a stitchmarker every 10th or 20th stitch. If your count is correct you can remove them when knitting the next round.

8. write everything down
Make notes of your stitch counts, the amount of rows and other changes you make as you knit. If you have a good blueprint-pattern it will be so much easier to reproduce other patterns in your size too! Why would you do a different shaping of a standard armhole when one method works for you and you already figured it out?

9. be inventive
Unless you want to knit your garment with completely period-accurate details, think of what could make your work easier. For example, omitting the side seams by knitting on circular needles up to the armholes. This makes knitting faster too, because you only have knit stitches. You can change certain details too: feel free to use buttons instead of a zipper and don't be afraid to make the sleeves fuller or less full than the original...

10. don't expect the first jumper to be perfect
This is probaby the most important thing. When working on your first vintage pattern it is easy to get carried away by the pretty vintage pictures. I guess, the first one just can't be perfect, since you need to experiment with the ease and the fit, plus vintage patterns are usually shorter than we are used to. I think you should just enjoy knitting the garment and more important, learn and use the good things in your next project!


the pattern:
Notes:
- When working with a gauge of 7 sts to an inch you will have a size S/M) garment.
- I started with about 3.5 in of ribbing at the waist (= 9 cm)
- I have lowered the neckline a bit by adding a few extra rows to the shoulders (the straight part following the neckline decrease)
- I casted on 84 sts for the sleeves instead of 80.
- Feel free to add length! The 40's style jumpers are usually rather short.

pattern part 1:


pattern part 2:


pattern part 3:

The original pattern appeared in the Australian Women's Weekly - through Trove

Previous posts in the Phillipa jumper series:
1. introduction
2. yarn an gauge
3. fit an ease
4. pattern charts an diagrams
5. knitting in round &stitch markers
6. methods to increase
7. my seamless pocket lining
8. my version: back neck opening
9. oh, those 40's sleeves
10. crochet finishing on neckline and pocket
11. the big reveal

9 Oct 2013

Phillipa jumper: 11. the big reveal!


After all those weeks you might be wondering how my finished jumper look like. You also might wonder why I choose to make 10 posts instead of just a few. Well, I like to do a lot of research for my projects and I like to experiment with different methods to achieve perfect results. If you look back you can find a lot of information on how to knit a vintage jumper for yourself. Well, here it is! And it definitely looks good for a first try!
(I'm wearing here a linen skirt, hence all those wrinkles...)


Front and back view:


The button tab:


So what am I going to do differently next time?
to change next time
  • yarn (go for nice, smooth wool)
  • less ease (not afraid of it anymore!) It is now a bit roomy although it has just an inch positive ease  Now I added width but with my bust size it wasn't necessary at all. I guess from cup A to C there is no need for that.
  • want to try other types of shoulder solutions
  • lower the armhole a bit
  • make the bodice a tad longer (though this is how it is supposed to be, truly 40's style!)
  • although it is period and pattern accurate, I prefer a bit less wide shoulders
not to change next time
  • tension/gauge (I think 7 sts/1 inch =28 sts/10 cm is just perfect for vintage jumpers! I already have two yarn options which I knit with the same tension and are easily available, plus not too expensive: drops alpaca and drops baby merino.
  • the neckline is flattering, just perfect for this type of jumpers, not too low and not too high
  • like the wide ribbing at the waist 
  • love the increase after the ribbing for a bit blousy look, it makes my waist look smaller!
  • like the button closure of the back neck opening with the crochet loops


The most important thing is that I learned a lot while knitting this jumper. I know now how to correct things, I'm not afraid of adding less ease either. I have a good idea how many stitches are just right with this gauge so I can adjust the sizing of my next jumper even better. That one will be just perfect!

Next time we are continuing the wartime pattern series. The next pattern will be a quick, but oh-so-pretty little project!

Previous posts in the Phillipa jumper series:
1. introduction
2. yarn an gauge
3. fit an ease
4. pattern charts an diagrams
5. knitting in round &stitch markers
6. methods to increase
7. my seamless pocket lining
8. my version: back neck opening
9. oh, those 40's sleeves
10. crochet finishing on neckline and pocket

2 Oct 2013

Phillipa jumper: 10. crochet finishing on neckline and pocket


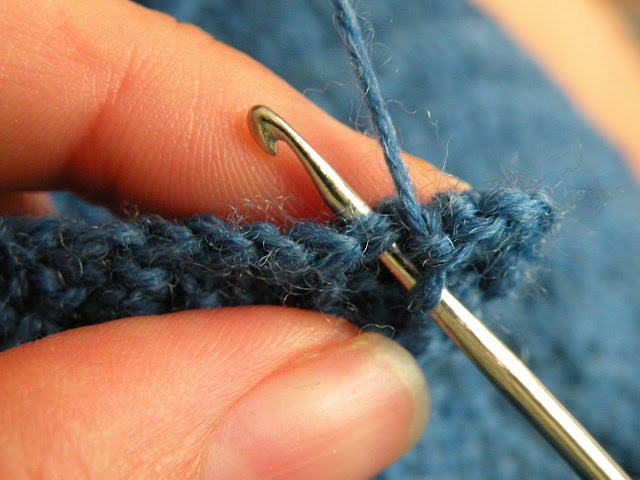
Here is the last post about the construction of the Phillipa jumper. The very last step, after assembling the jumper is to finish the neckline and the pocket opening. As often in the 30's and 40's, the Phillipa pattern calls for a crocheted finish: 2 rows of d.c.* all around. Another often used finishing method is to pick up stitches around the neckline and knit in ribbing. Sometimes the ribbed edge is knitted separately and sewn to the neckline after finishing. Since the 40's necklines are unusual high it is important to lower the neckline a bit if you want to finish it with a ribbed band.

*Note: this is the US abbrevation which is the same as the UK single crochet! I discussed the differences here. Scroll down for a step-by-step instruction!

With a crochet finish you get a nice, regular chain finish at the edges. It also helps to correct the U-shaped curves of neckline.


double crochet step-by-step
At the upper edge where you cast off you see the little chains, use one crochet stitch per one knitted stitch. At the sides you sometimes you need to put two in one hole, just check your tension every now and then. If your work curves upwards you are crocheting too tight, if it starts to golf you crochet too lose or use too many stitches. Practice, practice, practice! I used a metric size 2 crochethook.

1. insert the crochet needle into a stitch (under the V of a chain)
-

2. yarn over:

3. pull yarn through stitch, now you have two loops on your needle: 

4. yarn over again:

5. pull yarn through both loops: 

Ready! This is how my neckline looks like after the first row of double crochet:


Because the decrease of the knitted neckline is not a perfect curve I follow the pattern instructions and use a second row of double crochet to smooth it out:


The flat chain button loops were made in the first row: in the first row of dc I made loops of 5 chains and then the second row on top of that. Below fitting the button:


The finished button loops:


This is how the pocket edge looks like:


Since this is a straight line I decided to use only one row of dc to not to interfere with the diagonal pattern Remember, you can always adjust things you don't like. The pattern instructions are just one way to do things, dare to adjust and do things differently if you don't like the results!


Next post: the big reveal but have not manage to take good pics yet...
Previous posts in the Phillipa jumper series:
1. introduction
2. yarn an gauge
3. fit an ease
4. pattern charts an diagrams
5. knitting in round &stitch markers
6. methods to increase
7. my seamless pocket lining
8. my version: back neck opening
9. oh, those 40's sleeves

27 Sept 2013

Phillipa jumper: 9. Oh, those 40's sleeves!


Well, we are getting there, there will be one more post on the making of the Phillipa jumper before the big reveal! For now, let's talk about the sleeves.
did you know...
...that before the 1990's revival shoulder pads were very fashionable and widely used throughout the 1940's? Just look at those extended shoulder lines of old pictures, you often can spot the outer edges! 
Exaggerated shoulder lines were the rage in the first half of the 40's. By the end of the 1930's the sloping the shoulder lines were horizontally extended and got more and more accentuated with pleated or gathered puff sleeves, supported by shoulder pads. By the end of WW2 the shoulders became more angular by the end of the 40's with just a little upwards puff to finally become flat again in the 50's.


source images here

The sleeves of 1940's sewing and knitting patterns often have extended sleevecaps which are either gathered or folded into pleats when setting in the sleeves:


Below one of the finished sleeves of the Phillipa. The fullness of the sleeve cap is folded in 6 pleats, two on the top and two on the left and right side:


You really need to check the instructions or pictures of the pattern to see how many folds you are supposed to make or how the gathering should look like. My mistake: I assumed there were 2 in the front and two in the back, but according to the instructions there are 3 in the front and 3 in the back. Suggestion: focus!

Sewing the pleats:


First try (left) no success and a 'deflated' looking puff, second time (right) with 3+3 pleats much better and the pleats even support themselves for fullness:
  

shoulder pads
In contrary to the big, rounded, prefab foam shoulder pads which we all know from the 1990's the 1940's shoulder pads were triangle shaped and knitted for knitted garments. The pattern below was published repeatedly throughout the 1940's up to the 50's by the Australian Women's Weekly. This pattern makes triangle-shaped shoulder pads and is suited for fingering weight yarn.
shoulder pad pattern
- Using no 10 needles cast on 24 stitches.
- Work 24 rows in stocking stitch.
- Cast off.
- Fold in half diagonally, pad with cotton-wool and sew up edges.
To stuff the shoulder pads you could use synthetic fibres (like filling from a cheap IKEA cushion) instead of cotton or wool to add less weight. You can fix the shoulder pads with press-studs to the garment for easy removal when washing.

Next up the last pattern notes: crochet finish of the neckline.
Previous posts in the Phillipa jumper series:
1. introduction
2. yarn an gauge
3. fit an ease
4. pattern charts an diagrams
5. knitting in round &stitch markers
6. methods to increase
7. my seamless pocket lining
8. my version: back neck opening

23 Sept 2013

Phillipa jumper: 8. My version: back neck opening


Interestingly, the Phillipa pattern calls for a zipper closure on the neck opening, which was more popular in the late 40's and 50's. I decided to skip the zipper closure and go with a button closure. 1930's and 1940's sweaters and jumpers usually have quite high necklines. There is an extra opening needed in order to pull it over your head. Most of the garments of the era feature a button closure or press studs in the back of the neckline or button closure at the shoulders.

  • zipper closure: divide the back neck opening in the middle as instructed. Keep knitting in pattern on both sides. Before inserting the zipper reinforce the back of your seamline with tape.
  • button closure with vertical loops: the loops are crocheted on after finishing. An 'underlayment' button band is not necessary but looks professional. Imagine pulling the opening, you certainly don't want to show skin...
  • button closure with horizontal knit-in buttonholes: a popular method but not my favorite because of the minuscule buttonholes you should knit. You need to make an underlayment button band on one side and knit in buttonholes on the other: When knitting you cast off a certain amount of stitches and cast on again in the next row on your pattern side.
  • button closure with press-studs: you need an underlayment button band but instead of knitting in buttonholes add press-studs afterwards. Those can be either visible, with a nice shell-finishing or invisible and sewn to the wrong side of the upper layer.
  • shoulder opening: due to the shoulder shaping you always need to pick up stitches after finishing to do this.


An 'underlayment' button band is often knitted after finishing.
In that case you simply divide the back in two and finish the right and left part separately as you would do for a zipper closure. Then you need to pick up stitches along the one side (usually left) and knit about 1/2 in or 1.5 cm (usually in rib). Another method is below, when you knit your button band with the existing stitches. This is done in garter stitch to omit the curling edges of st-st. Again, I think it looks neat and you don't have to pick up stitches afterwards!

The finished button tab with crochet loops - more about those in one of the next blog posts of the Pillipa-series. The buttons are sewn right on the inside edge of the garter-stitch band (where the garter stitch meets the pattern)


knit-in button band
To do this after dividing the back as instructed I picked up 4 extra stitches when knitting the second row of the left side by knitting (purling) twice in the last 4 stitches. I left the original stitches on a spare needle at the front of the garment and knitted the extra stitches continuing my other half back.
The 4 extra stitches were knitted in garter stitch as instructed by the most vintage jumper patterns (K those stitches in every row).
This created an underlayment. You could either knit in buttonholes on your other hals back or crochet loops when finishing the edges as I'm going to do.


machine buttonholes 
How do you feel about knitting small buttonholes? Although I can say I'm an experienced knitter this one is always a misery. I think it is close to impossible to get them the right size or shape. Somehow they are always too big or too small, or too shapeless... Remember, whatever you do you need to reinforce the edges by using tape or grosgrain ribbon. The same counts if you want to insert a zipper too. It stabilizes the fabric and prevent stretching. Here is a detailed tutorial on how to do this.

Next up: those puffy 40's sleeves!

Previous posts in the Phillipa jumper series:
1. introduction
2. yarn an gauge
3. fit an ease
4. pattern charts an diagrams
5. knitting in round &stitch markers
6. methods to increase
7. my seamless pocket lining