Showing posts with label knitting. Show all posts

1 May 2015

raglan sleeve baby cardigan pattern - EU size 56-62


What I like about this pattern I made up is that you can add any pattern, from fair isle to combination of stitches or just simple stripes. You can use the moss-stitch border, a garter stitch border or just ribbing.
It fits sizes 56-62 (tested!) The cardigan is knitted from the bottom up, front, back and sleeves separately, then all the pieces are joined to knit the raglan yoke all in one piece again. You only need to seam the sleeves and sides at the end.

material & sizing:
I used a baby-weight yarn, drops baby merino which I knit with metric size 3 needles. The tension is 26 sts to 10 cm.
Finished measurements (European size 62)
  • width measured between underarms: 23 cm (=9 in)
  • length from the shoulder down: 24 cm (=9.5 in)
  • underarm length: 14 cm (=5.5 in)


You can adjust the size by casting on more rows and adding length before starting the raglan yoke. In that case you need to widen the neck as well.
Of course, using a heavier wool and larger needles is the easiest way to size up!

my basic raglan pattern:
front (make 2):
- cast on for cardigan 37 sts (each half front includes a border of 4 sts!)
- Row 1-6: Work in the border stitch of your choice for 6 rows (ribbing, moss-stitch or garter-stitch) adding the first buttonhole in the 3rd row.
- buttonhole: knit 2, cast off 2. In next row in border cast on 2 stitches and knit 2.
- Row 7-57: continue in stocking-stitch (alternating 1 row knit and 1 row purl) while keeping the first 4 sts (right front) an last 4 stitches (left front) of each row in moss-stitch or garter-stitch.
- add buttonholes in 23-43-53th row as desired (left front border for boys or right front border for girls )
- Row 58: cast off 2 sts opposite to borders for underarms
- Put stitches on holder

back:
- cast on 68 sts
- Row 1-6: Work in the border stitch of your choice for 6 rows (ribbing, moss-stitch or garter-stitch)
- Row 7-56: continue in stocking-stitch (alternating 1 row knit and 1 row purl)
- row 57 + 58: cast off 2 sts at beginning of row for underarms
- Put stitches on holder

sleeves:
- cast on 37 sts in main color
- Row 1-6: Work in the border stitch of your choice for 6 rows (ribbing, moss-stitch or garter-stitch)
- Row 7-50: continue in stocking stitch (alternating 1 row knit and 1 row purl)
- increase 1 st on both ends in row 16 (=39 sts)
- inc. 1 st at both ends of 22nd row (=41 sts)
- inc. 1 st at both ends of 28th row (=43 sts)
- inc. 1 st at both ends of 44th row (=45 sts),
- inc. 1 st at both ends of 46th row  (=47 sts)
- 51 + 52th row cast off 2 sts at begin of row. (fronts: 35 sts, back 64 sts remain)

yoke:
- Continue front and back with sleeves altogether, place stitchmarkers. For each stitch marker on the right side of work:
- last 3 sts before stitchmarker: slip one, knit one, pass slipped stitch over and knit one.
- first 3 stitches after stitch markers: knit one, knit 2 together
- Purl alternating rows.
Continue until the 84th row (before the 5th buttonhole is made)
shape neck: 
- knit 4 sts of border and put these stitches on holder for neckband
- continue in stocking stitch, decrease at raglan every alternate row as before, at the same time decrease 1 st at neck edge every row until 9 sts remain after knitting right side row.
- put stitches on holder, break wool.

Pick up 3 sts, transfer another stitches on needle, pick up 3 sts in front and transfer the last 6 stitches.

neck band:
- Knit 6 rows in the border stitch of your choice
- in first row (wrong side) decrease once more at stitch markers as described above
- 7th row: cast off

17 Apr 2015

Knitting inspiration: book with traditional Dutch fishermen's sweaters


This book has been on my wishlist for a long time. Finally it was on sale and I decided to buy it!
From 1880's until the 1950's dutch fishermen used to wear knitted sweaters (ganseys) for everyday work. The patterns were different in each village and were mainly made up from knit/purl stitches (my favorite type!). This had an economical reason: it took less yarn to knit than knitting cable patterns. The sweaters were knitted in the round up until the armholes and the sleeves were knitted from the shoulders down. This made reparations easier, the damaged underarms and cuffs could be re-knitted.
The patterns weren't written down (as many people couldn't write back in those days) the knitters memorized them as they learned from their mothers. Every village had it's 'own' patterns, probably because the women copied each others work and knitted what they liked.


The author collected old photographs of fishermen, often portrayed with their families. Based on the pictures she figured out how the original stitches looked like and reproduced the patterns. The book contains about 60 patterns from 40 different Dutch coastal villages. The book contains not only patterns to knit these sweaters but also history, stories of everyday life of the fishermen at sea and at home and a lot of old pictures.
Good news: there is a second book in the make with more fishermen's ganseys:


The wool that is used to make these traditional knits was produced again by the name 'Zuiderzee' by the dutch brand Scheepjeswol. It is a worsted/sport weight yarn:
100 grams=200 meters (metric needle 4,5-5)
19 sts and 24 rows = 10x10 cm

The original colors were blue, navy, anthracite and natural wool color.
It is easy to replace it with wool by any other brand: I'd use the drops 'Karisma' which I also used to knit my baby blankets. It has exactly the same length per 100g, though I'd knit it with a smaller needle to prevent stretching. The denim blue would make a perfect fishermen's sweater!

For more interesting information on the history of (English) ganseys click here

13 Apr 2015

vintage crochet and knitting inspiration


A while ago I was gifted a collection of old knitting and crochet magazines. The Hungarian 'Furge Ujjak' (='Quick Vingers') magazine was the first one promoting crochet, knitting and embroidery projects in the country. The first edition appeared in march 1957.
When I was a child my grandma used to buy the magazine every month. That was back in the 80's and the main focus was on garment knitting projects and fashionable use of traditional embroidery on garments.
When the magazine started in the 50's the main focus was on crocheting: they offered countless patterns for doilies, traycloths, tablecloths, crochet gloves and edgings with an amazing variation of different techniques, like Irish crochet, Bruges crochet (like above on the first cover), clones lace crochet and many more.
Each month they included a few knitted garments as well, embroidery projects, a few short stories and recipes. There are interesting projects as well, like knitted doilies and 3d shaped crochet items stiffened with sugar-water.


Now how pretty is this one, named 'Granny's lace':

28 Mar 2015

Finally there is a new green shade in the drops baby merino yarn collection!


As you might know the drops 'baby merino' is by far my favorite fingering weight yarn. Great quality for a good price. I love to use it both for my vintage knitting projects and for my knitted baby garments as well. I really missed a nice green color though, besides the only, rather bright green they make. I just discovered they are going to add this gorgeous moss-green color to the collection in may/june this year. Can't wait!

27 Mar 2015

Most used baby knits of the past months!


The wool baby items I knitted get a lot of use during the winter months and the cool spring days. For our daily walks I use my nice and warm baby blankets in the stroller.

currently we use on a daily basis:
(both: picture above)

during our walks in the winter months:
(both: picture below, you can just see the edge of the blanket!)

26 Mar 2015

easy baby hat (fits newborn to 2 months old) - free knitting pattern


Are you tired of all baby things yet?
This is a basic baby hat pattern I knitted a few months ago. It took me one evening. I didn't use a particular pattern and just a sewn, knit fabric baby hat to measure against. I think the most important thing is the right shape of the crown. Often patterns end up with too pointy crowns which don't look very flattering. This pattern has a nicely rounded crown and a double brim for softness. It has stocking stitch on the inside of the brim and K2, P2 border on the outside. The stocking stitch edge is folded back and secured with catch stitch to provide elasticity. You could add colorwork to it if you wished or use different stitches for the stocking stitch part.

material & sizing:
I used my favorite, fingering weight drops baby merino yarn and metric size 3 needles (size 2.5 for the brim)
gauge: 26 sts per 10 cm (approx.4 in)
Finished size will fit approx. 36-38 cm head circumference, height measured from brim to top approx. 12 cm.


measurements:
Not all baby-heads are the same! To make sure your hat fits well you need the following measurements:
1. head circumference, right above the ears
2. to calculate the height you need measure from ear to ear (imagine an old fashioned headphone) and divide by two
For a larger size you could add a multiple of 10 to the amount of stitches (for larger circumference) an add extra rows to the brim and to the first, straight part before starting to decrease (for more height)
Using sport weight yarn with larger needles is another option.
the pattern:


abbrevations: 
K = knit
P = purl
K2TOG = knit two together

- Cast on 80 sts
- Knit 10 rows in stocking stitch (K on right side and P on wrong side)
- knit 10 rows K2 P2

start row counting after knitting the brim:
- row 1-10 continue in stocking stitch (you can add a colorwork pattern here or for a larger size you can add extra rows here!)
- row 11 *K8, K2TOG* repeat between ** (72 sts)
- row 19 *K7, K2TOG* repeat between ** (64 sts)
- row 23 *K6, K2TOG* repeat between ** (56 sts)
- row 27 *K5, K2TOG* repeat between ** (48 sts)
- row 29 *K4, K2TOG* repeat between ** (40 sts)
- row 31 *K3, K2TOG* repeat between ** (32 sts)
- row 33 *K2, K2TOG* repeat between ** (24 sts)
- row 35 *K2TOG* repeat between ** (12 sts)
- row 36 *K2TOG* repeat between ** (6 sts)

- Cut yarn leaving about 30 cm in length.
- Pull yarn through final 6 stitches and make a knot to pull together the top of the hat. Pull the yarn to the inside and use it to sew up the sides.
take a look here for the flat seam method
- Fold brim lining (stocking stitch part) towards inside and secure with catch stitch.

20 Mar 2015

Vasarely inspired 'building blocks' baby blanket finished


This was truly a labor of love! It took 'forever' to knit this blanket on size 3 needles! Then again, it took forever to was and block it but now it is ready to use! I'm not complaining, started to knit merely 3 weeks before our little guy was born, so that's why it really took so long to finish.
I used drops Karisma yarn, just like for the other blanket I've made. It is a superwash treated yarn. After blocking the blanket grew slightly in size, but this is just because of flattening the 3d pattern. You can see below how 'wobbly' it is before blocking, due to the knit/purl stitches next to each other:


pattern: 
Again, it is a pattern consisting my favorite combination: only knit and purl stitches and it is surprisingly easy to memorize though it looks quite intricate with the 3-d blocks which remind me of the work of Victor Vasarely:


The pattern is available through Ravelry (click here) though I must say I figured it out myself, just by looking at pictures and counting stitches. After drawing a pattern chart I decided that it wouldn't be easy to keep track on it while knitting. I wrote the stitches down and then knitted a sample. While knitting made the necessary corrections and now have the pattern to work with!


material & sizing:


The yarn I used is the drops 'Karisma'. It is a 4-strands, sport weight, superwash-treated, 100% wool yarn. It comes in a lot of different colors. I choose a dark, greyish-blue hue: nr.65 'denim blue' which is not so baby-ish anymore.
I used 10 skeins of 50g (strangely my blanket weighs 525 g)
I always use smaller needles than recommended to prevent stretching after blocking and have no issues with 'growing' items after washing.
Using metric size 3.5 needles my gauge is 21 sts per 10 cm.
Size after washing/blocking approx. 90x100 cm
I haven't waisted more than a meter of the yarn. What I did was marking the beginning of a skein and the end of a skein with a piece of contrasting color wool at one side. This helped me to estimate where to start knitting the finishing edge pattern.

24 Dec 2014

A quick knit: chunky wool pillow cover


It took me just one evening to knit this chunky cushion cover front and a couple of hours to make the actual cover and sew the front panel on it.


material:
'Marl wool' color nr.1 (off white) from Zeeman. 50% acrylic + 50% wool
per skein: 100g=100meters (2.79 euro's)
used 230g for a 50x50 cm cushion cover front (total costs about 6.50 euro's)


I used two strands of yarn. Started with 42 sts and worked in q simple stocking stitch. After approx. 55 rows the cushion front was ready!
I used a circular knitting needle, about metric size 8 (I guess) and worked loosely.
 I made a separate full cushion cover, the back is made from a left-over piece of off-white IKEA 'Mette' fabric, for the front lining I used of a left-over piece of cheap off-white muslin fabric. After finishing sewing the cover I handsewn the knitted panel onto the front, starting with the top and bottom part and then sewing the sides.

pinning and stitching the top:

the bottom part at the opening:


the knitted cover is slightly smaller in the length since knits tend to stretch out:

12 Nov 2014

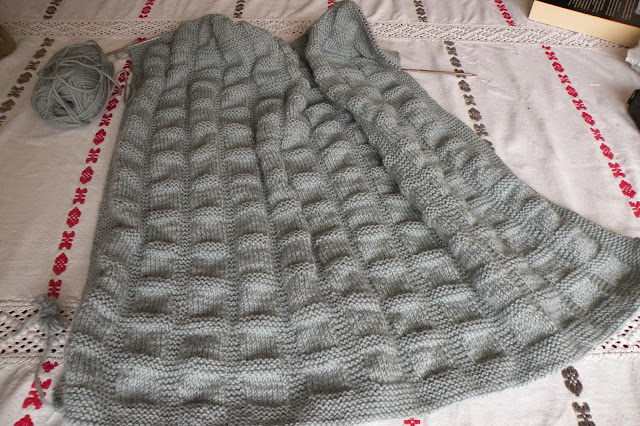
Simple blocks baby blanket finished + pattern!


Here it is! Finally finished this knitted blanket. Though it took me 2 weeks I am very pleased with the results.

material & sizing:
The yarn I used is the drops 'Karisma'. It is a 4-strands, sport weight, superwash-treated, 100% wool yarn. It comes in a lot of different colors. I choose a light blue-grey hue (nr.70)
I used just a little short of 9 skeins of 50g (approx. 440 g)
Using metric size 4 needles my gauge is 21 sts per 10 cm.


simple blocks baby blanket pattern:


material: about 9 skeins of 'drops Karisma'
gauge: 21 sts to 10 cm (approx. 22 sts to 4 inches)
abbrevations:
K=knit    P=purl

Cast on a multiple of 8, + 4 stitches
(I started out with 156 stitches, this makes approx. 75 cm in width)

Border: Knit for 11 rows
Next row: continue in square pattern, from here on this is going to be the right side of the work. (This way the border has a nice ridge at the bottom)
You have now 6 'ridges'.

Main part:
The main part of the blanket alters the square pattern with garter stitch rows.
  • Block pattern:
Every uneven row (=right side): Knit
Every other row (=wrong side): K8, P8 * K4, P8 * K8
Repeat these two rows 5 times (you count now 5 ridges along the squares on the right side)
  • Garter stitch rows:
Knit for 6 rows (this will form 3 ridges on the right side)

Border at top:
Continue to the desired length and finish with the garter stitch rows.
Continue in garter stitch for 6 more rows, ending on wrong side.
(You have now 6 ridges on the right side)

Cast off loosely in the next, right side row.
To prevent a tight cast-off I used this method which I learned from my grandma many years ago:
Knit two together through back loops and place the stitch back onto the left needle.

6 Nov 2014

Baby blanket progress


It seems like this is the slowest progressing project ever! Although I'm a fast knitter, it seems like it takes forever to finish this blanket. Probably because I'm used to knit smaller pieces. Even a 40's jumper for myself seems to go faster...
On the positive side I'm already at 2/3rd in the length, so definitely getting closer to the finish!


With 10 more weeks left of the pregnancy the next project is going to be a sewing one: dressing up the family cradle bassinet! I finally made a choice for a cute fabric, which I'm going to use in combination with plain white cotton batiste for the liner at the sides and the canopy!