Showing posts with label free crochet pattern. Show all posts

3 Apr 2015

diy: crib sheet with crochet edging - crochet pattern from 1965


I was looking for a pretty crochet edging to decorate one of the sheets for the family-crib. Here in the Netherlands you are supposed to use a well fitted sheet for your matress and a cotton baby blanket in combination with an upper sheet. The upper sheet is 75x100 cm and usually has some type of decoration on one of the edges which you can fold back over the blanket. The decoration can be a printed fabric stroke, embroidery, stripes of satin or lace...


Nicely decorated and better quality baby crib sheets costs around 20-25 euro's. My crib sheets are made out of a new, fine sateen-woven cotton 'GASPA' sheet from IKEA which was the wrong size for our bed (160x200cm). It was a little less than 20 euro's. The standard size is 75x100 cm, I've cut 4 of mine.
The crochet edging pattern I used is from an 1965 Australian Women's Weekly.
What I like about it is that you crochet one half circle at the time, so you can adjust the length as you go. There is no need to start with an certain amount of chains.

I used a metric size 2.5 needle, since I wanted a bit of structure instead of a really fine lace. 

the original pattern:

When crocheting it seems like every other half-circle turns upside down, like one is facing the right and every other facing the wrong side of the work. when blocking/steaming you need to turn them back in the normal position and everything will look right.


After finishing crocheting the right length I added an extra row at the top to make easier to sew it to the sheet. I used a simple pattern I made up:


- turn at the end with 4 ch (this will replace the first dc and 1 chain),
3 dc into space below, 1 ch, 3 dc into space below, 1 ch, 1 dc between two half circles *1 ch, 3 dc into space below, 1 ch, 3 dc into space below, 1 ch, 1 dc between two half circles*
- repeat between **

28 Nov 2014

Crochet autumn apples - an in-between project


A fun little project using a free pattern: Lily Sugar'n cream Apple Wreath.
Using a smaller needle than suggested with Lana Grossa 'Cotone' yarn my apples turned out smaller than the originals. I guess I'm going to use about 3 pieces to decorate a plain wooden wreath with. Nevertheless, quick to knit and the instructions are clear.

27 Nov 2014

owl pram spanner and discovering amigurumi

These little hearts are still part of my owl pram spanner project. The original pattern uses little flat flowers for the girls and flat leaves for the boys in combination with wooden beads to separate the owls. Part of my owl-family will be used for a mobile above the crib, so I wanted some extra shapes to put on that too. I quickly decided that I'd rather like to have something 3-dimensional there, and finally settled on little stuffed hearts.
I must say, it wasn't easy to find a suitable, free pattern on the internet. I quickly learned that all little, stuffed things are called 'amigurumi' and there are a lot of people making and selling patterns for almost everything you can imagine.
did you know...
...that Amigurumi is the Japanese art of crocheting small stuffed animals and fantasy creatures? The Japanese word 'ami' means crocheted or knitted, and 'nuigurumi' means stuffed doll. Amigurumi are typically animals, but can be anything with a 3-dimensional shape. Amigurumi first started appealing to the masses in 2003. 
Amigurumi are usually crocheted out of yarn using the single crochet stitch (double crochet in UK terminology). Click for a comparison of the terminology here. In order to achieve a tight gauge that retains stuffing and does not allow the stuffing to show through the fabric you need to use a smaller needle.

free amigurumi heart pattern
Most of the free heart patterns weren't the right size or shape to my taste or the surface looked not right (since using SC all around it is important where you increase/decrease the stitches). Finally I've found this great and easy pattern through Pinterest. The decreasing is mostly done at the sides which makes a nice surface from the front and back. Also the shape is pretty to look at, nice and wide. It is easy to crochet, since it goes in a spiral. You only need to mark the first stitch in every new round (I used a paperclip as a stitchmarker). You start with crocheting two separate round tops for your hearts, then attach them and start to decrease right away.
I used the smallest size (the pattern comes in 3 different sizes) which I think looks just perfect! Also, this was the first time I used a 'magic ring' or 'magic loop' to start out instead of chains an. You find a tutorial for that here.

struggle with safety eyes
It was the first time I used 'safety eyes' and of course I had no idea how they exactly worked. Apparently, the little 'screws' have a back fixation too. I was eager to sew on the crochet eyes to my little owls while waiting for the post to arrive, and the idea would be to attach the safety eyes first, secured from the back and then sew it on. Tried to perform 'eye-surgery' on the little ones by attempting to push the back rings underneath the (already attached) white crochet rings, unfortunately without any success. Lesson learned... At the end of the day I just used sewing thread to fix the back of the little screws, by pulling tight loops around them. No way they will fall out, or get lost now, for sure!
All that has left is to assembly my pram spanner!

2 Apr 2014

1952 crocheted ascot cravat


From knitting to crochet! The weather is getting warmer, but the spring days are often chilly. A 'vintage' girl would certainly wear an ascot with her jacket, so today's free pattern is an early 50's ascot cravat. The AWW published this pattern in 1952:
"Ascot cravat, crocheted in fine wool is designed to fit snugly. A brooch or scarf-pin adds a decorative touch."


ascot inspiration:
There are a few patterns out there for a plain, garter stitch knitted version, like these two below, but this one is different because it is crochet and it has a pretty stitch too! The crochet pattern also gives more body to the ascot.

left: a supposedly 1949 knitting pattern from the net
right: Agatha Christie's Miss Marple character wearing the same ascot-type scarf
did you know...
...that an ascot tie, or ascot, is a narrow neckband with wide pointed wings, traditionally made of pale grey patterned silk? This wide, formal tie is usually patterned, folded over, and fastened with a stickpin or tie tack. A cravat is another type of neckband.
material and sizing:
I used a fingering weight acrylic yarn with a metric size 3 hook. The finished width of the ascot with 41 stitches in pattern is 17,5 cm (=about 7 inches)


construction:
The construction of the cravat is simple. You start crocheting from one end of the main (middle) section, then you decrease the amount of stitches for the cross-square, increase again and end with the pointy end. Then join the yarn at the other end of the middle section and finish it in the same way.


I made one piece for the back loop instead of two and sewn it at a slight angle with a little bulk instead of flat, which makes it easier to pull the tail through:


 the stitch:


There is a decorative, but simple stitch used. You alter dc and treble stitches. In the following row you crochet a treble on top of the dc and a dc on top of the treble. This results in a pretty, bobbly pattern, which you wouldn't tell by looking at the original picture:


my scalloped edge:
When decreasing I ended the row with a treble, then turned with 3 chains in the beginning of the row, skipped the first stitch (a dc) and and put a dc in the next stitch (the first treble). This resulted in a pretty scalloped edge:


modifications:
- Adjustments in sizing see above under construction details.
- I crocheted the main part and the 'tails' of the scarf according the instructions. - The instructions for the square where the two parts cross are way off!
The pattern instructs to make a dc in every other stitch, ending with 24 sts. If you start out with 41 sts, you make a stitch in every other stitch you will end up with 21 instead of 24sts.
I tried the 21 but I found the square to be too wide. My second version I reduced the amount of stitches by half once more in a second row, but that turned out to be too small.
My third version which I like consists of 16 stitches. Here is how to do it:
  • reduce the amount of stitches by making a dc in every other stitch  starting with 2ch for the first dc (=21sts)
  • reduce further evenly in a second row until you have 16 stitches
On the other side of the square you need to increase in the same way, in two rows. Below the original version of the square which I thought was too wide and my version:


abbrevations:
As we all know, crochet abbrevations are different in the US and UK.
The pattern uses the UK abbrevations:
d.c. = double crochet (US: single crochet)
tr. = treble (US: double crochet)
In the pattern you first do a yarn over for the treble and not for the double crochet.

the original pattern:

22 Dec 2013

Vintage inspired Christmas bow finished!


Finally finished the Christmas decoration bow! Actually, it took just a few days to make it. To go to the edited post, pattern, modifications & details click here.

19 Dec 2013

vintage inspired crochet: christmas bow pattern


Timing, timing, timing! I was drawn to this Christmas bow because of the vintage feel of it. Initially, I imagined it in combination with a very simple wreath made of branches. I really liked the idea of the contrast between the simple and pure branches and the delicate, vintage-feel of the lace pattern.


I really, really wanted to finish it in weeks before Christmas, but I'm afraid I'm running out of time. Well, I'm still going to try! Instead of a bow this might be a table runner with a contrasting colored tablecloth underneath. If you start to crochet this now and have a few evenings you might be ready on time before Christmas eve! The original pattern comes from a contemporary crochet magazine which means it is probably copyrighted but certainly not available outside some parts of Eastern Europe and Germany. Because most of visitors the here are following this blog from outside Europe I feel I can share the pattern with you.


material:
- the original pattern suggests 250 g mercerized cotton (50g=280 meters) with 1-1.25 mm crochet hook.
- I used about 80 grams of a slightly heavier cotton yarn which I had in my stash ( 50g=210 meters) with a 1.5 mm hook
- silver ribbon (I used a leftover piece of dark green bias tape)

my pattern modifications:
  • smaller squares: the original instruction is to make 1dc + 2ch squares (fill with 2dc's) but after making the first part I didn't like the look of it. The little angel-face was too stretched out for my taste. I restarted the project with 1dc + 1ch (fill with 1dc) and liked it much better. For comparison: the magazine picture (left) and my version (right):
   

  • modification of the flower motif: because the smaller squares I needed to resize the flower a bit in the horizontal direction. For this I replaced the 7 chain 'rays' on the right and left sides with 5 chains. It has been some time since I crocheted something like this, so at first try I also made the mistake of not adding extra chains for the extra single and double crochets which are made in the next row. The pattern includes the finished amount of chains, one side from top to bottom: 4-5-7-7-7-5-4 ch. My count one side from top to bottom: 4-5-5-4-5-5-4 (this is the horizontally shortened version with the extra ch calculated. So this is exactly what you need to crochet if you use the smaller, 1dc+1ch squares:


  • bow variation: I made my own version for the bow, a smaller piece without the flower motifs, just repeating the other patterns around:


the original pattern chart:
I used the US abbreviations below which are different from the UK abbreviations! Read more about it here!
- the original pattern uses US 1 dc + 2ch squares (fill with 2dc's)
- the crosses in the center of the flower represents single crochets.
- the pattern below is the edge, originally there are 11 repeats of the flowers in between.

source magazine pic & pattern: 'diana' crochet magazine

8 Aug 2013

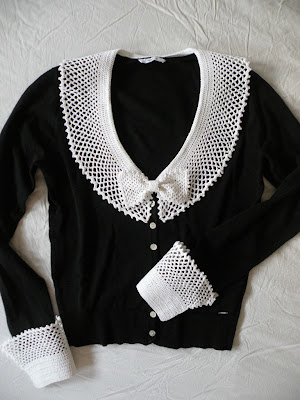
The 1934 collar en cuff in action!


Here are the pictures! Click here for the original 1934 pattern.
Of course, my version is less 'dramatic' sizewise than the original, but I think it is definitely more wearable. The collar really 'wants' to stay in a circular form, but after starching and ironing it stays nicely in shape:
   

(Sorry for my hair, it wasn't styled yet and I didn't wear make-up either) Though it's not clearly visible, I'm posing with an 1950's book on etiquette from the thrift shop!
Here is the full set on another sweater of mine:


8 ways to combine the pieces:
1. Just the collar:


2. The collar with the bow:


3. The cuffs with the bows
4. A small bow worn as a brooch
   

5. The small bow worn as a brooch in combination with the cuffs
6. The big bow in combination with the cuffs
  

7. The collar and bow worn with the cuffs
8. The set worn as originally designed


Notes on starching: 
Starch was used during the past decades to make household linens and clothes last longer. Especially the most used parts of the outfits like collars and cuffs were treated to prevent staining and weakening the fabric.
Yhe mixture I used is again a kitchen-purpose cornstarch:
Mix 1 heaping teaspoon of cornstarch with 300 ml of cold water and stir until it is completely dissolved. I dipped the cuffs and only the chain edges of the collar. Ironed it at medium temperature (for cotton) not too hot because thet could burn the cornstarch making brown spots.

An 1934 instruction: