Showing posts with label Burda. Show all posts

28 Jan 2013

New retro envelop patterns from Burda


Back in october I wrote about the Burda retro patterns. The new retro patterns from the 2013 spring collection are all in 60's style.
The 60's are not my favorite fashion period. With a broad upper back and a swayback the shapeless dresses with no darts gain some kind of pregnancy charm which I'd rather like to avoid. I still love the two patterns above, especially with the addition of a jacket and a cape which are shaped with shoulder darts, something I miss on the modern patterns. Since these patterns aren't expensive they are on my list to buy. (It's a pity the dress pattern with the jacket starts at size 12)

31 Oct 2012

Brown autumn top

   
Pic from Burda 09/2012

My favorite item in the september Burda was the dress versions of this pattern.The tops were okay but I didn't really liked the choice of fabrics and in the picture above they also ruined it by trying ironing (just look at the shiny lines alongside the darts). After seeing this version I was convinced that it would look good and wanted to make it as well. It also seemed a good wearable 'muslin' before cutting up the other fabric for the dress. The dress has  a round neck while the top has an interesting V-neck in the back.

Tracing the pattern was a horror. The people at Burda had the greatest idea of printing this pattern in pink. Not only tho outer lines but everything. Pink text and pink lines on a pink background. This made it nearly impossible to find the right lines while tracing. After that all kinds of things went wrong. I was so excited with my new parallel tracing wheel that I marked a 2,5 cm (almost 1 inch) seam- allowance everywhere instead of 1.5 cm (5/8 inch). Luckily discovered this after sewing the front darts. Next thing is that I rushed sewing the sleeves. I sew the darts first but that should have been the last step - sewing the shoulder seams and the darts in one go.
Did I mention I couldn't find any pins? There was a box of needles on hand...

I didn't like the idea of a 'standing collar' and cut about 12 cm inches off the neckband. Well, after sewing it it appeared to be way too small and pulled everywhere. After sewing one side of the neckband hand sewing the other side seemed just too difficult. I noticed that the basic zigzag stitch I choose worked really well (1.5 cm wide and 1.5 cm long stitches) but was almost impossible to remove the seams (of course, I didn't have my seam ripper on hand)

I removed the neckband and 1 cm fabric around as well. I cut a new neckband and decided to attach the neck- and waistband in the same way as on the Renfrew top.

19 Oct 2012

Retro inspired printed Burda patterns


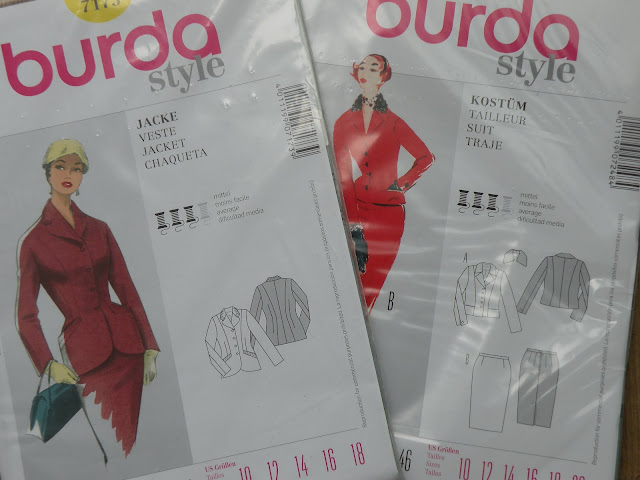
I wonder if anyone knows and tried these printed Burda patterns?
They look really pretty, with old fashioned artwork and the prices are (at least, here in Europe) half of the big 4 pattern prices. Overall, a nice selection of mostly 50's and 60's garments.
Strange enough I can't find any review online. My biggest problem with Burda patterns is that the garments like jackets are very loosely fitted or have a lot of ease. I always make size smaller than my measurements indicate. The back of the envelopes state 'fitted' for the 50's patterns and 'semi-fitted'  for the 60's patterns. Promising! The Vintage Vogue patterns look for me the best, I love that there is some variation in the designs they choose to re-issue. The Retro Buttericks are mostly dresses and Simplicity has only a few Retro patterns.

I've bought the two patterns above. The packaging is not much, the patterns and instructions are sealed in cheap plastic. That means once you open it you have to store your pattern in an envelope because you can't put them back without tearing the plastic apart...
Surprise, surprise, there are no seam-allowances included. To tackle this problem I've got a 'parallel' tracing wheel with chalk which you can adjust to add seam allowances while tracing:


Basically you trace along the pattern lines with the wheel (at the right) while mark your fabric with the chalk (left) along the line with a seam-allowance included. No need to measure and mark seam-allowances after tracing anymore! Really a time-saver. Why didn't I know that?...
But back to the patterns:
- The instruction booklet consist more text than diagrams than I'm used to with the big 4.
- I like the fact that the pattern pieces are printed in a different color, this makes easier to trace the outer lines.
- But nothing is perfect, so the printing is a darker shade of the same color which makes it impossible to write the instructions over while tracing.


While looking at the pattern pieces I wondered if there are any 'vintage'  features like shoulder darts and darts around the elbow on the sleeves... As far as I can see there aren't any. Both of the jackets have seams through the shoulders, so that's not clear and there aren't any visible darts on the two-piece sleeves.
No time yet to start on one of these patterns, I think I'm going to try the knit dress from the september Burda first. I need a quick and easy project right now, since we are still busy finishing stuff for our new home.


18 Oct 2012

Burda magazine - to buy or not to buy?


My mom used to buy Burda through the 80's. I had a subscription a few years back but after a while the design seemed all the same. Nowadays I occasionally buy a Burda if there are a couple interesting designs. In the past it was possible to lend magazines from the library, but they recently stopped and you only can read it there. (What's the point if you can't copy the patterns?) So now I try to figure out whether there are designs worth the money or not. Considering that one PDF pattern from the burdastyle website costs as much as one issue (plus ink and paper for printing) it is cheaper to buy the magazine anyway.

The latest issue I've got is the 09/2012. Actually I've bought it for the pattern of the dress above because of the interesting dart lines. Both the pink and the lace is mede from the same pattern #109. But there are more pretty, mostly retro inspired designs there:

 
#118 and #114

  
#108 and #103

  
#132 and #102+#116

Another issue I have is the 10/2011. I made my fourties style blue dress from that one.

20 Oct 2011

The finished fourties-style blue Burda dress!


Fabric: cotton
Pattern: Burda magazine 10/2011 #125 'Little black dress with lace inset'
Time to complete: well, quite a few hours (again), mainly due to the seam finishing with bias band.
I wanted a vintage style dress with an inset and I fell in love with this pattern the moment I saw it! It is a petite dress, so I took size 17 (which is an equivalent of size 36) And again, it is a size smaller than my measurements. Since I'm short waisted I just lengthened the bodice by 1 cm. I didn't think the straight skirt of the original dress would look good on my figure so I adjusted the skirt pattern to make an A-line skirt of it. Here is how I did it.
The fabric I choose has a pretty, matte, satiny shine but ravels like crazy, so I finished the seams with bias tape. Unfortunately the shop ran out of the pale pink one so I had to do the skirt with a dark blue tape.
Instead of a lace inset I used the main fabric and added a few buttons.
The fit is great, it is fitted enough to look beautiful but there is enough room for me to comfortably sit in it.

Finishing the hem with bias tape

How to finish a hem if you don't have a dress form?
Having a dress form can certainly come handy if you are at the last phase of making a garment, the hem finishing. It makes the measuring easier. I don't have a dress form, but I figured out a way to get the hemming right very quick and accurate. I like my skirts just falling on/above the knee.
I like to finish a hem with a contrasting color bias tape or ribbon. On my blue dress I used a dark blue bias tape, since the shop run out of the pale pink one I started with (isn't it ridiculous?)

How to get the length right?
- I pin the seam allowance of the hem in place
- I put the dress/skirt on and adjust the hem seam allowance one side of the dress in front of a mirror (just with a few pins)
- I take the dress off and measure how long the skirt should be at the mid front, mid back and at the sides (For me it is usually 1 cm shorter at the mid front than at the sides and back)
- I pin the hem again, measuring at every 10 cm from the waist down
- I put the dress on and check if the front and the back length are even and the right and left side are even
- Take the dress off again

Bias tape finishing:
- I press the hem from the wrong side of the skirt (with the pins in place)
- I remove the pins and cut the excess fabric, leaving 2 cm from the fold:


- I sew the bias tape with the usual seam allowance of 1.5 cm (5/8''), placing the bias tape with the right side to the right side of the skirt:


- Cut 1/2 of the excess fabric (0.6 cm=1/4''): 


- Fold the hem and press again:


- Catch-stitch the bias tape:


This leaves small dots of thread on the right side of the fabric, practically invisible from a distance, but I really like the way it looks:

9 Oct 2011

Seam finishing on the Burda dress


I need to finish this dress because I want to wear it to an event next wednesday. I think I can get it ready in time since the next 2 days I'm off from work.

Things to do: 
- assemble the skirt
- attach it to the bodice
- insert the invisible zipper
- make the collar
- finish the seams

I already started with finishing the seams. Because I didn't want to line the Burda dress and the fabric ravels like crazy I decided to use 'Hong-Kong binding'. The hong-Kong binding looks really neat and the seams don't get bulky either. Usually, finishing the seams is my least favorite part of sewing but now I really enjoy it. Probably because the results are so satisfying...
I used a contrasting color bias band (of course!). This time I choose pale pink. I also used it for finishing the sleeves. The sleeves have small cuffs and I really needed to cover up the raw edges without getting all the layers bulky.

"The Hong Kong binding seam finish encloses the raw edges of the seams inside strips of bias. Both sides of the seam require two passes to sew the bias, and because it is so labor-intensive, it is mostly used in very high-end clothes. This method is especially suitable for heavy fabrics and for summer garments that you wouldn’t want to line."
Description from Burdastyle

The steps:
1. sew bias band on the right side of the seam allowance, with raw edges matched.
2. turn the bias strip over and press the seamline
3. wrap the binding around seamline and pin in place
4. stitch from the right side at the line where the fabric and the bias band meets (your stitches will be 'invisible')
5. trim excess from wrong side

28 Sept 2011

Progress

My little assistant 'at work' - in front of my sewing table of course... (again, she managed to sit on my muslin)


I didn't realize there was a yellowish stripe on one of the bodice pieces, just saw it after stitching:
Had to cut a new one of course...


All pinned up before stitching (because of the sunlight there is not one picture which represent the real blue color of this fabric)


The finished insert and the pleat for the buttons at the front:


24 Sept 2011

Peter Pan collar for the Burda dress

    
Yesterday relaxed a bit with a cappuccino in the garden. The sun is back after a wet and cold summer.
I made a sketch of the dress. Finally I found the right fabric. They didn't have it in dark green, so I took the dark blue one. It is a thicker cotton sateen which is not shiny.

The weather was nice and warm so I couldn't resist reading the newest Karin Slaughter book 'Fallen'. All of her books are great. While I generally don't like love-stories I really can't wait to find out when Sarah and Will finally get together... I guess I have to finish the book first before I can go on with my dress!

I drafted the Peter Pan collar today. I used the tutorials of Gertie here to draft the collar pattern.
One thing I changed is that my collar pieces meet up almost in the middle. Because there is a zipper in the back I left just a bit in between the two parts (a total of 0.5 cm =1/5'').
First I placed the front and back pieces together to create the neckline. I used 1/2'' (=1.3 cm) overlap at the sleeve end of the shoulder seam.
I used the same width as explained int the tutorial which is 1 3/4'' (about 4,5 cm)


As for the front insert piece, I decided to omit the tucks because my fabric is quite heavy. I'm going to make 2 valse pleats for the row of buttons (on the right) I think that will be enough.


Update:
My mom just called and mentioned a dark green fabric (!!!) she has. Apparently I bought it years ago and she thought I could use it with my new sewing adventures. I didn't think of asking her about fabrics yet, so I was quite surprised she spontaneously came up with something that fits into my fall palette!
I guess I need to make the 40 minutes drive to that fabric store to be able to tackle the other colors...