

Here is the last post about the construction of the Phillipa jumper. The very last step, after assembling the jumper is to finish the neckline and the pocket opening. As often in the 30's and 40's, the Phillipa pattern calls for a crocheted finish: 2 rows of d.c.* all around. Another often used finishing method is to pick up stitches around the neckline and knit in ribbing. Sometimes the ribbed edge is knitted separately and sewn to the neckline after finishing. Since the 40's necklines are unusual high it is important to lower the neckline a bit if you want to finish it with a ribbed band.
*Note: this is the US abbrevation which is the same as the UK single crochet! I discussed the differences here. Scroll down for a step-by-step instruction!
With a crochet finish you get a nice, regular chain finish at the edges. It also helps to correct the U-shaped curves of neckline.

double crochet step-by-step
At the upper edge where you cast off you see the little chains, use one crochet stitch per one knitted stitch. At the sides you sometimes you need to put two in one hole, just check your tension every now and then. If your work curves upwards you are crocheting too tight, if it starts to golf you crochet too lose or use too many stitches. Practice, practice, practice! I used a metric size 2 crochethook.
1. insert the crochet needle into a stitch (under the V of a chain)
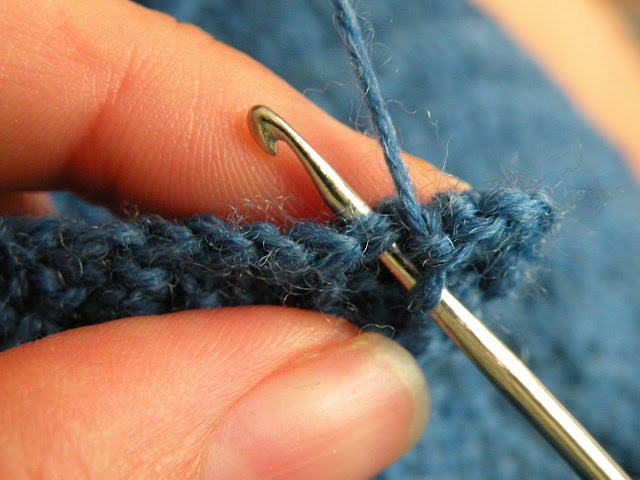 -
-2. yarn over:

3. pull yarn through stitch, now you have two loops on your needle:

4. yarn over again:

5. pull yarn through both loops:


Ready! This is how my neckline looks like after the first row of double crochet:

Because the decrease of the knitted neckline is not a perfect curve I follow the pattern instructions and use a second row of double crochet to smooth it out:


The flat chain button loops were made in the first row: in the first row of dc I made loops of 5 chains and then the second row on top of that. Below fitting the button:

The finished button loops:

This is how the pocket edge looks like:

Since this is a straight line I decided to use only one row of dc to not to interfere with the diagonal pattern Remember, you can always adjust things you don't like. The pattern instructions are just one way to do things, dare to adjust and do things differently if you don't like the results!

Next post: the big reveal but have not manage to take good pics yet...
Previous posts in the Phillipa jumper series:
1. introduction
2. yarn an gauge
3. fit an ease
4. pattern charts an diagrams
5. knitting in round &stitch markers
6. methods to increase
7. my seamless pocket lining
8. my version: back neck opening
9. oh, those 40's sleeves
No comments:
Post a Comment