

Past week I've lost myself in working in the new house, painting the stairs and forgot
note:
I have a different approach to this pattern because I learned my lessons when knitting my first jumper. This means that I already know how to make the jumper fit correctly and make small adjustments in shaping as I go.
Click here to go to the Phillipa jumper series.
pattern diagram
So, regarding the general shape the main difference between my first Phillipa jumper and this one is the shape of the sleeves and the waistline ribbing.
Left Top Honours, right Phillipa:
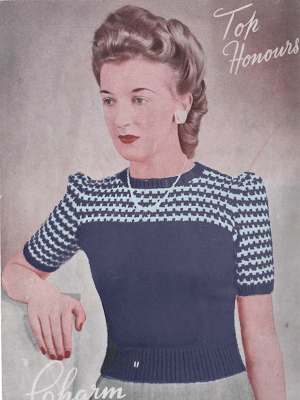

When looking at the original picture this jumper starts with the same amount of stitches after the ribbing and increases above that while the Phillipa makes a first series of increases in the last row of ribbing. I liked the little blousiness of my finished Phillippa better and decided to adapt that. In fact, I even adapted the stitch-count of the Phillippa to achieve a zero ease.

Below the Phillipa sleeve and the Top Honours sleeve next to each other. Notice that the sleeve caps look quite different. While the Phillipa has more fullness and uses pleats the Top Honours has a small square shaped extension, which gathered results in smaller, 'uprising' shoulders:

pattern chart
Again, there was no visual pattern chart, only written instructions.
While by looking at the original picture you see 'scalloped' rows, the pattern is formed by straight rows with slipstitces. Quite different, ha?

Because the repeating pattern of the slipstitches it is important to think of how you place them across the yoke and the sleeves. You might need to adjust your stitch-count to that. The pattern itself is shaped by 3 K stitches with a Sl.stitch on each side. Let's take a look at the visual chart:

1st row: K1 *SL1, K3* SL1, K1
2nd row: P1, SL1 *P3, SL1* P1
3rd row: K
4th row: P
Continue in pattern in contrasting color and repeat the 4 rows above.
These 8 rows complete the yoke pattern.
(Twist the different color yarns at the beginning of the K rows)
Are you not familial with pattern charts? click here to read more!
Are you not familial with pattern charts? click here to read more!
how to make the pattern look symmetrical
When reading the instructions you see that one pattern unit (this is the repeating part between the stars) is made up by one slip stitch and the next 3 sts (this makes a total of 4 sts). To make the pattern look symmetric I made sure to end with a slipstitch plus an extra stitch next to that at the beginning and the end of the row across the yoke.
Since I learned from the process of knitting the Phillippa jumper I knew how many stitches to use for a good fit. Now I had to make sure the yoke looked symmetrical after finishing the armhole decrease (adapted that too from the Phillipa pattern)
How to calculate:
1. start with the amount of stitches you need for a good fit.
2. distract the amount of stitches used for the armhole shaping (remember, you decrease for armhole shaping on both sides!)
3. what is left is the amount of stitches for the yoke
4. to make the yoke look symmetrical distract 3 from the total amount of your yoke stitches and then divide that number by 4.
5. you need to round up or down a few stitches to the closest match. One or two stitches more or less doesn't matter that much in the fit but do in the looks.
why calculate so much?
Now, why should you spend time on re-counting and calculating all of the pattern stitches?
If you follow every written original pattern instructions you will not always end up with a garment you like. As you might know by now, I am quite picky about small details, like the finishing touches or symmetry.
To show you the result when you do your stitch count correctly here is a picture of the sleeve seam. The seam is almost invisible and I like that!
To achieve this I made sure to start with an extra stitch before the first pattern unit but didn't end with the slipstitch and the extra stitch at the end. That way when sewing the pieces together there is one slipstitch next to the seam which makes the pattern look continue all around:

If you have any questions, please leave a comment!
Next time more about the back neckline opening and the sleeves (you need to calculate the amount of rows as well to make sure the pattern of the yoke continues across the sleeves correctly)
1. introduction
No comments:
Post a Comment