

It is autumn here in Europe. It is getting dark earlier and after quite a few warm and sunny days the past week has been cold and rainy. It is time to pull out our gloves and hats! (And knit more pretty jumpers of course!) After a long project it is always nice to do a quick one. In the wartime pattern series I've already shared a wartime glove pattern which was knitted on two needles and could make perfect gloves for casual wear, when going for a walk or sitting on the bike. No fuss with 4 needles, a great project for beginners.
This time I have another 2-needle glove pattern to share! While the 'servicewomen gloves' were easy to make this one is rather an intermediate version. Still just 2 needles which makes it a great starter pattern when you are not comfortable with using 4 needles yet. The lace pattern is not as difficult as it seems, if you are carefully counting your stitches and keep track on your row count. In this post a short introduction, a few notes on sizing and a lot of phase pictures to show the details of the construction.

This pattern appeared in a 1942 september issue of the Australian Women's Weekly. Interestingly, due to a printing error, at first only half of the pattern was published, they 'forgot' to include the instructions for the fingers... The corrected version of the pattern appeared about a month later. (Note: I've found a minor printing error in the second version too) Again, the introduction text is intriguing:
"Lacy gloves knitted on two needles. The attractive panel introduced into the gloves lifts them out of the ordinary class. Anyone who can knit a pair of socks can make these with ease. Spare one coupon for wool and make pair of these well-fitting gloves for yourself, and then another pair for a friend. Welcome gift."

What a great idea to knit these gloves as a gift! You can use leftover yarn and knit them in just a few days. As you can see in my pictures and in the original as well, the lace part comes up higher above the wrist than we are used to. The ribbing of our contemporary gloves, usually starts right above the wrists. I think this version is much more elegant, giving the hands an elongated look. Also, when wearing them with a coat there is no ribbing peeping out under your sleeves, you only see the pretty lace pattern. The original bird's perspective picture is just lovely, don't you think?

sizing
The original pattern is for size 6 which is quite small.
The gauge is 10 sts per inch (=40 inches per 10 cm) knitted on size 13 needles (=metric 2.25) To achieve this gauge you should use very fine fingering weight, almost lace weight yarn.
For average size hands, like 7 you need to enlarge the gloves a bit. As always, the AWW advises using a larger needle with the same yarn. I would advise to use slightly thicker yarn instead of upsizing your needles, as loosely knitted garments tend to stretch out very quickly. You don't want to make shapeless gloves, right?
I made mine with a fingering weight yarn, with a gauge of 7 sts to an inch (28 sts to 10 cm) This produce gloves which fit medium size, 7-7.5 hands. I've kept the same stitch count as the original and only needed to adjust the row count (=length) of the fingers to make them fit perfectly.
phase pictures
When reading the instructions it is really hard to imagine how your work should look like. It is a whole lot of information about picking up extra stitches, making a gusset, then omitting the gusset, in the meantime continuing the lace pattern correctly... I think visual information is always easier to understand. In contrary to the servicewomen gloves which are knitted lengthwise, these gloves are knitted in the 'traditional' way from the bottom up, but flat and not in the round. Let's take a look at the step-by-step phase pictures!
We start to knit at the wrist with a k1, p1 ribbing. Above the ribbing you can divide the pattern into 3 main parts: on the left side you see the lace pattern which forms the back of the glove, on the right the palm of the glove knitted in stocking stitch and in the middle after a few rows we start with shaping a reversed triangle which forms the gusset for the thumb:

did you know...Below is the finished thumb gusset. Instead of knitting two stitches in one as instructed by the pattern, I used the 'make' a stitch method as I find the results much neater. I discussed this method here. To omit counting the gusset stitches (as suggested by the patten) I used two stitch markers which I placed next to the right and left stitch and did my increases next to those stitch markers. This made making the gusset really easy!
that a gusset is a triangular or rhomboid piece of fabric inserted into a seam to add some width and reduce stress from tight-fitting clothing. Think of the underarm area of the tight fitting sleeves of the 50's, or the crotch of contemporary tights and pantyhoses.

As you can see I also placed a stitchmarker next to the 24 stitches of the lace pattern, that way I didn't have to count the stitches on the right all the time:


After finishing the thumb gusset you need to cast on new stitches to make the back of the thumb. I used the same method to cast on stitches as described in my servicewomen gloves pattern here. The thumb and the first finger were pretty straight, except a minor adjustment in the length of the fingers. I made mine shorter, since the instructions of the original pattern should fit the fingers of E.T. in my opinion... Below right is the right length before starting the shaping of the fingertop:


All of the fingertops are made the same way, by decreasing the stitches over 3 rows. You pull the yarn through the last stitches and knot by pulling the yarn through the loop (below right)

After finishing the thumb you need to knit the lace pattern and the back further. To do this you need to pick on stitches after the lace part of the row, at the bottom of the thumb:


The two pictures below are made of the right hand glove, showing the same part above the thumb (just in case you wonder why the lace pattern is on the right instead of the left side). The front and back are connected now.


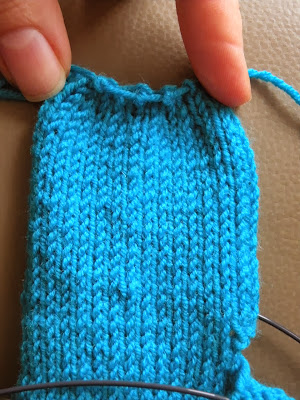
Be sure to fit a few times to measure the right length. I used a simple row-counter again to keep trace of the lace pattern:

The first finger is knitted in a similar way as the servicewomen gloves. The outer side is already attached, you only need to cast on a few stitches for the inner side:


The instructions of the second finger gave me some headache and at first sight I just couldn't figure out how it was supposed to work! I guess this is the 'curse' of using original vintage patterns... At the end of the day I decided that for me it was impossible to do it the way the pattern instructs, I had to purl the first row and knit the second instead of knit forst and purl the second... Once I tried this it went like a breeze! The fingers can be made longer or shorter if you wish. The length of the hand above the thumbs can be adjusted as well.


For the last 3 fingers you need to pick up stitches at the bottom of the cast-on stitches of the previous finger. That way you connect the two fingers while knitting. I found easer to do this with a crochet needle:


Here it is, a finished glove before stitching:

In the next post: stitching up the gloves and the lace pattern.
No comments:
Post a Comment