Showing posts with label OnMyNeedles. Show all posts

26 Aug 2013

Knitting gloves on two needles - 1943 pattern (2/2)


For the intro of this post click here and for construction details click here.
Below you find a lot of tips and tricks on how to knit these gloves successfully!


Tricks and tips:
- My BF noticed that the cuff starts a bit high, at the heel of the hand, instead of starting around the wrist. The reason is that your hand gets smaller below the heel of the hand, towards the wrist, but the handpalm and fingers are knitted without shaping. To adjust the shaping and make the lower part more fitted the cuff starts quite high, on the heel of the hand. (You can see this in the original picture too)
- I slipped the first stitches of every row, as usual in order to create a neat edging along the sides. (this time it is also stated in the pattern description!)
I did knit the first stitches of the newly cast on rows.
- The pattern instructs 'K (knit) into the backs of all cast on stitches' when starting a new finger. Why should you knit in the backs of the cast on stitches: If you try you can observe that the stitches knitted in the normal way seem to want to curl up while the stitches knitted into the back of the loop lay nice and flat.

Methods I used to cast on and off:
There are many different methods to cast on and off stitches. The right amount of elasticity is essential for these gloves, so I tried several methods to achieve that. The two methods described below worked for me the best.
Bonus: if you cast on and off as described below you have really nice edges which are easy to sew together, like here:


To cast off stitches between the fingers: 
- Slip the first stitch from the left hand needle to the right hand needle (this is the same as for every row)
- Knit the second stitch.
- Using the left hand needle, lift the first stitch over the second and drop it off the needle.
- You have now one stitch left on your right needle.
- Knit the next stitch and lift the 'left-over' stitch on the right needle over the new stitch with your left needle.
- Repeat.

To cast on new stitches between the fingers:


- Knit row then turn work as if you are going to start the next row. (= your existing stitches are on the left needle)
- Insert the right needle in the space between the first two stitches and knit: yarn around the needle and pull yarn forward.
- Transfer the new stitch back to the left needle.
- Knit into the space between the new stitch and the second stitch in the same way and put it on the left needle too.
- Continue until you have the desired amount of extra stitches on the needle, plus one.
- When knitting the row knit this last (extra cast on) stitch together with the first stitch of the existing stitches.
Why to cast on an extra stitch?
When knitting the row, there is often a longer piece of yarn between the existing stitches and the first newly cast on stitch which creates a weak point. To avoid this and make the place between the fingers firmer, knit the last (extra cast on) stitch together with the first stitch of the existing stitches.
If you haven't used these techniques before I would advise to practice it to make sure the new stitches are not too tight or too loose! Here is a picture of how a finger should look like (this side you work on is the wrong side when assembling the gloves) If you have any questions, feel free to leave a comment!

Left picture below: the wrong side of the work (you cast on and off on this side) Right picture: shows the right side of the work (observe that the rows on the left and right edges of the fingers look more alike):
   

How to make a flat seam?


Here is what a finished seam line looks like from the right side of the work:


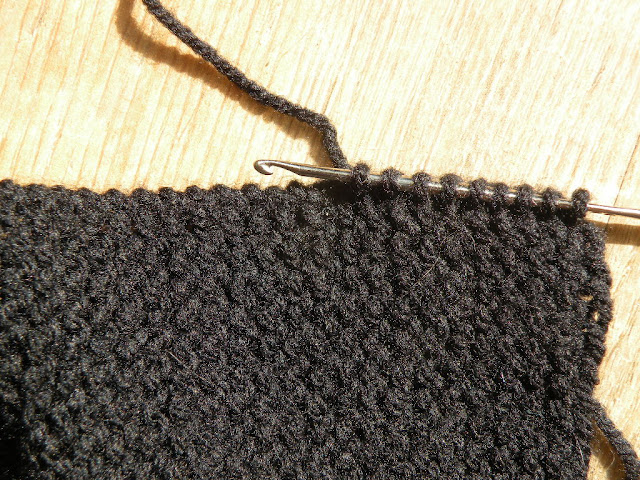
Picking up the stitches for the cuffs:
- The pattern instruct you to pick up stitches for the cuffs. Since the gloves are knitted lengthwise, the cuff will be knitted sideways to that.
- Hold the gloves with the right side of the work facing you.
- The stitches should be picked up working from right to left
- With the garter stitch the edges will have small bobbles in every 2nd row (instead of chains when knitting with stocking stitch) see picture below. The easiest way is to pick up the new stitches between these bobbles.
- Pick up the stitches with a crochet needle and count them.
A little trick: You are often instructed to mark the work andistribute the desired amount of stitches evenly between the markings when picking up new stitches. I rather pick up a few more stitches and adjust the amount by K2TOG's in the first row. This is easier anmakes a neater finish i.m.o. than leaving 'gaps' when picking up the stitches. I also transfer the new stitches after every 10 stitches to my knitting needle, this makes it easier to count.
- I picked up 50 stitches. This is 2 more than the 48 the pattern instructs.
We adjust the amount of stitches when knitting the first row by K2TOG's.
- The pattern instruct to pick up 48 stitches, 50-48=2 so I had to get rid of 2 extra stitches. I choose to knit 2 stitches together in the first row on either side of the of the thumb. If you have more stitches you should distribute your K2TOG's evenly.


The pattern:
  • Needles: no. 10 (metric 3.5) voor loose knitters no.11 (metric 3)
  • Material: To achieve the right size I recommend to use a dk-weight yarn. For the larger size you can use worsted/Aran weight yarn and a larger needle. The pattern indicates 2 oz.=40 g wool for a pair. (I used acrylic yarn for the black test-glove and it took about 30g for just one glove, even with just a 1 inch cuff. This would make about 80g acrylic yarn for one pair) 
  • Gauge: is not stated in the original description. To determine the gauge needed: Measure the length of your hand palm from the horizontal wrist-line to the middle finger. distract 1/2 inch (or 1.2 cm) from it. This is length should be about the same as 18-20 stitches in your gauge swatch. You can achieve this by using DK-weight yarn or for a large/extra-large size using worsted/Aran weight yarn.
  • By using thicker yarn you can easily adjust the size! I wouldn't recommend using a larger needle because loosely knitted gloves won't be warm.

This pattern appeared in an 1943 issue of the Australian Women's Weekly magazine. All original newspaper images through Trove, all other images are mine.

Is there anything I would change?
The pattern is really easy to make up and is accurate as well. The only thing I would change next time is to make the length of the thumb shorter because my thumbs are a bit shorter (10 stitches instead of the recommended 12 stitches)
Other than that the gloves are perfect!

27 Jun 2013

Trinity/Blackberry stitch hat finished!


Here is the finished hat. It was a quick project, a little less than 100g yarn went into it. I knitted it on metric size 3 needles (=US 2 and =old UK11)
I did the decreasing freehand, because the pattern is quite forgiving. As long as you keep making the dots (P3TOG) and decrease (2TOG) in the uneven rows. Here is a picture of how I do it on my circular needles:


And the finished hat (the 'real' color is a rich aubergine hue).


Here is my experimental picot-edge:


The knitted on double brim:

25 Jun 2013

On my needles - Trinity/Blackberry stitch hat


Yes, there is another hat in the make...
I've found this 80%acrylic/20% wool yarn and wanted to test with a smaller piece how it 'behaves' when wearing and washing. If it all goes well I might try to make a sweater!

By the way, this is the only picture which represents the real color, the other pics turned out kinda greyish:


I started with my trusty doubled brim as always, but this time I made picot-edge which looks pretty:


The pattern is the 'Blueberry'  or 'Trinity'  stitch which I've spotted on one of Miss Lemon's sweaters too. It is really easy to make and still looks special:/> Blackberry or Trinity pattern
Row 1. *P*
Row 2. *P3TOG, K1-P1-K1 in the next stitch*
Row 3. *P*
Row 4. *K1-P1-K1 in one stitch, P3TOG*
Repeat rows 1 to 4
When working on circle needles you only work on the wrong side of the pattern: rows 1 an 3 are: *K* (Rows 2 and 4 remain the same!)

Tips:
- On my sample this stitch took up a little bit extra in the width compared to plain stockinette. To avoid a 'shrunken' look like above, I used a smaller size needle on the brim and changed to bigger when starting the pattern.

This is the wrong side patternwise, but the side I'm working on:


- After making a mistake in counting which made a row of bobbles shift I started to use a stitch marker (a plain safety needle was on hand) to mark the last stitch of every row. Well these things happen when you are trying to knit a pattern with a practically invisible dark thread in the evening while watching TV... (Anyway, I left it as it is, since I don't think it will be disturbing in the finished item)


- An easy trick to determine whether you have to continue with an even or uneven row: After you finish an even row the stitches are divided in groups':


After you finish an uneven row your stitches are evenly distributed on your needle:

22 Jun 2013

Knitting: standard yarn weight system

I've always wondered what 'worsted weigt' and 'fingering weight' yarn meant. As far as I know there is no similar system of knitting yarns in Europe (at least not in the Netherlands or in Hugary) Weird, ha?
In a pattern they just give one certain make of yarn (like 'Rowan Revive'  or  'Katia Sirocco' ????) the needle size and the gauge. First of all, I don't know all the specific yarns so first I have to google them and even then I don;t have the slightest idea how thick they are. And then, somehow I tend to use smaller size needles than recommended so the needle size + an unknown make basically doesn't give me any information at all.
I think the specific names for certain yarn weights like below give already a hint of what kind of stitch size and structure to expect. (Of course, making a sample is always essential to determine the right amount of stitches to start with.)


Here is a link to an overview of knitting needle sizes (US, UK, metric and old UK-often used in vintage patterns)

Yarn weight overview

(source: Craft Yarn Council)

14 Jun 2013

Quick little projects: baby bootie knitting patterns


The ultimate baby shower gift are self-made baby booties. They are original, quick and easy to make. we often don't realize, but for those who can't knit or crochet it seem to be a little wonder if you are able make one of these.
There are a tons of baby bootie patterns out on the internet. Of course, you can buy them but there are enough free patterns as well, and it is easy to customize them so why would you pay? Just browse the internet for more inspiration!
I've chosen three free patterns from the internet to show here. Scroll down for links to the patterns.
Above from left to right: The Bernat baby's booties, Saartje's booties and a Vintage ribbed baby bootie pattern. I used the same leftover yarn (hence the 'not so baby-ish' black and grey colors) for all three of them.

All of these three patterns are available in different sizes but imo trying another gauge could be enough to adjust the sizing. Apparently, most newborns and baby's look adorable with these mini-booties during the first months and later on as they grow they are just busy trying to kick them off. So you can certainly come far enough with the smallest stitch count and a different gauge. Here are my notions on these patterns:

  • Yarn for the samples: 'baby acrylic'-type (fingering weight or 3-ply)
  • Gauge: about 7 st per inch (28 st per 10 cm)
  • Needles: I used European metric size 2.5 (US size 1).

1. Bernat baby's booties


When reading reviews on the internet a lot of people mention that these booties stay on very well and don't slip off from the little feet! Making the smallest size these booties came out really tiny, probably perfectly sized for a newborn baby.
When knitting you start at the bottom, shape the toe-part by increasing and decreasing the amount of stitches and then continue to make some length for the rolled over part. The booties are open at the back during the process. You stitch the sole and the back at the end. The pattern uses garter stitch with a small part of stockinette (grey). This makes it really easy to knit.

Finished size:
Tiny! Sole from heel to toe: 6 cm

My tips:
- It is not mentioned but very important is to catch off really loosely, otherwise the booties are impossible to put on and can even be dangerous if too tight!
- Be careful when stitching the sole and back and avoid thick sewing lines! There are quite a few pics on the internet that show thick ridges along the stitching lines which can't be comfortable for tiny feet! Be sure you just pick up the very edge when stitching.


How to customize:
- use 1K 1P instead of the garter stitch
- use stockinette stitch for a rolled down edge instead of a folded edge
- sewing buttons at the outer sides of the fold over part
- fold over part in a different color
- crocheting an edge in a contrasting color
- crocheting ruches along the fold over edge: I did this by putting two single crochet stitches in every stitch of the finished edge and then adding a second row putting two single crochet stitches in every stitch of the first row:


2. Saartje's booties    

This pattern uses two colors which already makes the little booties pretty. Again a pattern that uses the similar shaping method as the Bernat booties. you start out at the bottom and continue to shape the toe-box. Pick up the second color and after a few rows you pick up new stitches to make the straps. The pattern uses garter stitch what makes knitting quick and easy. At the end of the process you'll be left with quite a few pieces of thread. I didn't find this a problem, it is a matter of carefully weaving in the thread along the stitches. (I have just one button for my sample, but of course there should be two of them there!)

Finished size:
Sole from heel to toe 7,5 cm

My tips:
- Be careful when stitching the sole and back and don't make thick sewing lines! There are quite a few pics on the internet that show thick ridges along the stitching lines which can't be comfortable for tiny feet! Be sure you just pick up the very edge when stitching.
- Again, catch off quite loosely to avoid tight sitting straps around the feet.


How to customize:
- use contrasting color buttons
- use buttons with a motif
- make one strap across instead of two crossing straps
- make loops instead of straps and pull a twisted thread through to tie

3. Vintage ribbed baby booties pattern


There are a lot of different versions of this pattern available.The amount of the ridged edges can be different as well. A lot of them free, so I would certainly advise not to buy it!  The original pattern seems to be one from the 50's.
As opposed to the other booties which you knit from bottom to top this pattern has a different approach. You are knitting from side to side and then gather the top and bottom of the ridged edges together as a finishing touch. According to the description you could put a loose ribbon under the folded edge for a vintage look but you can crochet a chain as well or make a twisted thread (my grandma used twisted thread ties in knitted pieces all the time!)

My tips:
- I made the first bootie by following the pattern and making 9 ridges with 10 rows of stockinette (grey) in between. Then the toe box seemed so roomy that I decided to remove a few rows and ended with 5 ridges and 6 rows of stockinette in between. Imo further increasing the amount of ridges would make the front of the bootie too wide and the bootie length too short.
- Be careful when assembling the bootie and pulling the ridges together not to make it too thick.
- The pattern I used didn't say anything about shaping the heels but I would certainly advise to make the heels a bit rounded by pulling a few rows lightly together. I can also imagine adding a little shaping when knitting by decreasig/increasing the edge in about 12 rows in the middle.

Finished size:
Sole from heel to toe 7,5 cm


How to customize:
- instead of using one solid color knit the inverted (stockinette) ridges in a contrasting color
- make a tiny crochet flower to cover the seam at the top
- use a button instead a flower for baby boys (and girls)
- crochet little stuffed balls/flowers or strawberries for the ends of the ties
- make little pom-pom ties

To crochet the little flower I used:
- Chain 4 and form with a slipstitch a ring.
- Petal: *chain 3, 2 double crochet into ring, chain 3, slipstitch into ring*
repeat 4 more times for a five-petal flower.

Last but not least, here are the links to these free patterns 
(click on the name below to go to the pattern source)
1. Bernat baby's booties
2. Saartje's booties
3. Vintage ribbed baby booties

10 Jun 2013

Quick thick yarn hat & cowl


Seed stitch:
*1K, 1P* in next row K on P and P on K (for circle needles)


Hat:
A little less than 100 g yarn
Gauge: 12 stitches and 14 rows=10 cmx10 cm
Cast 52 stitches
1st row: K
2 - 12 row: seed stitch
from row 13 next 10 cm stockinette
decrease: Row 1: *11K, K2TOG* (48 st remain)
Row 2: K
Row 3: *4K, K2TOG* (40 st remain)
Row 4: K
Row 5: *3K, K2TOG* (32 st remain)
Row 6: K
Row 7: *2K, K2TOG* (24 st remain)
Row 8: K
Row 9: *1K, K2TOG* (16 st remain)
Row 10: K
Row 11: *K2TOG*
Pull thread through remaining stitches and finish


Cowl: 
A little more than 200 g yarn
Cast 74 stitches and  knit round with a circle needle in Seed stitch

Edit: I used Pingouin 80% acrylic and 20% wool yarn from a cheap store 'Euroland'. Paid 10 euro's for 6x50 g.

5 Jun 2013

Grey knitted hat an basket weave cowl finished!


The grey hat and the cowl I started here are finished. A little less than 300g yarn went into it (used 2 for the cowl and 1 for the hat)
Costs: about 6 euro's. I thought about making the top of the hat flat, but I like the slightly gathered look. Though I decreased the stitches over 16 rows to avoid bulking.

Peek at the back of the basket weave pattern:


The cowl is knitted in the width. After finishing and casting off I joined the seams with a stitch that looks like a knit stitch:

click on picture for source and written instructions!


This is how the finished seamline looks: