Showing posts with label DIY. Show all posts

7 Apr 2015

nursery diy: crochet letter flags


I've been planning to make this one for a long time but eventually was gifted by a friend of mine. The flag-line is consisting of basic, freehand granny squares with the letters embroidered in a contrasting color. Pretty, isn't?

1 Apr 2015

What to wear when nursing in public?


For the record, just because supermodel Doutzen Kroes is spotted breastfeeding her daughter on the street in Amsterdam, it's not like breastfeeding in public is a common thing here in the Netherlands! In the contrary, I can't really remember ever seeing a woman nurse in public...
For the first time we had a family gathering, about an hour from home and at a public place, so I tried to figure out what I should wear.

Speaking for myself, I really wouldn't mind breastfeeding in public,but it's 't
he others' who are getting rather uncomfortable by the idea of watching me nurse. Of course, I could use nursing covers, scarves, blankets, whatever to 'hide' my baby's but I simply hate both the idea and the look of hiding! Especially because I'm convinced that nursing is a normal and natural thing to do...

I really don't like nursing tops which are all the same, mostly unflattering wrap-overs and screaming from miles 'nursing top'. I do have 2 roomy long tops which have a wide neckline which I can pull down. I like to wear them with skinny jeans and have already used it in combination with a nursing bra.
It worked well, when we had visitors at home and they weren't bothered by the idea of having a glimpse of my boob by accident. At the end of the day a nursing bra simply exposes everything, so it is far from ideal when nursing in public.

This is what I wear at home:


These tops are supercomfy! I discovered these at H&M, after wearing nursing bra's at night for weeks (!) which was really uncomfortable.
But, back to 'public':
There is one type nursing bra, from the quite expensive Belgian brand 'Mammae' which has a nice 'up-down' opening, but again, it is covered by a padded 'flap' which opens sideways:

Mammae nursing bra

While I like the luxurious look of this bra and do prefer the up-down opening of the inner layer I ask myself where you leave the outer, padded layer when nursing.

When searching the internet I've found this rather simple idea: 'Megan Nielsen's 'no-sew nursing top solution' and decided to try. I liked the idea of a cami which forms a sort of 'modesty panel' at the front, so there would be no cleveage visible above the baby's head. After a quick wardrobe search I decided to try it on an old cami which I wanted to throw away because it was too short. The fabric is quite stretchy, so my 7 cm diameter holes stretched out and became quite larger when I've put it on. (good to know for next time) I wore a non-padded nursing bra underneath.
I must say, it worked well!

Now, since this was a try-out I'm planning to make another 'set'. Just a few things to remember next time:
- use a nursing bra and a cami of the same color (this one seems a nobrainer, but still...for now, I only have white nursing bra's)
- start by cutting smaller holes at first and try it on a few times
I keep you posted!

23 Mar 2015

diy: 'birhouse' nursery clock


Another diy project for the nursery!
I wanted to have a clock with bright colors, but couldn't find any I liked, except this quite expensive one, the Karlsson 'Woodpecker' clock:


Well, time for some diy!
I came across a wooden cutout 'bird house' below (bought at Xenos) and used the mechanism of the cheapest IKEA clock.


material:
- IKEA 'Rusch' clock
- wooden cutout for main figure (bught at Xenos)
- wooden cutout trees or other figures to hang, mine were 'leftovers' from the Christmas decoration (also bought at Xenos)
- other embellishments of your choice (wooden bird bought at Xenos)
- abut 30cm fine chain (mine is a piece from a chain with clips to display greeting cards)
- acrylic paint
- glue

method:
1. First removed the clock mechanism and the hands:


2. I decided where to put the mechanism. I liked the idea of the clockhands reaching over the edge.
The wooden cutout figure was thicker than the holder of the clock hands so we had to cut a a few millimeters deep layer away at the back to make it fit:


3. Glued the clock mechanism in place:


4. I painted the wooden parts and the plastic second-hand as well in contrasting colors


5. Painted and attached the other embellishments

16 Jan 2015

diy: fitted changing pad cover 'Koeka Amsterdam' knock-off aankleedkussenhoes


Here is my third Koeka knock-off project!
For the changing pad I used their 'Amsterdam' changing pad cover as inspiration. They use a cotton waffle fabric in combination with a cotton bath-towel fabric for the middle section. These sell for about 45 euro's a piece!
Below the original version:


this is my knock-off:


...with a way better fit at the sides and corners!


material:
- cotton waffle fabric (prewashed and -shrunk)
- bath towel 70x100 cm (enough for two changing pad tops. I ripped our the side seams for the seam allowances)
- elastics
- embroidery thread
optional: fabric dye to match the colors

costs: 
My costs were for two changing pads less than 15 euro's!
About 6 euro's for 85 cm of cotton waffle fabric, 3.99 euro's for one IKEA Haren bath towel (70x100cm), about 1 euro of elastics and 1 euro of embroidery thread.
(I used dylon to dye both fabrics in the same color. The fabric dye was the most expensive, about 10 euro's but used for other projects as well)

step-by-step:
1. Prewash and iron your fabrics before starting!
It is better to let the fabric shrink before the first use instead of the second one... I prewas my cotton fabrics at a normal temperature, but then put them in the dryer with fairly hot air.
Cotton waffle fabric tends to 'bobble' after washing. After prewashing I ironed my big piece of fabric and after cutting the rectangular pieces I ironed them again, making sure that the stripes run horizontally and vertically.
2. Take the measurements and make your pattern

Making the cover requires a bit of 3 dimensional thinking. You need to 'translate' a 3-dimensional shape into flat, 2d pieces.
The cover is made out of one rectangular upper part (consisting of two pieces of waffle cotton with a piece of bath towel in between) and 2 contoured parts for the short sides.
First, measure your changing pad. Use a standard seam allowance you are used to work with. For me it is 5/8" or 1,5 cm. I used my handy parallel tracing wheel to do this.


You can either measure and draw directly on your fabric, or choose to make a paper pattern first. You can choose how wide you like to have the bath towel section. The original one goes  up quite high at the sides.
If you assemble the top part from different fabrics don't forget to add extra seam allowances where the two fabrics meet!(= at both long sides of the bath towel and at one side of the side sections of the waffle fabric.)
3. Cut the pieces:
- 1  upper middle section (bath towel)
- 2x upper side sections (waffle fabric)
- 2x the contoured sides (waffle fabric)


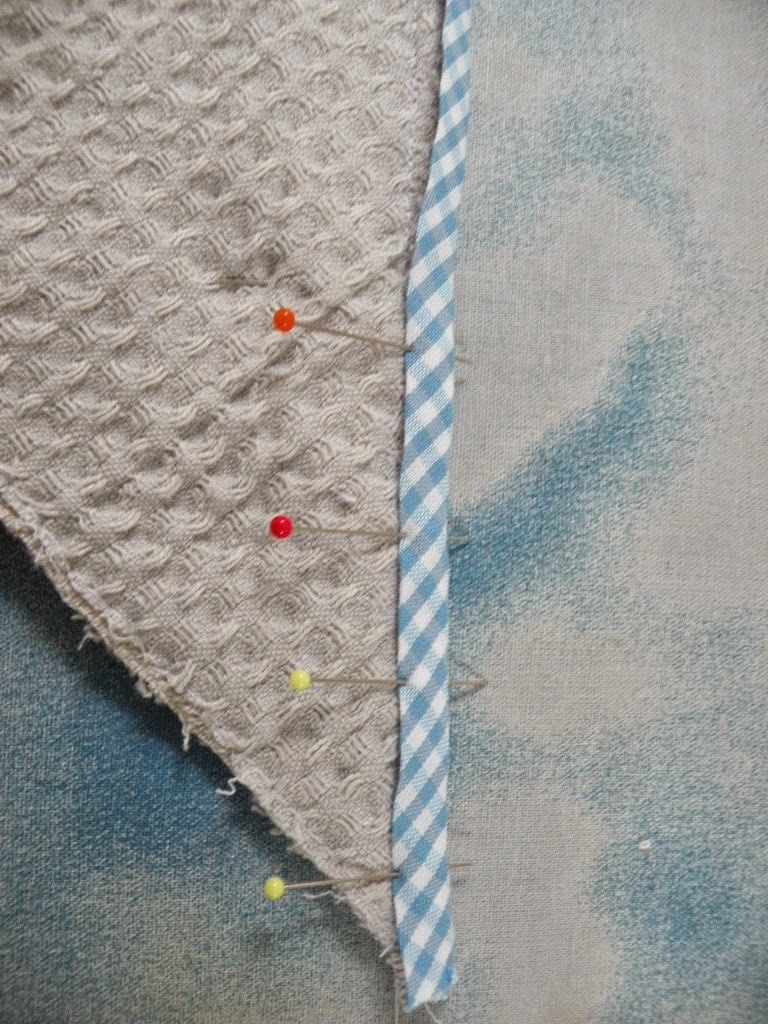
4. Sew the waffle fabrics at the sides to fill up to the desired (measured) width according to pattern  Pin and sew.


5. Finish seam allowance (I used a simple zigzag stitch) and fold the seams under the waffle cotton layer. Press. I used a really small top stitching on the waffle cotton to keep the seam allowances nicely in place. The topstitching will be practically invisible when you embroider next to it.

6. Attach the contoured sides:
Since it is easier to sew a straight line simply clip and open up the seam allowance (basically straighten the shaped part). Place the pieces with right sides together, pin and sew. Clip the other layer as well.
As you can see my seams don't match up here. I decided to make the center part just a little bit shorter for a nice, tight fit.


Topstitching and clipping the corners:


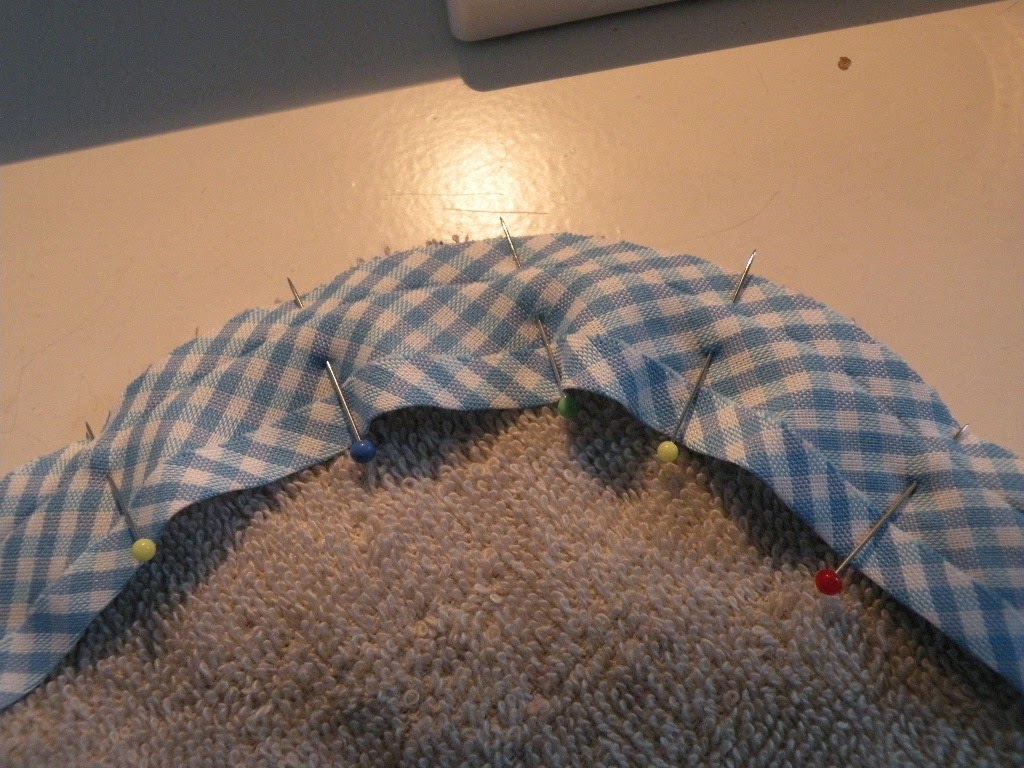
7. Fit the cover on the changing pad: fold the short sides under and mark the corners. You can measure it too, but there is somehow always a certain amount of 'unexpected' stretch in the fabric which you can spot and correct this way:


8. If it is needed, open up the seams in the corners up to the marking on the inside and pin the seams in a downwards vertical direction. Stitch, reinforce corners by running 3-4 times through it. Finish seam allowances and press:


9. Now it's time for a lot of relaxing handsewing!
Embroider the edges of the bathtowel-layer with blanket-stitch in a contrasting color before putting in the elastics:


This is the best time to add the little appliques too. Of course, you are free to skip them or to use a Koeka-style applique. Those are made out of felt and secured with a simple cross-stitch (like an X) with embroidery thread.
I didn't liked the flower appliques of the original cover, and made really simple and cute crochet bunnies instead. I used this tutorial


10. Last step!
Make the elastic casing at the bottom. I used about 2 cm to do this, first folded back 0.5 cm and then 1.5 cm. Pinned and pressed before sewing.
To prevent bulking the elastics only go around the corners: 10 cm at the short sides and 15 cm at the long sides, measured from the corner seam. The mid-sections remain straight for a better fit.


Ready! ...and now make one more...
I have made two covers, and planning to make a light grey one too. Just for fun!

30 Dec 2014

diy: bench cushion cover made from IKEA 'Signe' cotton rugs


When you look at the frequency of my blog posts,you probably can tell, with just 2 weeks (!) left to 'd-day' I'm more active than ever. I spend almost every day behind my sewing machine, working on baby-related and other projects, running up-and-own the stairs and just not sitting on my butt... The days just seem to fly by. I think every day that I really, really should pack a hospital bag, but on the other side, I don't experience early signs like Braxton-Hicks contractions and I don't expect the baby popping out just like that...

People around me say this is the 'nesting instinct', and I'm definitely feeling very energetic and productive these days and I do have an urge to organize and finish unfinished projects. I can't complain, I have no annoying pregnancy symptoms at all, besides quite frequent trips to the bathroom and tired legs at the end of the day from running around... But: no back pain, no swollen legs, no heartburn, and I don't even need a nap during the day!
Let's be honest, working on fun and creative projects is still better than cleaning the house all day long, right?


We have a teak wooden outdoor bench at the dinner table which we use a lot. Up until now we've kept the original seating cushions (just because it was easy) which were quite ugly yellow and red colored, and even after several attempts to have them cleaned remained stained.
Lately, I've visited a nearby IKEA store quite a few times to buy baby-related items (like my fav. project-bathtowels) I came across these cotton rugs. They only had a few left-overs with brown stripes. For 1.49 euro a piece I thought it was a bargain and I took 4 of them. The idea was to use them for the bench.


As you can see the rugs have a rustic texture and they are not perfect (like the stripes don't match perfectly) but they are really sturdy, so ideal for intensive use:


material & sizing:
my finished size: approx. 50cm x 145 cm
- 4 IKEA 'Signe' woven cotton rugs
- 1 meter of IKEA 'Minna' fabric for the back
- mattress for cushion stuffing

step-by-step:
I didn't make step-by-step pictures this time, but what I did was:
- cutting off the shorter, knotted edges, and then zigzagged them to prevent fraying.
- then I sewed two rugs together, pressed and steamed the seam and then strengthened the seams with topstitching on both sides of the seam.
- I used IKEA's sturdier cotton 'Minna' fabric for the back with an overlapping seam and simple velcro closure.
- I kept the rugs as long as possible and folded under, so it looks good from the sides too! (= the back fabric is shorter than the front)
- For the stuffing I simply recycled the old mattresses (complete with cover and all) and made the new cover a bit smaller (both in length and width) for a nice, firm look.


Below is another project from a few days ago, the roman blinds which were lying around for about a year of 1.5?... I wrote about how to make those here.
The total look is much more cleaner and coordinated (until we saved enough money to have the bay-windows placed instead of the old window...)

29 Dec 2014

diy: hooded baby bath cape


material & sizing:
Finished size: 75x75 cm (29 1/2 x 29 1/2")
- 1 IKEA Haren bathtowel 100x140cm (39x59") surface density: 400g/m2 (1.31 oz/sq ft)
- about 260 cm bias tape (approx. 102")
optional: leftover fabric for front of hood


step-by-step:
1. cut a 75x75 cm square main piece (no seam allowances needed!)
2. draw rounded corners with a small size plate (mine has a diameter of approx. 10 cm = 4")
3. cut and a triangle for the hood. My triangle measures 19 cm (=7 1/2") from the rounded top to the center of the long side.
(If you want to add another fabric layer to the front cut another triangle. I used my trusty cotton waffle fabric, but you can use any other printed fabric too.)


4. if you have more layers for the hood, pin and stitch the layers of triangles together (this prevents the layers from shifting when attaching the bias tape)

First finish the edge of the long side of the triangle hood:
5. press one side of the bias tape slightly open, this makes it easier to place.
6. pin it with the open side to the edge on the wrong side and stitch.
7. trim about 1/2 of the seam underneath the bias tape to reduce bulking.


8. press seam flat from the right side, then turn wrong side up (you can see the trimmed seam below at right):


9. fold the bias tape in half (the edge should meet the stitch line) press and pin:


10. sew the bias tape in place on the right side with a small topstitching:


11. Pin the triangle for the hood in place:


12. attach the bias tape all around as described above (steps from 5 to 10)
Al the layers are going to be thick, so carefully trim after sewing:


don't forget to slightly stretch the bias tape when pinning around the corners!


13. ready!


I made two of these bath capes today: