Showing posts with label muslin. Show all posts

28 Apr 2015

Butterick 6183 pattern adjustments: sleeve + back pieces


Here are the sleeve patterns: original one (on top) and the adjusted one. I have used Nancy Zieman's method to make this adjustment and wrote about it in this blogpost. The nice thing is that both the sleeve hem and the sleevecap remains unchanged while you add width and more room for movement at the armpits.

The back has princess seams. Below are the adjustments I made to the back side pieces. There is a central panel which I simply shortened by cutting at the shorten/lengthen line for the swayback adjustment.
In the pics below you see the back side panel adjustments.
left: I added width at the hem: 1/2 of the seam adjustment below the waistline, tapering to nothing at the waistline. (I did the same at the sides of the center panel as well)
right: finished the swayback adjustment by taking out (1cm) at the center side tapering to nothing to the side seam of the side back panel.


I still need to add extra length at the hem since the pattern length is going to be the finished length of the top.
Haven't decided on the fabric yet, I need to dig into my stash I guess...

24 Apr 2015

Butterick 6183 top muslin part 2 - fitting the back


Fitting the back is hard and is not much fun when you have to do it on your own. It is so much easier to do the fitting on a dress form or someone else!
For now I have to rely on what I see in the pictures and make new pics after each adjustment to see if the fit is improved.

fitting 1
This is the size 10 muslin:


- At first sight you see a snug fit, no ease at the upper back. I already determined that my muslin is a size too small, but the length seems to be good (placing of the apex and waist markings are good)
- There are diagonal wrinkles towards the shoulder - I guess sizing up will sold this problem due to more ease across shoulder blades. If it was a sleeveless top I'd do a forward shoulder adjustment as well, but for a top with sleeves I think it is not necessary.
- Looking at the pictures, what's more interesting is the waistline. There are horizontal fold wrinkles at the waistline. What you also see (especially from the side) is that the back hem is raised. Fold wrinkles means there is excess fabric. At first sight you'd think it is a swayback problem, right? But: this could be a sign of a too tight fit across the hips. Probably the combination of both.
To check this I decided to open up the back seams from the waistline down.

fitting 2.


- The back looks much more relaxed with the seams open and wrinkles are gone! More room in the hips is definitely part of the wrinkle-problem. It would be easier to deal with this if the finished measurements were printed somewhere on the envelope or the pattern pieces...now I have no idea how much ease is built in...
- I marked the waistline and another thing I notice is that the waistline marking (black line at the back) is sloping downwards. (note: the line at the front is not the waistline but the lengthen/shorten line of the pattern):


The waistline needs to be 'lifted', which means that my back waist length is shorter than the pattern's. This is a swayback adjustment.You can see here that the side seam is pretty much vertical, so I only need to add width at the back.


fitting 3.
alterations done:
- Pinched out 1 cm at the center back for swayback adjustment, tapered to nothing at the side panels
- closed the side seams, added 1x seam allowance at both seams


- the fit at the hemline seems to be fine now, even when wearing a jeans underneath
- the waistline sits at the right place and looks horizontal:


I'm happy with how the top looks now and not going to make another muslin. I'm going to transfer all the adjustments to the pattern pieces.

pattern adjustments to do:
- add 3 cm length at hemline
- alter sleevecap by adding width (2x1cm)
- cut size larger pattern pieces (probably need to shorten the bodice pieces a tad to keep placing the waistline at the same height)
- add width at the hips in the back (3 cm at hemline tapering to nothing at waistline)
- do a minimal swayback adjustment (raise waistline by 1 cm)

22 Apr 2015

Butterick 6183 top muslin - part 1


So, here is the muslin!
I must say, despite the amount of pattern pieces (4 front, 3 back + sleeves) this came together rather quickly.

sizing:
This pattern comes with pattern pieces for different cup sizes which is great, since in the past I was fine with the standard sizing and have never done a full bust adjustment. After checking the pattern instructions I calculated my 'new' bust size...which turned out to be the largest one, a d-cup.
I haven't really found the finished garment measurements so I thought I'd go with size 10, which with a semi-sitted garment fits most of the time, with just minor adjustments.

So, here is how it should look:


fitting:


  • the size 10 shoulder width looks perfect
  • the choice of the largest cup size was good (though size 10 is too tight)
  • the waistline sits at the right height and I like the fact it doesn't look too loose around the waist
  • I'd like to have this length for the finished length so I need to add extra length for hemming
  • if I want the top to be somewhat fitted around the waist with this bust size, I need to put a side zipper in (I've already left one side of the muslin open)
-
  • there are horizontal/diagonal wrinkles at the (finished) sleeve side of the yoke. The yoke is a tad too tight at the bottom seamline, so I need to go for a size larger there
  • obviously, the fit across the bust is too snug, I need to size up that as well. Note: the apex marking is sitting at the right height but not at the right place. (The seams are sitting at the right apex placing) 
  • the area below the bust in the front is slightly 'baggy'. Now baggy-ness is always caused by too much fabric. I could pinch a bit out along the seamlines, which would make the fit under the busts better. This can be done when assembling the top so I don't need to change that on the pattern pieces yet.
  • the sleeve width needs adjustment, just like I did on my Simplicity blouse (you see the wrinkles when I lift my arm up)

  • horizontal wrinkles at the lower back --> more about that next time!
  • also the tightness at the upper back will be better with the size 12 pattern pieces:


pattern adjustments to do:
- trace a size larger (size 12) pattern pieces
(there is enough ease in the sleeve cap, so this change will not affect the fit)
- adjust sleeve width by adding a total of 2 cm (I think this is necessary, even if the sleeve is going to be a size larger) I have used Nancy Zieman's method and wrote about it in this blogpost

Pretty straight forward, right?  Next post is all about the back. I keep you posted!

16 Apr 2014

sewing for victory - 4. taking a few steps sideways


Two weeks have left of the challenge. Have you already finished your garment?
Well, according my plans, by now I should post pictures of my perfected muslin and my dream-fabric (sort of), but my muslin is not ready yet.
To tackle a couple of problems I decided to include yet another pattern in the mix. And I made another blouse muslin! So what I have today is an all new muslin, of which I'm planning to use the bottom part (to be precise).
Hence my choice for today's Western-inspired 'intermezzo':


Let's start with something else (talking about steps sideways) Exciting news, I've recently bought a pair of brogues! Okay, this maybe not soooo exciting, but after 1.5 years of 'shoe-diet' I'm glad to have a pair of these beauties! As you can guess, these are from my current favorite brand, Clark's, I wrote about in these posts. Usually I buy new sneakers to wear with jeans, but this year I decided on brogues which are more elegant and can be worn with skirts as well. Brogues are (of course) totally 30's and 40's too!


did you know...
that brogues were very popular through the 30's for women's polo- hike-, and sportswear outfits? Of course, those weren't this flat type of shoes, these became popular during the war years, "for war work and play" unfortunately only in  black or brown.
I chose a fun, grey-and-white color combination. I don't wear browns, black looked just black, the beige was not pretty, the white was too white and this fits more in my personal style. I don't wear authentic, fully vintage styled outfits, but rather mix and match vintage styled and contemporary things to create something new, which is 'me'.
Now bending back to the Sew for Victory project...

the new pattern:


The new pattern in the game is the famous Simplicity 3688, which is a sort of mini-wardrobe consisting a 40's jacket, a skirt, pants and a blouse. A very good value, because you get 4 patterns for the price of 1. It sells for about 10$ (sadly, in Europe more, about 16 euro's, which is in comparison to other patterns still a bargain though)


You will find several dozens of those pants on the internet (seem to have a very good fit!) a few versions of the skirt and the blouse and practically none of the jacket. Why?! You guess: this goes on my 'to-make-one-day'-list....
Let's take another step sideways, just for fun:
Look at the pictures of the re-issued pattern (below right) and that of the original one (below left, source: vintage pattern wiki). How vivid are the original 40's colors in comparison to the remake?! They probably had a really, really faded pattern envelope when recreating the items in boring beige-ish, pale browns and pastel-yellow, though the styling and the hairstyle were spot on.
Below a little mix of fabrics which I think could have been more effective: marroon-brown, forrest green and bright yellow. What do you think?
By the way, I love how the original pattern introduces one more color for an extra skirt!


Bending back to my blouse project:
I'm interested in this blouse pattern, because of the pleats at front and the length from the waist down. (I'm pleased to say that my frankenpattern-yoke has the same shoulder-width as that of the Simplicity blouse!) Looking at the finished measurements I decided to make a muslin of the size 10 pattern instead of the size 12, which I would have chosen by looking at the body measurements. Tip: always check the finished measurements before making a muslin! While the 40's garments were close-fitting, the contemporary remakes often include a lot of ease.
did you know...
...that the finished garment measurements are always printed on the pattern tissue and sometimes (partly) on the pattern envelope?
simplicity 3688 blouse muslin:
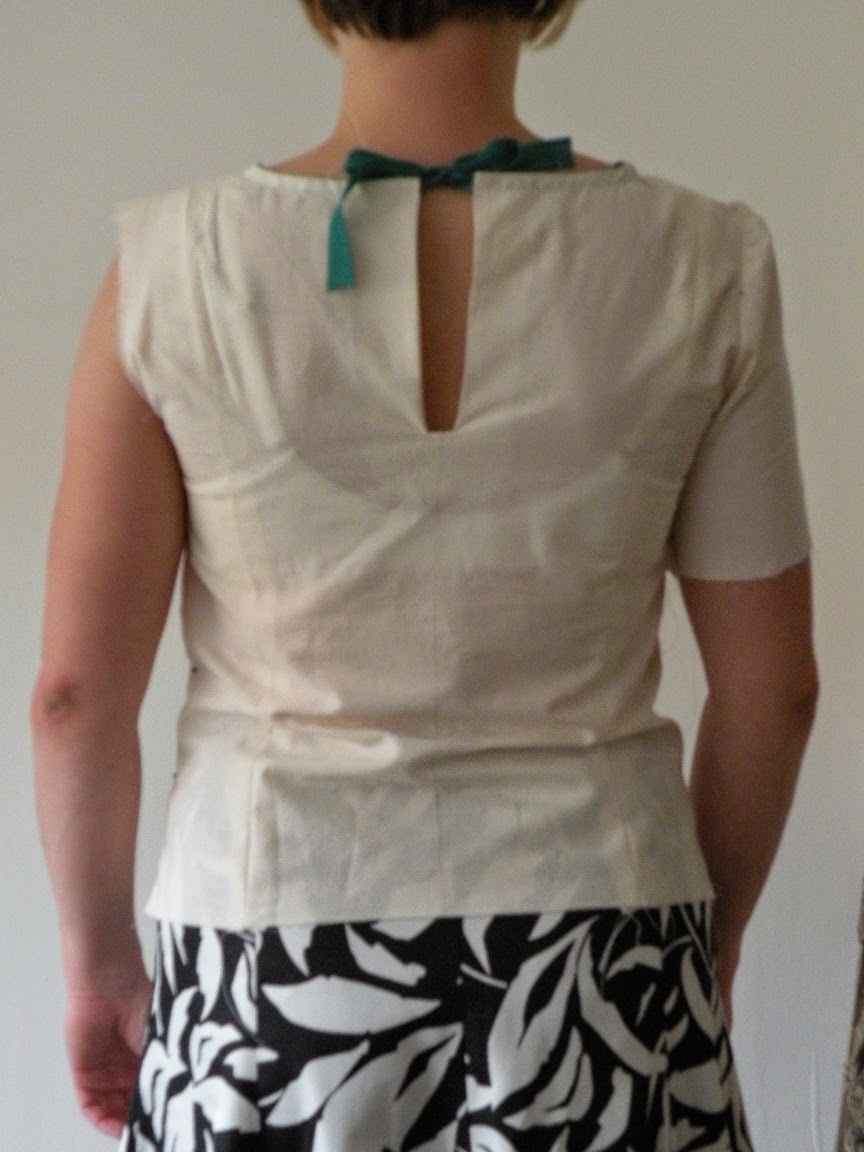
Want to see my muslin of the Simplicity 3688 blouse? Here we go:
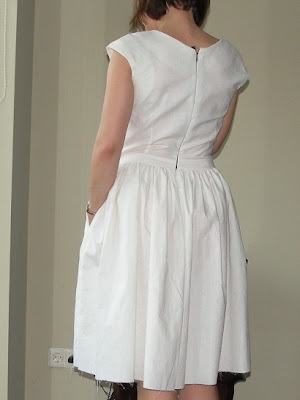
Front and side view (please ignore my 'made-in-China' pajama pants and chopped-off head) Below two sets of front and side view pics:


Try not to forget that this blouse is supposed to bu tucked in. (Just in case you wonder why the sides look so bulky...)
When I lift my arm you can see that the sleeve is a tad too tight. There are a lot of small wrinkles along the underarm and there are a few horizontal wrinkles from the armhole to the bust and to the sleeve: horizontal wrinkles usually indicate tightness. (By the way, do you see any side-bulks below? They are gone!)


the verdict:


+
+ the length is perfect for me (which was one of the reasons to make this muslin)
+ the finished measurements were right, size 10 has a perfect fit along the bodice
+ the neckline: even if I don't love high necklines, this one looks really pretty! The finishing with the self-bias fabric is a breeze (even if I managed to sew it on inside-out...)
+ fit of the yoke and shoulders is good
+ bust fitting: the gathering gives enough room and looks great
+ waist pleats: I like the look
+ the elbow-dart: a pretty, vintage addition which also adds comfort (the slightly bended sleeve is more natural, just look at the pics below. When standing relaxed your arms aren't 'hanging' straight!)

-
- the back is too baggy (I guess this is necessary to be able to put it on without a side opening, but still...)
- the sleeve is a tad too small, I need more room for my upper arm
- the problem above can be solved by sizing up the sleeve (or by altering the sleeve pattern by cutting in along the fold-line and spreading at the top)
- I had high expectations of the shoulder darts of the sleeve-cap but I was disappointed. The darts don't really add fullness or shape whatsoever.


to change:
  • cut one size larger sleeves 
  • add darts to back (why not to try?)
  • open up the side if needed (in case the blouse gets too tight to pull on)
Actually, this might be the my second project for Sew for Victory!


to adapt for my 40's blouse design:
  • the length
  • the front pleats
Next up: muslin adjustments
For other Sew for Victory posts click here:
1. project plan
2. style, pattern & fabric inspiration
3. muslin, the good, the bad and the ugly

10 May 2012

Pattern testing: Sewaholic Cambie dress muslin


Size 8 muslin (left) and size 6 dress (right)

As I mentioned I was a pattern tester for this dress. The Cambie dress has a sweetheart neckline with gathered cap sleeves and a full of A-line skirt. I love dresses and my favorite part of the design are the sleeves with a 'sleeveless' look. If you look at the picture of the back you can see why isn't it sliding off the shoulders. A clever solution. I believe this is another pattern that looks good on everyone, with every type of body shape.

As always I started by making a muslin. Since the skirt has two versions and I always choose the A-line skirts I decided to invest some extra muslin fabric and sew up the complete dress with the gathered skirt. I made size 8 since that is my Sewaholic size, though I used size 8 bust and size 6 waist measurements for my Lonsdale dress. As you can see the top turned out too big, but I instantly loved how the dress looked like! I felt like a little girl in a swirly skirt and spent the rest of the evening (pinned up) in my dress...while making a size 6 muslin for the top with the waistband to try out the fit. (It is visible that I used facings for the neckline of my muslin instead of a double layer)

I thought the gathered skirt would make me look bulky around the waist and hip, but it actually looks much better than I thought. I like it!
I simply went down one size and size 6 was a perfect match. I usually have to shorten the bodices but this one fits right out of the envelop. The length was just right, I used my blind hem foot for the eyelet fabric, for me the skirt shouldn't be shorter than this. As fort the fabric I wanted to try a swiss dot but wasn't be able to get it here in the Netherlands. Somehow this type of fabric just doesn't exist? The I've found this pretty eyelet with the big circles and now I feel sorry for buying just enough for this dress. I feel like I want to make at least 10 summer dresses out of eyelet fabric!


The dress wasn't hemmed here and I just pinned up the back. Isn't it pretty?

26 Feb 2012

Renfrew top muslin


Well, all the plans for the weekend has changed. Instead continuing working on my Marfy dress I made anther muslin. I ordered the new Sewaholic pattern, the Renfrew top a couple of days ago and it arrived on friday!

The Renfrew top is a fitted knit top with banded hems and variations for the sleeves and neckline. I've seen a lot of pics around on sewing blogs and thought the fit was great. Also I love wearing V-neck tops with 3/4 sleeves and somehow, there aren't many out there to buy. This was the second pattern I ordered from Sewaholic Canada (there are no resellers in the Netherlands). Ordering the pattern was easy, and the delivery quick.

Of course I had to start with the construction of a muslin!
Since I haven't sewn knits for a long time I did not have knit fabrics in the house. But I did have a giant pile of crew shirts from my friend. I used an old, man's x-large sized crew-shirt which has been worn and washed for years and years. I thought long enough to make it a bit sturdy to qualify as a 'stable knit'. Since I don't have a serger I can't sew with really stretchy knits anyway.


Sizing is always tricky, so I pulled out my other Sewaholic pattern, the Lonsdale dress. I used size 8 for the bust tapering to size 6 in the waist and hips on that dress. I used the finished garment measurements and compared to the Renfew top finished measurements. Decided to go with size 8 at the top part (shoulders and bust) and tapered to size 4 at the waist and hips.

The V-neck neckband was a bit tricky, an interesting construction. It didn't turned out perfect, but will get better next time around.  I followed the instructions and used zigzag stitch around the neckline to secure the seam allowance and I think it looks good. (When I was young my grandma used to make almost all our clothes and she used to sew knits with zigzag stitches too.) Next time I might try to use a double needle, that way there would be two straight stitching lines instead a zigzag.

I think the results are not bad! I didn't have enough fabric to make the waistband, so I just folded the seam allowance back and stitched with a zigzag stitch. It is just a muslin, but surprisingly, the length of the top turned out just right! With a waistband would be a bit longer, but also perfect.
(I never wear my shirts tucked in) There is enough room under the arms, the top feels roomy enough but still nicely fitted.