Showing posts with label BabyBootie. Show all posts

2 Sept 2014

vintage newborn baby bootie pattern from 1966


This weeks baby bootie is a 'newborn bootie' pattern from 1966. The 'fancy stitch' is easy to knit and it can be made both for baby boys and girls. Interesting detail is the picot edge which is occasionally appears on knitted tops or sweaters. Always wondered how it's done? Scroll down to read!

"A quick-and-easy gift, you can knit these bootees in a night. Make them in white or lemon and they will suit either a boy or a girl."
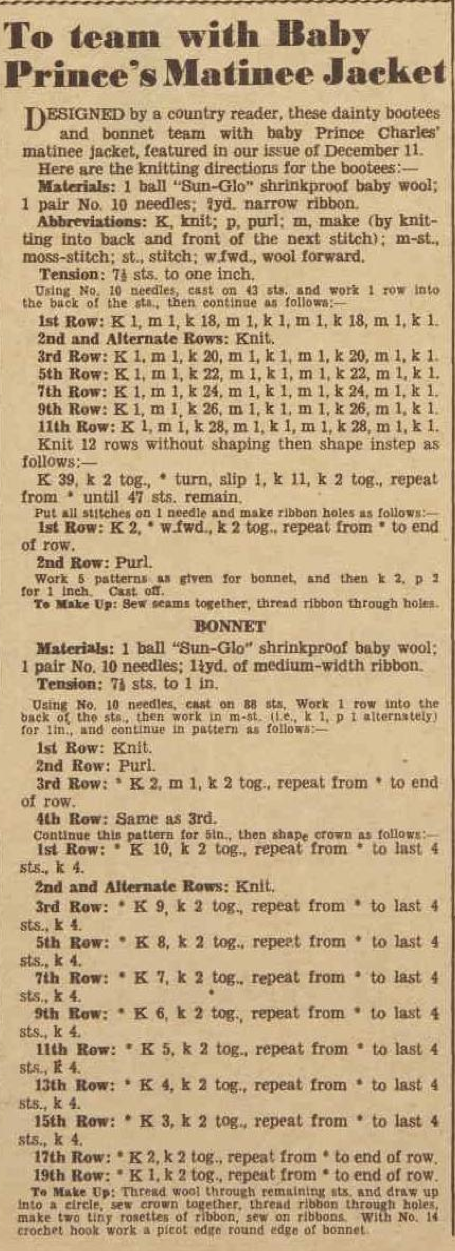
   

material & sizing:
The suggested tension is 8 sts to an inch. I used the same gauge as always, used fingering weight yarn, metric size 3 needles and a tension of approx. 28 sts to 10cm (7sts=1in) The finished size is 9 cm (=3,5 in) from heel to toe, which should indeed fit newborn to 3 month old babies.br />
construction:
The bootie is knitted top-down. You start with making the picot edge.
the finished bootie before sewing:


I made 2 repeats of the 'fancy stitch' after the picot edge. The instructions tell to continue until the work measures 1 1/2 in. Instead of measuring the length I repeated the pattern twice, for the same look as in the original picture (making 4 rows of small holes). Close-up of the fancy stitch with the tiny holes:

The instep is shaped by knitting the instep and picking up stitches along the edges. A common problem can be holes in the inner corner.

trick: how to avoid holes?
If you have ever tried to knit socks you might be familiar with the holes in the inner corners when knitting a sock with a heel flap. There are a few sock-knitting tricks to avoid those holes. These holes are actually created by the stretched-out strands of the previous row, between the last stitch before starting to knit the instep and the first stitch of the instep. Here we are knitting tiny booties, so there is just one trick you need to apply: when you pick up stitches along the edges, pick up an extra stitch next to the inner corner. Then you knit this stitch together with the stitch next to it in the next row.

the toe-shaping:


trick: seaming along the sole
If you don't do this in the right way you'll end up with vertical lines along the seam on the right side or a very thick seamline. Here you can see how I pick up the middle loop of the chains along the edges (seaming on wrong side). This way it looks good from the right side and the seam won't be thick!


picot edge:
The picot edge in knitting is actually created by making a row of holes (K2TOG, YARN OVER) Then the work is folded along the row-lines and sewn or knitted in place. This creates the scalloped edge. These row of small scallops are called picot.
In this pattern you make the picot edge like this:
  • you knit 3 rows in stocking-stitch
  • knit a row with holes
  • knit 3 rows of stocking-stitch again
  • fold and knit together the loops on the needle one by one with the loops of the cast on edge

did you know...
...that a picot is a loop of thread created along the edge of lace, ribbon, crocheted, knitted or tatted material. The word picot is pronounced [pē' kō]. It is a diminutive derived from the French verb piquer, meaning 'to prick'.
   

the pattern:

6 Jun 2014

Vintage 1966 embroidered baby bootie for cool summer days


I don't know how the weather is anywhere else, here it has turned into a rainy summer right now. When the weather is rainy I tend to turn to knitting, rather than sewing. How about you?
I thought it would be nice to continue the Big Baby Bootie project with a light, summery pair of booties, this time from the 60's. These booties have an unusual shape and are very easy to make. Left the original, right my version.
How cute is this?!

As you can see you can use any color, you could even add a pretty figure-button instead of the embroidery.


material & sizing:
The original pattern uses 4-ply yarn, the tension is not specified.
As usual, I made mine with a fingering weight yarn, metric size 3 needles and a tension of approx. 28 sts to 10cm (7sts=1in)
The finished size is 8,5 cm (3,3 in) from heel to toe, which should fit newborn to 3 month old babies.


construction:
The construction is quite interesting again. It is a top-down knit.
After knitting the short cuff you continue with a row of holes for the ribbon. Then you divide the knit in 3 and continue separately with the sides and the front part. After knitting through the remaining stitches continue with the toe-shaping.


toe-shaping:


the side openings sewn together:


After assembling and adding a ribbon in a contrasting color it looks already pretty:

my tip:
if you plan to add embroidery or other decoration, the best time to do this before assembling the booties!
flower embroidery step-by-step:
The little flower is a simple embroidery work. There are no instructions in the original pattern, I assume in the 60's just everybody knew how tho embroider these simple little flowers (just like I learned from my grandma). Here is a step-by-step guide. I used the same yarn in a different color.

1. Start by pulling up the thread in the center of the flower. Put the needle through the center again and up at the outer point of the petal. This way you actually make a loop:


2. As you pull your thread up you are now in the middle of your loop:


3. Now secure your loop by putting the needle down right outside your loop. Finally pull the thread up in the center.


4. Continue making the other petals, starting across the first one.
I usually do 6 of them.


Here is how the finished flower looks:


abbreviations for beginners:
k = knit
p = purl
st-st. = stocking stitch
inc = increase or make one by knitting twice in one stitch
w.fwd = wool forward (or yarn over)
k 2 tog = knit two stitches together
sl1 = slip one stitch over from left needle to right needle without knitting
p.s.s.o. = pass slipped stitch over the loop of the k stitch


the original pattern:

28 Mar 2014

vintage 1948 'Prince Charles' bootie & bonnet pattern


Today we stay in the 40's, with a Royal baby bootie pattern!
It's hard to imagine, but Prince Charles (now age 64 and already a grandfather) was once the long-awaited-for firstborn Royal baby to queen Elizabeth. Just like nowadays with Royal families, it was a hype to watch every step of him and a dream of mothers to copy every piece of clothing he wore for their own baby. Below Elizabeth and the 19-weeks old Charles in an official photo-session (he is wearing an Irish linen and Irish crocheted frock, that was once worn by his mother):


In 1948, a short month after the birth of H.R.H. Prince Charles Philip Arthur George the AWW published a matinee jacket pattern which is told to be the first one baby Charles wore. (if you wonder: the picot edges are crochet) The pattern has larger holes and probably looks more stretched out than the pattern you get when following the instructions. You could use a yarn over instead of knitting 2 stitches in one for a more lace-y appearance, but for the booties it would give less elasticity imo.

"A matinee jacket of this design made by Miss Ada Rates, one of the nannies who made garments for the layette presented to Princess Elizabeth by the British Nursery Nurses Association, was selected to be the little Prince's first jacket. So many inquiries were made about the jacket before the Royal baby was born that directions were made available for other young mothers."
A few months later a  reader designed her own version of a matching bonnet and booties which uses the same stitch to complete the set. The AWW-readers were very happy to complete their own 'royal' set!
   

material & sizing:
The suggested tension is: 7,5sts=1in (30sts=10cm). As usual, I made mine with a fingering weight yarn, metric size 3 needles and a tension of 28 sts to 10cm (7sts=1in) The finished size is 12 cm from heel to toe.


construction:
The construction is bottom-up. The foot is knitted in garter-stitch.
The toe shaping is done by increasing from the middle part of the garther stitch sole. The sides are shaped by using my favorite method: decreasing alongside the instep. This way there is no need to pick up stitches. After 5 repeats of the fancy stitch pattern the top is finished by a short ribbed cuff. The bootie is seemed along the sole and the back.


The toe is softly rounded:
   

modification:
  • for the ribbed edge you need to increase one stitch at the end of the first K2, P2 row (=48 sts)
fancy stitch - error in pattern!


This is why it is handy to test these patterns!
While knitting I discovered an important error: the 'fancy stitch' is instructions are wrong! I took a look at the original article with the matinee jacket pattern and this is definitely the right version:
  • R1: knit
  • R2: purl
  • R3: K1 *K1, M1, K2TOG* K2
  • R4: K2 *K1, M1, K2TOG* K1
(the K1 and K2 at the ends needs to be added because of the total amount of stitches is 47 and one pattern block consists of 4 stitches.)

abbreviations for beginners:
k = knit
p = purl
m1= make one by knitting twice in one stitch
w.fwd = wool forward or yarn over
k 2 tog = knit two stitches together
slip1 = slip one stitch over from left needle to right needle without knitting

the original pattern:
error in instructions of fancy stitch, given at bonnet! for correction see above.