29 Apr 2015

Butterick 6183 top: cutting!


Finally cutting out the pattern pieces!
While watching Project Runway season 11 love that each season has a few designers who are really strong in constructing and draping and come up with the most amazing garments in just a day or two.
The fabric I use is a thin jeans-type fabric with little bows... (the color is darker, it's like in the picture above) The pattern is not really regular or symmetric, so I don't have to match the pieces.

28 Apr 2015

Butterick 6183 pattern adjustments: sleeve + back pieces


Here are the sleeve patterns: original one (on top) and the adjusted one. I have used Nancy Zieman's method to make this adjustment and wrote about it in this blogpost. The nice thing is that both the sleeve hem and the sleevecap remains unchanged while you add width and more room for movement at the armpits.

The back has princess seams. Below are the adjustments I made to the back side pieces. There is a central panel which I simply shortened by cutting at the shorten/lengthen line for the swayback adjustment.
In the pics below you see the back side panel adjustments.
left: I added width at the hem: 1/2 of the seam adjustment below the waistline, tapering to nothing at the waistline. (I did the same at the sides of the center panel as well)
right: finished the swayback adjustment by taking out (1cm) at the center side tapering to nothing to the side seam of the side back panel.


I still need to add extra length at the hem since the pattern length is going to be the finished length of the top.
Haven't decided on the fabric yet, I need to dig into my stash I guess...

24 Apr 2015

Butterick 6183 top muslin part 2 - fitting the back


Fitting the back is hard and is not much fun when you have to do it on your own. It is so much easier to do the fitting on a dress form or someone else!
For now I have to rely on what I see in the pictures and make new pics after each adjustment to see if the fit is improved.

fitting 1
This is the size 10 muslin:


- At first sight you see a snug fit, no ease at the upper back. I already determined that my muslin is a size too small, but the length seems to be good (placing of the apex and waist markings are good)
- There are diagonal wrinkles towards the shoulder - I guess sizing up will sold this problem due to more ease across shoulder blades. If it was a sleeveless top I'd do a forward shoulder adjustment as well, but for a top with sleeves I think it is not necessary.
- Looking at the pictures, what's more interesting is the waistline. There are horizontal fold wrinkles at the waistline. What you also see (especially from the side) is that the back hem is raised. Fold wrinkles means there is excess fabric. At first sight you'd think it is a swayback problem, right? But: this could be a sign of a too tight fit across the hips. Probably the combination of both.
To check this I decided to open up the back seams from the waistline down.

fitting 2.


- The back looks much more relaxed with the seams open and wrinkles are gone! More room in the hips is definitely part of the wrinkle-problem. It would be easier to deal with this if the finished measurements were printed somewhere on the envelope or the pattern pieces...now I have no idea how much ease is built in...
- I marked the waistline and another thing I notice is that the waistline marking (black line at the back) is sloping downwards. (note: the line at the front is not the waistline but the lengthen/shorten line of the pattern):


The waistline needs to be 'lifted', which means that my back waist length is shorter than the pattern's. This is a swayback adjustment.You can see here that the side seam is pretty much vertical, so I only need to add width at the back.
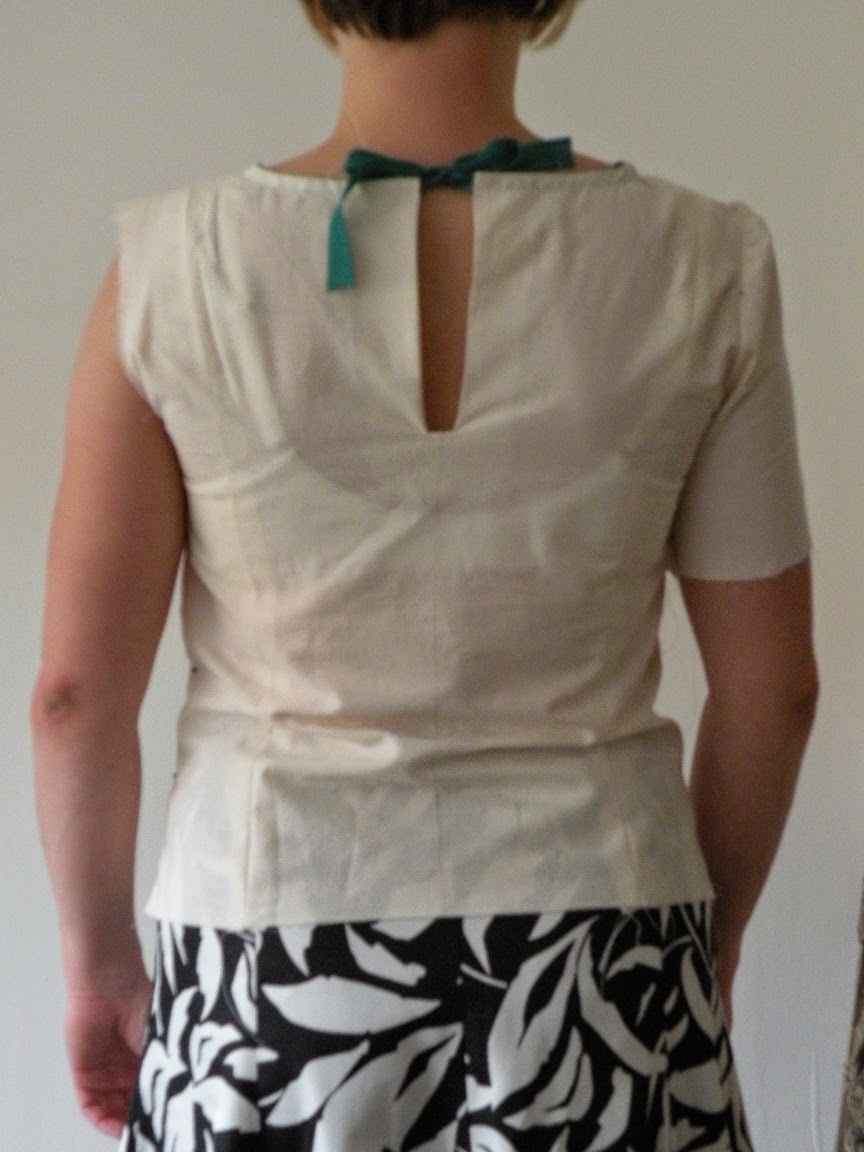

fitting 3.
alterations done:
- Pinched out 1 cm at the center back for swayback adjustment, tapered to nothing at the side panels
- closed the side seams, added 1x seam allowance at both seams


- the fit at the hemline seems to be fine now, even when wearing a jeans underneath
- the waistline sits at the right place and looks horizontal:


I'm happy with how the top looks now and not going to make another muslin. I'm going to transfer all the adjustments to the pattern pieces.

pattern adjustments to do:
- add 3 cm length at hemline
- alter sleevecap by adding width (2x1cm)
- cut size larger pattern pieces (probably need to shorten the bodice pieces a tad to keep placing the waistline at the same height)
- add width at the hips in the back (3 cm at hemline tapering to nothing at waistline)
- do a minimal swayback adjustment (raise waistline by 1 cm)

22 Apr 2015

Butterick 6183 top muslin - part 1


So, here is the muslin!
I must say, despite the amount of pattern pieces (4 front, 3 back + sleeves) this came together rather quickly.

sizing:
This pattern comes with pattern pieces for different cup sizes which is great, since in the past I was fine with the standard sizing and have never done a full bust adjustment. After checking the pattern instructions I calculated my 'new' bust size...which turned out to be the largest one, a d-cup.
I haven't really found the finished garment measurements so I thought I'd go with size 10, which with a semi-sitted garment fits most of the time, with just minor adjustments.

So, here is how it should look:


fitting:


  • the size 10 shoulder width looks perfect
  • the choice of the largest cup size was good (though size 10 is too tight)
  • the waistline sits at the right height and I like the fact it doesn't look too loose around the waist
  • I'd like to have this length for the finished length so I need to add extra length for hemming
  • if I want the top to be somewhat fitted around the waist with this bust size, I need to put a side zipper in (I've already left one side of the muslin open)
-
  • there are horizontal/diagonal wrinkles at the (finished) sleeve side of the yoke. The yoke is a tad too tight at the bottom seamline, so I need to go for a size larger there
  • obviously, the fit across the bust is too snug, I need to size up that as well. Note: the apex marking is sitting at the right height but not at the right place. (The seams are sitting at the right apex placing) 
  • the area below the bust in the front is slightly 'baggy'. Now baggy-ness is always caused by too much fabric. I could pinch a bit out along the seamlines, which would make the fit under the busts better. This can be done when assembling the top so I don't need to change that on the pattern pieces yet.
  • the sleeve width needs adjustment, just like I did on my Simplicity blouse (you see the wrinkles when I lift my arm up)

  • horizontal wrinkles at the lower back --> more about that next time!
  • also the tightness at the upper back will be better with the size 12 pattern pieces:


pattern adjustments to do:
- trace a size larger (size 12) pattern pieces
(there is enough ease in the sleeve cap, so this change will not affect the fit)
- adjust sleeve width by adding a total of 2 cm (I think this is necessary, even if the sleeve is going to be a size larger) I have used Nancy Zieman's method and wrote about it in this blogpost

Pretty straight forward, right?  Next post is all about the back. I keep you posted!

20 Apr 2015

currently obsessed with: Butterick 6183 top


Okay, here is the problem: because of breastfeeding I sadly can't wear any of my fitted blouses and tops. After the 9 long months of pregnancy I was anxiously waiting to be able to wear 'normal' clothes again. Though my normal b-cup size didn't grow larger than a small d-cup it is apparently enough to leave me with next to nothing to wear...except t-shirts (again, sigh) of course...
Lately I'm attracted to the minimalist trend and often wear a plain V-neck t-shirt with jeans. I am in desperate need of new, more 'dressed' stuff which I also can wear later (hopefully with my 'regular', smaller boobs, once I stop breastfeeding) Tops which go with jeans and skirts as well. The last item I made for myself was a retro, 40's blouse for the 'Sew for Victory' challenge, a year ago, just before I got pregnant. Ever since I've been sewing all kinds of practical things for the nursery but no garments at all.

I guess my biggest problem is that I really don't feel like myself, I really do not 'feel' this new-larger-boobs silhouette of mine. Trying to keep things simple right now. I know shaping below the bust is important, so really loose fitting items would end up looking boxy.
I think this top, which is part of the new Lisette capsule collection for Butterick really stands out.
What I like about is:
- the length (not too long)
- the flattering rounded neckline (not too low and not too high)
- the graphic lines
- the loosely fitted shape
- and of course the fact that the pattern comes with different cup sizes. Thank God, the (full) bust adjustment is already done here!

Unfortunately it took a while (like months after the US release!) before the pattern was available here in the Netherlands. Well, finally it came out last week and I bought it right away. I'm already dreaming of sewing it in different fabrics: clean and simple in crisp cotton or dupion silk, in pretty lace, maybe denim or even in a double knit, uni color or color blocking (more fabric inspiration from the Lisette pattern site here)


With such a simple silhouette having a perfect fit is essential. Here comes my favorite part: making a muslins!!! The shoulder width and the length both have to be perfect. To prevent a 'boxy' look I already know I have to do a swayback adjustment. (Hate fitting the back seams by myself!) I wonder how it is going to look with larger boobs... I can see some problems in that area as well.
Before you think I'm about to add yet another UFO-project to the pile, I have already managed to cut and sew a muslin! Stay tuned!

17 Apr 2015

Knitting inspiration: book with traditional Dutch fishermen's sweaters


This book has been on my wishlist for a long time. Finally it was on sale and I decided to buy it!
From 1880's until the 1950's dutch fishermen used to wear knitted sweaters (ganseys) for everyday work. The patterns were different in each village and were mainly made up from knit/purl stitches (my favorite type!). This had an economical reason: it took less yarn to knit than knitting cable patterns. The sweaters were knitted in the round up until the armholes and the sleeves were knitted from the shoulders down. This made reparations easier, the damaged underarms and cuffs could be re-knitted.
The patterns weren't written down (as many people couldn't write back in those days) the knitters memorized them as they learned from their mothers. Every village had it's 'own' patterns, probably because the women copied each others work and knitted what they liked.


The author collected old photographs of fishermen, often portrayed with their families. Based on the pictures she figured out how the original stitches looked like and reproduced the patterns. The book contains about 60 patterns from 40 different Dutch coastal villages. The book contains not only patterns to knit these sweaters but also history, stories of everyday life of the fishermen at sea and at home and a lot of old pictures.
Good news: there is a second book in the make with more fishermen's ganseys:


The wool that is used to make these traditional knits was produced again by the name 'Zuiderzee' by the dutch brand Scheepjeswol. It is a worsted/sport weight yarn:
100 grams=200 meters (metric needle 4,5-5)
19 sts and 24 rows = 10x10 cm

The original colors were blue, navy, anthracite and natural wool color.
It is easy to replace it with wool by any other brand: I'd use the drops 'Karisma' which I also used to knit my baby blankets. It has exactly the same length per 100g, though I'd knit it with a smaller needle to prevent stretching. The denim blue would make a perfect fishermen's sweater!

For more interesting information on the history of (English) ganseys click here

15 Apr 2015

My top 3 breastfeeding essentials


Well, breastfeeding was no fun in during the first weeks, I had sore, cracked nipples and we couldn't manage anything even close to a perfect latch. Using a nipple shield made things even worse. The pain remained and our little guy couldn't latch on without that thing. I tried and I we both cried but we pushed through. After 6 weeks of nursing with pain things got better and since week 8 everything goes great!
I guess when it comes to breastfeeding you have to be determined instead of just 'trying' to breastfeed your baby. Sadly, in our society is formula the new 'normal' and people often find the idea of breastfeeding something weird...
Anyway, I'm planning to go continue at least for the first year.
  • H&M nursing top
During the first weeks of nursing I was wearing a nursing bra at night and hated it (you just shouldn't sleep with a bra on). Now I wear this top instead of and it is really comfy. It comes in a 2-pack, white and black colors. Even if you aren't sure you want to continue breastfeeding these tops are a better investment than a nursing bra.
  • manual breast pump
Though I have an electric pump, I reach for this one quite often. It is really easy to use and works great! I have a second hand Philips Avent 'Isis' (this an older one, now discontinued and replaced by the 'Manual Comfort'). It is safe to buy a second hand manual pump because every part can be cleaned and sterilized.
  • reusable silicone nursing pads
I have 'Lilypadz' and wear it with a regular nursing bra instead of a padded one (somehow I'm unable to find a padded one that fits). No nipples visible under a t-shirt. Great!

13 Apr 2015

vintage crochet and knitting inspiration


A while ago I was gifted a collection of old knitting and crochet magazines. The Hungarian 'Furge Ujjak' (='Quick Vingers') magazine was the first one promoting crochet, knitting and embroidery projects in the country. The first edition appeared in march 1957.
When I was a child my grandma used to buy the magazine every month. That was back in the 80's and the main focus was on garment knitting projects and fashionable use of traditional embroidery on garments.
When the magazine started in the 50's the main focus was on crocheting: they offered countless patterns for doilies, traycloths, tablecloths, crochet gloves and edgings with an amazing variation of different techniques, like Irish crochet, Bruges crochet (like above on the first cover), clones lace crochet and many more.
Each month they included a few knitted garments as well, embroidery projects, a few short stories and recipes. There are interesting projects as well, like knitted doilies and 3d shaped crochet items stiffened with sugar-water.


Now how pretty is this one, named 'Granny's lace':

7 Apr 2015

nursery diy: crochet letter flags


I've been planning to make this one for a long time but eventually was gifted by a friend of mine. The flag-line is consisting of basic, freehand granny squares with the letters embroidered in a contrasting color. Pretty, isn't?

3 Apr 2015

diy: crib sheet with crochet edging - crochet pattern from 1965


I was looking for a pretty crochet edging to decorate one of the sheets for the family-crib. Here in the Netherlands you are supposed to use a well fitted sheet for your matress and a cotton baby blanket in combination with an upper sheet. The upper sheet is 75x100 cm and usually has some type of decoration on one of the edges which you can fold back over the blanket. The decoration can be a printed fabric stroke, embroidery, stripes of satin or lace...


Nicely decorated and better quality baby crib sheets costs around 20-25 euro's. My crib sheets are made out of a new, fine sateen-woven cotton 'GASPA' sheet from IKEA which was the wrong size for our bed (160x200cm). It was a little less than 20 euro's. The standard size is 75x100 cm, I've cut 4 of mine.
The crochet edging pattern I used is from an 1965 Australian Women's Weekly.
What I like about it is that you crochet one half circle at the time, so you can adjust the length as you go. There is no need to start with an certain amount of chains.

I used a metric size 2.5 needle, since I wanted a bit of structure instead of a really fine lace. 

the original pattern:

When crocheting it seems like every other half-circle turns upside down, like one is facing the right and every other facing the wrong side of the work. when blocking/steaming you need to turn them back in the normal position and everything will look right.


After finishing crocheting the right length I added an extra row at the top to make easier to sew it to the sheet. I used a simple pattern I made up:


- turn at the end with 4 ch (this will replace the first dc and 1 chain),
3 dc into space below, 1 ch, 3 dc into space below, 1 ch, 1 dc between two half circles *1 ch, 3 dc into space below, 1 ch, 3 dc into space below, 1 ch, 1 dc between two half circles*
- repeat between **