
Showing posts with label seam finish. Show all posts
Showing posts with label seam finish. Show all posts
8 Jun 2012
Seam finishing
I often have the problem that I don't want to use zigzag stitch to finish the fabric edges. Double folded cotton seam binding or satin tape works well for somewhat thicker fabrics but doesn't work for fine fabrics like cotton or linen.
There is a great tutorial on the Lilacs and Lace blog here about seam finishing with a rayon seam binding. This seems to be fine and delicate and won't make the seams heavy and stiff.
I still have to look around here in the Netherlands for the 'Hug Snug' rayon tape. Anyone experience with it?
17 Mar 2012
Stretch stitches for edge finishing of knits
I don't have much experience with stretch stitches other than the simple zigzag stitch. Since I want to finish my Renfrew top I wanted to try a few other stitches on my new sewing machine.
These are the 'advanced' stretch stitches on my machine. I don't like number 11 that much, the results with nr. 12 look better:

Number 09 is a variation on the classic zigzag, also known as tricot-stitch or multi-zigzag stitch:

Number 10 is my favorite, a combination of a straight and a zigzag stitc. Because the straight stitches there is stretch in your seam and the zigzag finishes the raw edges while sewing:

Number 12 is a sort of imitation of the overlock stitch, which is also stretchy and gives a neat edge finishing. Warning: this one uses a lot of thread!

Here is a little stretch test for comparison:


I used a 'walking foot' because I found that the knit fabric was stretched too much with the regular foot. This resulted in wavy seams, not handy on clothing. The walking foot is designed to help with the transport of multiple layers of fabrics. It does this by helping with the transport of the upper layer of the fabric, the feed dogs in it move simultaneously with the machine's feed dogs. Here is the walking foot in action.
EDIT: Added here a close up of the walking foot (yes, the white box at the back is also part of the foot):

1. The fabric is held down before the needle goes down:

2. The transport part is lifted up (and makes a step forward) when the needle is down:

Another option could be the 'tricot-foot' which I don't have (yet).
This one is made for the same purpose: even feding the faric layers, especially for thin layers and slippery fabrics. It works differently, there is a small piece of rubber (blue) under the foot that helds the fabric down when the stitch is made and releases when the transport feet move. According to some reviews on the internet it should be working just as fine for knits as the walking foot:

These are the 'advanced' stretch stitches on my machine. I don't like number 11 that much, the results with nr. 12 look better:
Number 09 is a variation on the classic zigzag, also known as tricot-stitch or multi-zigzag stitch:
Number 10 is my favorite, a combination of a straight and a zigzag stitc. Because the straight stitches there is stretch in your seam and the zigzag finishes the raw edges while sewing:
Number 12 is a sort of imitation of the overlock stitch, which is also stretchy and gives a neat edge finishing. Warning: this one uses a lot of thread!
Here is a little stretch test for comparison:
I used a 'walking foot' because I found that the knit fabric was stretched too much with the regular foot. This resulted in wavy seams, not handy on clothing. The walking foot is designed to help with the transport of multiple layers of fabrics. It does this by helping with the transport of the upper layer of the fabric, the feed dogs in it move simultaneously with the machine's feed dogs. Here is the walking foot in action.
EDIT: Added here a close up of the walking foot (yes, the white box at the back is also part of the foot):
1. The fabric is held down before the needle goes down:
2. The transport part is lifted up (and makes a step forward) when the needle is down:
Another option could be the 'tricot-foot' which I don't have (yet).
This one is made for the same purpose: even feding the faric layers, especially for thin layers and slippery fabrics. It works differently, there is a small piece of rubber (blue) under the foot that helds the fabric down when the stitch is made and releases when the transport feet move. According to some reviews on the internet it should be working just as fine for knits as the walking foot:
20 Oct 2011
Finishing the hem with bias tape
How to finish a hem if you don't have a dress form?
Having a dress form can certainly come handy if you are at the last phase of making a garment, the hem finishing. It makes the measuring easier. I don't have a dress form, but I figured out a way to get the hemming right very quick and accurate. I like my skirts just falling on/above the knee.
I like to finish a hem with a contrasting color bias tape or ribbon. On my blue dress I used a dark blue bias tape, since the shop run out of the pale pink one I started with (isn't it ridiculous?)
How to get the length right?
- I pin the seam allowance of the hem in place
- I put the dress/skirt on and adjust the hem seam allowance one side of the dress in front of a mirror (just with a few pins)
- I take the dress off and measure how long the skirt should be at the mid front, mid back and at the sides (For me it is usually 1 cm shorter at the mid front than at the sides and back)
- I pin the hem again, measuring at every 10 cm from the waist down
- I put the dress on and check if the front and the back length are even and the right and left side are even
- Take the dress off again
Bias tape finishing:
- I press the hem from the wrong side of the skirt (with the pins in place)
- I remove the pins and cut the excess fabric, leaving 2 cm from the fold:


- Catch-stitch the bias tape:


This leaves small dots of thread on the right side of the fabric, practically invisible from a distance, but I really like the way it looks:

Having a dress form can certainly come handy if you are at the last phase of making a garment, the hem finishing. It makes the measuring easier. I don't have a dress form, but I figured out a way to get the hemming right very quick and accurate. I like my skirts just falling on/above the knee.
I like to finish a hem with a contrasting color bias tape or ribbon. On my blue dress I used a dark blue bias tape, since the shop run out of the pale pink one I started with (isn't it ridiculous?)
How to get the length right?
- I pin the seam allowance of the hem in place
- I put the dress/skirt on and adjust the hem seam allowance one side of the dress in front of a mirror (just with a few pins)
- I take the dress off and measure how long the skirt should be at the mid front, mid back and at the sides (For me it is usually 1 cm shorter at the mid front than at the sides and back)
- I pin the hem again, measuring at every 10 cm from the waist down
- I put the dress on and check if the front and the back length are even and the right and left side are even
- Take the dress off again
Bias tape finishing:
- I press the hem from the wrong side of the skirt (with the pins in place)
- I remove the pins and cut the excess fabric, leaving 2 cm from the fold:
- I sew the bias tape with the usual seam allowance of 1.5 cm (5/8''), placing the bias tape with the right side to the right side of the skirt:
- Cut 1/2 of the excess fabric (0.6 cm=1/4''):
- Fold the hem and press again:
- Catch-stitch the bias tape:
This leaves small dots of thread on the right side of the fabric, practically invisible from a distance, but I really like the way it looks:
11 Oct 2011

9 Oct 2011
Seam finishing on the Burda dress

I need to finish this dress because I want to wear it to an event next wednesday. I think I can get it ready in time since the next 2 days I'm off from work.
Things to do:
- assemble the skirt
- attach it to the bodice
- insert the invisible zipper
- make the collar
- finish the seams
I already started with finishing the seams. Because I didn't want to line the Burda dress and the fabric ravels like crazy I decided to use 'Hong-Kong binding'. The hong-Kong binding looks really neat and the seams don't get bulky either. Usually, finishing the seams is my least favorite part of sewing but now I really enjoy it. Probably because the results are so satisfying...
I used a contrasting color bias band (of course!). This time I choose pale pink. I also used it for finishing the sleeves. The sleeves have small cuffs and I really needed to cover up the raw edges without getting all the layers bulky.
"The Hong Kong binding seam finish encloses the raw edges of the seams inside strips of bias. Both sides of the seam require two passes to sew the bias, and because it is so labor-intensive, it is mostly used in very high-end clothes. This method is especially suitable for heavy fabrics and for summer garments that you wouldn’t want to line."
Description from Burdastyle
The steps:
1. sew bias band on the right side of the seam allowance, with raw edges matched.
2. turn the bias strip over and press the seamline
3. wrap the binding around seamline and pin in place
4. stitch from the right side at the line where the fabric and the bias band meets (your stitches will be 'invisible')
5. trim excess from wrong side

15 Sept 2011
Skirt - finishing the waistband and the hem
I'm planning to finish the skirt today!
I didn't make a muslin for the skirt because I thought that fitting problems could easily be solved here. The fit wasn't great here, it was okay on the hips but way to big above that:
So I decided to place darts both in the front and the back. The fit is already better with the back darts here:

I used the leftover fabric from my Butterfly garden dress for the facing. I love the contrasting colours! The zipper isn't inserted yet:

Understitching on the inside:

I stitched the upper part and the sides of the facing (right side on the right side of the skirt) and then turned it back. Now I have to topstitch on the right side:

The inside after the topstitching:

Since I have an old sewing machine there is no buttonhole making program on it. I had to experiment a bit to get it right by using zigzag stitch. The try-out buttonholes are not so pretty:

And here they are! They aren't perfect, but work just fine! I marked the place of the buttonholes with a contrasting colored thread first.


Since the facing of the waistband is bright colored I decided to use a contrasting colored bias band on the hem. The combination of dark green - pink fascinates me somehow!
I didn't make a muslin for the skirt because I thought that fitting problems could easily be solved here. The fit wasn't great here, it was okay on the hips but way to big above that:
So I decided to place darts both in the front and the back. The fit is already better with the back darts here:
I used the leftover fabric from my Butterfly garden dress for the facing. I love the contrasting colours! The zipper isn't inserted yet:
Understitching on the inside:
I stitched the upper part and the sides of the facing (right side on the right side of the skirt) and then turned it back. Now I have to topstitch on the right side:
The inside after the topstitching:
Since I have an old sewing machine there is no buttonhole making program on it. I had to experiment a bit to get it right by using zigzag stitch. The try-out buttonholes are not so pretty:
And here they are! They aren't perfect, but work just fine! I marked the place of the buttonholes with a contrasting colored thread first.
Since the facing of the waistband is bright colored I decided to use a contrasting colored bias band on the hem. The combination of dark green - pink fascinates me somehow!
(I used plain zigzag stitch to finish the other seams. Just because the fabric is too thick and didn't want to add more stiffness.)


1 Sept 2011


7 Aug 2011
Details on the maxi dress
After reading the Sewaholic sewalong post about stay tape I decided to reinforce the sides. I've got the one that you can iron on the fabric, there's no need to stitch it:
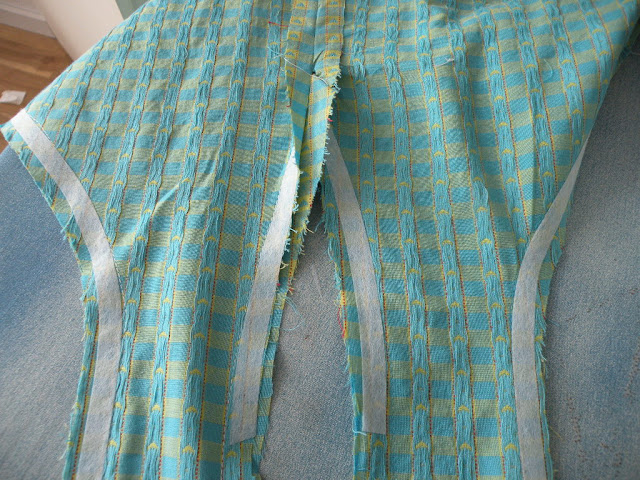
Matching the pattern on a side seam:

Matching the stripes. The seam finishing is the same as on my ' Butterfly garden' dress:

On the side seams tried to match the horizontal blue lines. You can't match the pieces everywhere because of the different grainline (picture on the left) The front and back skirt seam is matched both horizontally as vertically (picture on the right)


Making the loops. I find it easier to press the seams before turning them right side out, that way the seams stay open on the inside:


I pinned the pockets to match the stripes:


I've finished the lower edge of the pockets with a bias band (this fabric is really a horror to work with!)


Matching the pattern on a side seam:
Matching the stripes. The seam finishing is the same as on my ' Butterfly garden' dress:
On the side seams tried to match the horizontal blue lines. You can't match the pieces everywhere because of the different grainline (picture on the left) The front and back skirt seam is matched both horizontally as vertically (picture on the right)
Making the loops. I find it easier to press the seams before turning them right side out, that way the seams stay open on the inside:
I pinned the pockets to match the stripes:
I've finished the lower edge of the pockets with a bias band (this fabric is really a horror to work with!)
Subscribe to:
Posts (Atom)