Showing posts with label StripeJumper. Show all posts

1 Feb 2014

1945 Top Honors jumper - proper pics at last!


I've realized that somehow I missed out on making proper pics of my finished Top Honors jumper (which is one of my favorites to wear right now!) So here they are! You find the project posts here.


Here is one more picture of the finished closure of the back neckline:

13 Dec 2013

Top Honours jumper reveal!

edit: 
I finally managed to take proper pic of my finished jumper.
You can find them HERE.
total amount of yarn used: 290g (little less than 6 skeins of drops baby merino)


Hi everyone, a really quick and short post before the upcoming busy days, of moving in our new home.
I still have to make proper pics of my finished jumper, but don't have the time to do that these days. Here are two quick snapshots of my new favorite jumper which I've already worn one time, combined with a black skirt, thighs and pumps. As you see I didn't use any vintage styling.
The fit of the jumper is just as great as I expected and the finished texture is smooth and elastic like a good quality double knit fabric would be. The drops baby merino is definitely my favorite yarn to knit with!
Coming up: more pics and the pattern modifications I made, of course.

3 Dec 2013

Top Honours jumper: 4. Neckline tricks


Finishing the neckline is almost always the last step in the knitting process. While the neckline of the Phillipa jumper is finished with a crochet edge the Top Honours jumper has a classic rib finish. While it seems easy there are a number of tricks that makes your neckline look prettier. Because I wanted the grey color closest to my face I used that for the neck band (the waist and sleeve ribbings are blue)

1. picking up stitches
Usually the pattern instructions tell you how many stitches you need to pick up along the neckline. Then you should divide both the numbers as the neckline in even amounts, place stitchmarkers and pick up the amount of stitches  distributed evenly between your markers. So what's wrong with that? Basically nothing, but in my opinion it is almost impossible, plus time-consuming to distribute the stitches evenly.
I prefer another method, which is picking up more stitches and reducing the amount in the first round. This way you don't end up with gaping holes and you get a prettier, smoother curve. I picked up every stitch evenly and corrected the amount in the first row by knitting (or purling according to pattern) together every 4th and 5th stitch. This methoprevents a stretched-out look too.

As you can see there were quite a few stitches!

Try to keep the same distance all around, also on the diagonal sides:


To prevent a really high closing neckline I reduced the width of the ribbing.

2. casting off
It is important to cast off very loosely! (=a trial & error experience)
Even when you don't need to stretch the neckline out to pull it over your head, tightly cast off stitches can deform the shape of the finished neckline.


3. how-to: finish with a button loop
I choose a decorative button to finish the ribbed edge and used press studs for the opening (trying not to disturb the pattern). Attach the button at the inner edge of your button band underlayment. A small silver colored rose looks great on the blue- and grey tones:
   

I finished castig off the ribbing at the side where I wanted to have the button loop. The ribbing pulls a bit inwards (left pic) so I filled that up with a row of double crochet (right):
   

Secure the last stitch with a slipstitch to make a neat and straight edge:
   

Make a chain loop for your button:
   

check that your loop is not too tight and not too loose before finishing the loop:
   

Previous posts about the making of this jumper: 
1. introduction 
2. pattern chart and pattern diagram 
3. sleeve caps + my modification: back neck opening

25 Nov 2013

Top honours jumper: 3. sleeve cap + modification: back neck opening


Hello everyone, let's start this week with a post on the progress of my Top Honours jumper! I still manage to knit between the skirt-sewing project and th e house-project...


When reading the instructions I was surprised to find that there was no extra opening besides the quite small neck opening. Could it be an error or was it supposed to be like that? Anyway, I decided to add a back opening, just like the Phillipa's to avoid stretching up the neck opening every time I put the jumper on and off.
With the calculations I made I ended up between two pattern units, with a slipstitch in the middle. Since an edge with slipstitches wouldn't be stable I divided the pattern by adding my underlayment next to that. Added 4 stitches for an underlayment just like on my Phillipa jumper here. (I'm planning to use press-studs because of the busy pattern and just one, pretty button on top.


this is how it looks from the right side and the wrong side:
   

shoulder seam:
When attaching the sleeves you need to match the stripes, up until the last 2 on the diagonal line. Then top square part needs to be shirred before attaching:


A quick fitting in the bathroom - I hate bathroom-pics, but can you tell I'm happy with the fit?


Previous posts about the making of this jumper:
1. introduction 
2. pattern chart and pattern diagram 

13 Nov 2013

Top Honours jumper: 2. Pattern chart and pattern diagram


Past week I've lost myself in working in the new house, painting the stairs and forgot didn't pay attention to make the necessary drawings for the blog. But here they are, the pattern diagram and pattern chart for my Top Honours jumper!
note: 
I have a different approach to this pattern because I learned my lessons when knitting my first jumper. This means that I already know how to make the jumper fit correctly and make small adjustments in shaping as I go.
Click here to go to the Phillipa jumper series.

pattern diagram
So, regarding the general shape the main difference between my first Phillipa jumper and this one is the shape of the sleeves and the waistline ribbing.
Left Top Honours, right Phillipa:
   

When looking at the original picture this jumper starts with the same amount of stitches after the ribbing and increases above that while the Phillipa makes a first series of increases in the last row of ribbing. I liked the little blousiness of my finished Phillippa better and decided to adapt that. In fact, I even adapted the stitch-count of the Phillippa to achieve a zero ease.


Below the Phillipa sleeve and the Top Honours sleeve next to each other. Notice that the sleeve caps look quite different. While the Phillipa has more fullness and uses pleats the Top Honours has a small square shaped extension, which gathered results in smaller, 'uprising' shoulders:


pattern chart
Again, there was no visual pattern chart, only written instructions.
While by looking at the original picture you see 'scalloped' rows, the pattern is formed by straight rows with slipstitces. Quite different, ha?


Because the repeating pattern of the slipstitches it is important to think of how you place them across the yoke and the sleeves. You might need to adjust your stitch-count to that. The pattern itself is shaped by 3 K stitches with a Sl.stitch on each side. Let's take a look at the visual chart:


1st row: K1 *SL1, K3* SL1, K1
2nd row: P1, SL1 *P3, SL1* P1
3rd row: K
4th row: P
Continue in pattern in contrasting color and repeat the 4 rows above.
These 8 rows complete the yoke pattern.
(Twist the different color yarns at the beginning of the K rows)

Are you not familial with pattern charts? click here to read more!

how to make the pattern look symmetrical
When reading the instructions you see that one pattern unit (this is the repeating part between the stars) is made up by one slip stitch and the next 3 sts (this makes a total of 4 sts). To make the pattern look symmetric I made sure to end with a slipstitch plus an extra stitch next to that at the beginning and the end of the row across the yoke. 
Since I learned from the process of knitting the Phillippa jumper I knew how many stitches to use for a good fit. Now I had to make sure the yoke looked symmetrical after finishing the armhole decrease (adapted that too from the Phillipa pattern)

How to calculate:
1. start with the amount of stitches you need for a good fit. 
2. distract the amount of stitches used for the armhole shaping (remember, you decrease for armhole shaping on both sides!) 
3. what is left is the amount of stitches for the yoke
4. to make the yoke look symmetrical distract 3 from the total amount of your yoke stitches and then divide that number by 4.
5. you need to round up or down a few stitches to the closest match. One or two stitches more or less doesn't matter that much in the fit but do in the looks.

why calculate so much?
Now, why should you spend time on re-counting and calculating all of the pattern stitches?
If you follow every written original pattern instructions you will not always end up with a garment you like. As you might know by now, I am quite picky about small details, like the finishing touches or symmetry.
To show you the result when you do your stitch count correctly here is a picture of the sleeve seam. The seam is almost invisible and I like that!
To achieve this I made sure to start with an extra stitch before the first pattern unit but didn't end with the slipstitch and the extra stitch at the end. That way when sewing the pieces together there is one slipstitch next to the seam which makes the pattern look continue all around: 

If you have any questions, please leave a comment!

Next time more about the back neckline opening and the sleeves (you need to calculate the amount of rows as well to make sure the pattern of the yoke continues across the sleeves correctly)

Previous posts about the making of this jumper: 
1. introduction 

4 Nov 2013

1945 Top Honours jumper: 1. introduction


As promised, here is the next WW2 jumper project. I'd like to show you that there are a lot of free online resources for knitting patterns, so this one is not from the AWW like the Phillipa was.
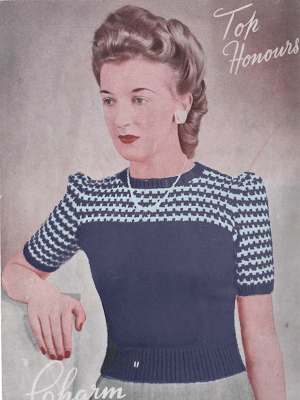
This jumper pattern was published in a 'Charm' knitting booklet. I spotted it online and liked the simple but decorative yoke pattern. Actually, I don't know if this pattern is really from 1945 but by the end of the war patterns often had names referring to  the victory. Also the hairstyle of the models and the smaller shoulder lines suggest this was a pattern from the end of the WW2 years. Think of the Phillipa jumper: the 1940's started with significantly wider shoulder lines and puffy sleeves supported by quite large shoulder pads.

choosing a pattern for the yarn
The yarn I choose is a fingering-weight merino yarn: 'Drops Baby Merino' turquoise which I also used for the Lace gloves.
I mail ordered this yarn and it turned out to be quite bright. First I planned to make a lace patterned jumper but I thought this bold color wouldn't really suit a sweet and delicate looking pattern. I decided that the bright teal needed another color to tone it down a bit. I choose a dark grey shade of the same yarn: left turquoise (color 32) right dark gray (color nr 20):


Now I only needed a two colored jumper pattern. First I was thinking of making thin stripes in combination with a plain yoke, but then I found this 'Top honours' jumper pattern on the internet. Smaller puff in the sleeves and again a simple but decorative yoke pattern.
did you know that...
often, we don't realize how much old color pictures fade! Don't be fooled, according the pattern description the original colors were navy and light blue though the original pictures faded to some kind of greyish-khaki and cream.
Below I Photoshopped the picture and enchanced colors. This is how the original picture must look like. Much better, right?


A mental note: always read a pattern description carefully instead of jumping right into it. Since I had enough of the bright teal I decided to use that as the main color and anthracite grey instead of the light blue.

In the detailed Phillipa series I discussed a lot of the essential steps on how to knit successfully from a vintage pattern. In the next few posts more on the pattern-specific decisions and how to 'mould' a pattern to make the finished garment fit perfectly. In other words, let's put to the test what I've learned when knitting the Phillipa!