Showing posts with label refashion. Show all posts

12 Apr 2013

How to shorten a pair of jeans the right way - tutorial


This might be not an exciting post for someone who is used to do this on a regular basis but I'm sure beginners will appreciate it. And by the 'right way' I mean: as opposed to how my BF's mom does it. Scroll down for a picture...

I've read about this method somewhere in the early 90's  in a magazine. The idea was to cut the original hem off and reattach it again. I must say, didn't used for myself that much but I've found it really handy to shorten my BF's jeans this way. Sometimes it's hard to find the right width/length combination or you buy a pair of pretty jeans on sale with the wrong length.

But, some pants are made extra long for a purpose. Why?
Especially designer jeans, but also cheaper, workwear jeans (like the one below) usually come with just one, standard length. The reason is that they produce only one length for one waist size, because they expect that you want to have perfectly fitted clothes an have the pants altered to your special measurements. If you pay a lot of money to buy those expensive designer jeans they always offer a service to alter it to your measurements. However, usually they won't do that with workwear...
Nowadays, we aren't used to that anymore, so ready-to-wear jeans fabricants offer one waist size in several lengths. The idea is: you just pick up the right length an go. If it fits approximately it should be good enough.
The good news: it's easy to fix!

So why don't we just chop off the hem of a pair of jeans?
- To sew a pair of jeans they use a thick thread, often in very special shades which you can't find on the market. There are probably similar colors but the thread would be too thin. And why would you bother to buy thread just to hem one pair of jeans anyway?
- Another reason is, especially with faded or distressed jeans the hem is often part of the design. They assemble the jeans first before adding design elements of fading or distressing the fabric. If you look at the jeans below on the left, you see that this finish can't be reproduced at home.


Below is what you definitely don't want to end up with!!!
There is one thing left, you need to 'recycle' the original hem somehow.


The method below is what works for me, it's quick and easy. Important is that the width of the original hem is about the same width as the new hem, so it works only for straight legged jeans. (And for children's trousers as well.)
I used white thread for the demonstration, but for a really neat finish I'd choose dark blue or other color similar to the color of the jeans.

1. Measure and mark the desired length you want to remove.
Fold the hems up like below. What you see of the wrong side of the fabric is 1/2 of the the total length you are going to remove (black line)

Important!
The original hem is going to be folded down at the end so it adds some extra length, but most of the time this is not that much.
If you have a wide hem or just want to work perfect, you could subtract the width of it from the total to-be-removed length first and then divide that amount by 2. (That would be then your black line below)

For example:
- want to shorten jeans total by 3 inches
- have an original hem that is 1/2 inches wide
That would be:
3 - 1/2 = 2 1/2   and then: 2 1/2 : 2 = 1 1/4
My folded wrong side (black line) would measure 1 1/4 inches


Press well. You could pin it as well, but for me pressing with steam works fine:


2. With a small stitch length (I use about 2.5) stitch as close as possible next to  the original hemline on the wrong side. Match the side seams carefully like below:
 

This is what it looks like from the right side:


3. Trim the excess fabric. I usually leave as much seam allowance as the original side seams use:
 

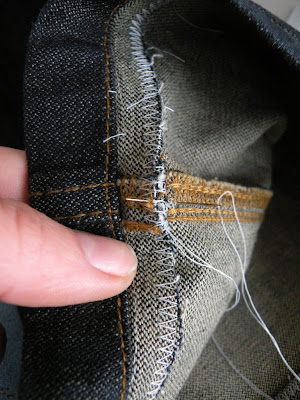
4. Finish the seam allowance. I use a wide zigzag stitch (length 1.0-1.5 and a width of 5, this is the max on my sewingmachine)
Repeat the same for the other hem.
 

5. Turn the hem back.  Press & steam well, with the seam allowance facing upwards on the inside:


6. I secure the inside along the side seams with a few stitches. I found this way it stays better in place and won't roll back when washed:
  

This is how the finished hemline will look like after you have recycled the original hem:
 

10 Apr 2013

Actually sewed something! Boyfriend jeans refashion


before & after

Well, actually it was not really sewing something from scratch, but after watching the British Sewing Bee contest I felt like I had to sew something. Anything. So decided to refashion something for quick results.

Boyfriend jeans have been around for almost a year now. They look great with a short, fitted jacket and must-have heels or ankle boots for the cold days.
I prefer this year's 'new' version of the BF jeans: the 'slim' one. These look less baggy, like Jennifer Aniston's or Gwen Stefani's below.
According to my internet research these jeans are:
- slouchy yet feminine
- have a relaxed fit
- have tapered legs
(I don't prefer the distressed patches)
 

The tapered legs form a huge problem for someone with quite muscular calves like myself. Usually all those jeans that are sitting a bit comfortable around my calves (not even talking about a loose fit!) are quite saggy looking above the knees an certainly not fitting around the waist.

So I turned to my BF's closet and pulled out a pair of quite expensive Versace jeans which were hidden there for about 7 years. (He used to spend money on  stuff like that before we met) In a slightly 'disturbed' moment (and much to my horror) he took the jeans to his mom to have the legs shortened and after chopping the bottom parts of she hemmed them with a plain, thin grey thread!!!
I mean, first of all, everybody knows that is not the way you should shorten a pair of jeans, and especially not such an overexpensive pair!


Besides that, the thread used on these pair of jeans has a very distinctive golden sheen to it which can't be reproduced without cutting and reattaching the original hem. Not only is the original hem stitched with the right thread but it is often distressed together with the jeans, so you won't destroy the original design by cutting the hem off.
Read my tutorial of how to do it the right way here!

 Anyway, after I told BF that his jeans were in my opinion ruined, I've never seen him wearing those jeans (not once!). Because since then he gained some weight I know for sure he is not going to wear them in the future either.
Much to my luck, those jeans are just about the 'right' size and fit to become my (first) pair of boyfriend jeans!

Actually, the fit around the thighs and above that is just roomy enough, especially when worn with the must have accessory, a belt:
 

All I needed to do is to slightly taper the legs to make them sit comfortably but not overly loose around my calves. the destroyed hemline wasn't an issue since these jeans are worn with rolled up cuffs:

On top is a pair of Levi's 'bold curve' jeans. There is more room for the hips and thighs and below that it is tapered. It fits just right around my calves, without much room, so I choose to make the boyfriend jeans slightly wider along the leg line. I only took some fabric out of the outer seam which is not topstitched and straightened the curved line of the Levi's pair.
To avoid bulkiness I finished the bottom edge by a simple zigzag stitch.


And here are the 'after' pics:

18 Mar 2012

Cavalli goes Renfrew - finished


I made a start with refashioning a Cavalli man's shirt. Due to a problem with my old sewing machine I had to stop but now finished it with my new sewing machine! The Renfrew top pattern is a quick and easy one.
I used the nr. 10 stitch + a small zigzag to secure the edges:


Matching the seams is easy with the walking foot, the layers stay perfectly together (seam allowance here already trimmed):


The length is slightly shorter than the original of the pattern. Since the fit around the waist is great I just took out 3/4'' from the bottom before attaching the waist band:


4 Mar 2012

Cavalli goes Renfrew! - part 1


Even if I can't work on this project right now I'd like to show how far I am in the process of refashioning an original Cavalli shirt!
My boyfriend had about 7-8 years ago a period of buying really expensive clothes. Well, if you wonder we didn't know each other by that time.  As he were a bit older and gained a bit weight he didn't fit those pretty shirts anymore. These two with the cutout motives were just too pretty to throw or give away and I kept them for years and years in the closet:


Now, after sewing up the Renfrew muslin I thought the Cavalli shirts were ready for a makeover!I satred out with the purple one. Since the shirt shrunk a bit it was already closer to my size than to the former L of my boyfriend. Let's say they aren't bigger than a women's size medium.

This means there wasn't much fabric to work with. First I carefully took the shirt apart. This was a lot of work!

The front, back pieces and the sleeves fitted just right but then all of the available fabric was used. It would be nearly impossible to find the same color fabric so I decided to introduce another color. I took a basic black shirt to supply the sleeve and neckline bands. Decided to keep the original seam at the bottom of the shirt for now, I'm going to decide about the waist band after assembling.
   

I decided to cut in the motifs at the front and the sides:


Used the good old zigzag stitch everywhere, at the end two rows next to each other.
 

I reinforced the shoulder seam with satin bias band, cut in half lengthwise and folding the sides under:
 

Here is visible that the stitches aren't perfect, this was the moment that I decided the sewing machine needed some reparation again (though I'm really satisfied with the overall look!)