Showing posts with label knit. Show all posts

31 Oct 2012

Brown autumn top

   
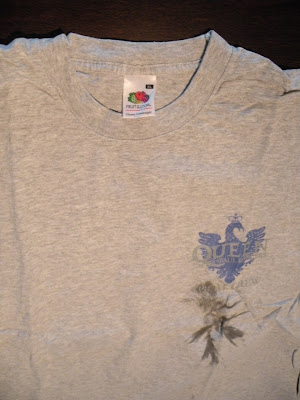
Pic from Burda 09/2012

My favorite item in the september Burda was the dress versions of this pattern.The tops were okay but I didn't really liked the choice of fabrics and in the picture above they also ruined it by trying ironing (just look at the shiny lines alongside the darts). After seeing this version I was convinced that it would look good and wanted to make it as well. It also seemed a good wearable 'muslin' before cutting up the other fabric for the dress. The dress has  a round neck while the top has an interesting V-neck in the back.

Tracing the pattern was a horror. The people at Burda had the greatest idea of printing this pattern in pink. Not only tho outer lines but everything. Pink text and pink lines on a pink background. This made it nearly impossible to find the right lines while tracing. After that all kinds of things went wrong. I was so excited with my new parallel tracing wheel that I marked a 2,5 cm (almost 1 inch) seam- allowance everywhere instead of 1.5 cm (5/8 inch). Luckily discovered this after sewing the front darts. Next thing is that I rushed sewing the sleeves. I sew the darts first but that should have been the last step - sewing the shoulder seams and the darts in one go.
Did I mention I couldn't find any pins? There was a box of needles on hand...

I didn't like the idea of a 'standing collar' and cut about 12 cm inches off the neckband. Well, after sewing it it appeared to be way too small and pulled everywhere. After sewing one side of the neckband hand sewing the other side seemed just too difficult. I noticed that the basic zigzag stitch I choose worked really well (1.5 cm wide and 1.5 cm long stitches) but was almost impossible to remove the seams (of course, I didn't have my seam ripper on hand)

I removed the neckband and 1 cm fabric around as well. I cut a new neckband and decided to attach the neck- and waistband in the same way as on the Renfrew top.

18 Mar 2012

Cavalli goes Renfrew - finished


I made a start with refashioning a Cavalli man's shirt. Due to a problem with my old sewing machine I had to stop but now finished it with my new sewing machine! The Renfrew top pattern is a quick and easy one.
I used the nr. 10 stitch + a small zigzag to secure the edges:


Matching the seams is easy with the walking foot, the layers stay perfectly together (seam allowance here already trimmed):


The length is slightly shorter than the original of the pattern. Since the fit around the waist is great I just took out 3/4'' from the bottom before attaching the waist band:


17 Mar 2012

Stretch stitches for edge finishing of knits

I don't have much experience with stretch stitches other than the simple zigzag stitch. Since I want to finish my Renfrew top I wanted to try a few other stitches on my new sewing machine.

These are the 'advanced' stretch stitches on my machine. I don't like number 11 that much, the results with nr. 12 look better:


Number 09 is a variation on the classic zigzag, also known as tricot-stitch or multi-zigzag stitch:


Number 10 is my favorite, a combination of a straight and a zigzag stitc. Because the straight stitches there is stretch in your seam and the zigzag finishes the raw edges while sewing:


Number 12 is a sort of imitation of the overlock stitch, which is also stretchy and gives a neat edge finishing. Warning: this one uses a lot of thread!

Here is a little stretch test for comparison:


I used a 'walking foot' because I found that the knit fabric was stretched too much with the regular foot. This resulted in wavy seams, not handy on clothing. The walking foot  is designed to help with the transport of multiple layers of fabrics. It does this by  helping with the transport of the upper layer of the fabric, the feed dogs in it move simultaneously with the machine's feed dogs. Here is the walking foot in action.

EDIT: Added here a close up of the walking foot (yes, the white box at the back is also part of the foot):


1. The fabric is held down before the needle goes down:


2. The transport part is lifted up (and makes a step forward) when the needle is down:


Another option could be the 'tricot-foot' which I don't have (yet).
This one is made for the same purpose: even feding the faric layers, especially for thin layers and slippery fabrics. It works differently, there is a small piece of rubber (blue) under the foot that helds the fabric down when the stitch is made and releases when the transport feet move. According to some reviews on the internet it should be working just as fine for knits as the walking foot:

4 Mar 2012

Cavalli goes Renfrew! - part 1


Even if I can't work on this project right now I'd like to show how far I am in the process of refashioning an original Cavalli shirt!
My boyfriend had about 7-8 years ago a period of buying really expensive clothes. Well, if you wonder we didn't know each other by that time.  As he were a bit older and gained a bit weight he didn't fit those pretty shirts anymore. These two with the cutout motives were just too pretty to throw or give away and I kept them for years and years in the closet:


Now, after sewing up the Renfrew muslin I thought the Cavalli shirts were ready for a makeover!I satred out with the purple one. Since the shirt shrunk a bit it was already closer to my size than to the former L of my boyfriend. Let's say they aren't bigger than a women's size medium.

This means there wasn't much fabric to work with. First I carefully took the shirt apart. This was a lot of work!

The front, back pieces and the sleeves fitted just right but then all of the available fabric was used. It would be nearly impossible to find the same color fabric so I decided to introduce another color. I took a basic black shirt to supply the sleeve and neckline bands. Decided to keep the original seam at the bottom of the shirt for now, I'm going to decide about the waist band after assembling.
   

I decided to cut in the motifs at the front and the sides:


Used the good old zigzag stitch everywhere, at the end two rows next to each other.
 

I reinforced the shoulder seam with satin bias band, cut in half lengthwise and folding the sides under:
 

Here is visible that the stitches aren't perfect, this was the moment that I decided the sewing machine needed some reparation again (though I'm really satisfied with the overall look!)

26 Feb 2012

Renfrew top muslin


Well, all the plans for the weekend has changed. Instead continuing working on my Marfy dress I made anther muslin. I ordered the new Sewaholic pattern, the Renfrew top a couple of days ago and it arrived on friday!

The Renfrew top is a fitted knit top with banded hems and variations for the sleeves and neckline. I've seen a lot of pics around on sewing blogs and thought the fit was great. Also I love wearing V-neck tops with 3/4 sleeves and somehow, there aren't many out there to buy. This was the second pattern I ordered from Sewaholic Canada (there are no resellers in the Netherlands). Ordering the pattern was easy, and the delivery quick.

Of course I had to start with the construction of a muslin!
Since I haven't sewn knits for a long time I did not have knit fabrics in the house. But I did have a giant pile of crew shirts from my friend. I used an old, man's x-large sized crew-shirt which has been worn and washed for years and years. I thought long enough to make it a bit sturdy to qualify as a 'stable knit'. Since I don't have a serger I can't sew with really stretchy knits anyway.


Sizing is always tricky, so I pulled out my other Sewaholic pattern, the Lonsdale dress. I used size 8 for the bust tapering to size 6 in the waist and hips on that dress. I used the finished garment measurements and compared to the Renfew top finished measurements. Decided to go with size 8 at the top part (shoulders and bust) and tapered to size 4 at the waist and hips.

The V-neck neckband was a bit tricky, an interesting construction. It didn't turned out perfect, but will get better next time around.  I followed the instructions and used zigzag stitch around the neckline to secure the seam allowance and I think it looks good. (When I was young my grandma used to make almost all our clothes and she used to sew knits with zigzag stitches too.) Next time I might try to use a double needle, that way there would be two straight stitching lines instead a zigzag.

I think the results are not bad! I didn't have enough fabric to make the waistband, so I just folded the seam allowance back and stitched with a zigzag stitch. It is just a muslin, but surprisingly, the length of the top turned out just right! With a waistband would be a bit longer, but also perfect.
(I never wear my shirts tucked in) There is enough room under the arms, the top feels roomy enough but still nicely fitted.