Showing posts with label Drops. Show all posts

27 Mar 2015

Most used baby knits of the past months!


The wool baby items I knitted get a lot of use during the winter months and the cool spring days. For our daily walks I use my nice and warm baby blankets in the stroller.

currently we use on a daily basis:
(both: picture above)

during our walks in the winter months:
(both: picture below, you can just see the edge of the blanket!)

20 Mar 2015

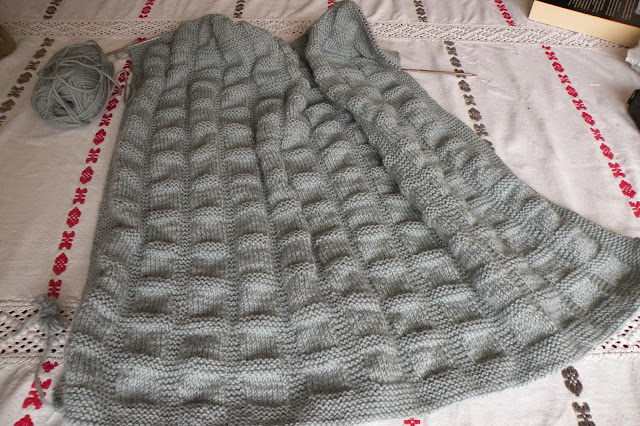
Vasarely inspired 'building blocks' baby blanket finished


This was truly a labor of love! It took 'forever' to knit this blanket on size 3 needles! Then again, it took forever to was and block it but now it is ready to use! I'm not complaining, started to knit merely 3 weeks before our little guy was born, so that's why it really took so long to finish.
I used drops Karisma yarn, just like for the other blanket I've made. It is a superwash treated yarn. After blocking the blanket grew slightly in size, but this is just because of flattening the 3d pattern. You can see below how 'wobbly' it is before blocking, due to the knit/purl stitches next to each other:


pattern: 
Again, it is a pattern consisting my favorite combination: only knit and purl stitches and it is surprisingly easy to memorize though it looks quite intricate with the 3-d blocks which remind me of the work of Victor Vasarely:


The pattern is available through Ravelry (click here) though I must say I figured it out myself, just by looking at pictures and counting stitches. After drawing a pattern chart I decided that it wouldn't be easy to keep track on it while knitting. I wrote the stitches down and then knitted a sample. While knitting made the necessary corrections and now have the pattern to work with!


material & sizing:


The yarn I used is the drops 'Karisma'. It is a 4-strands, sport weight, superwash-treated, 100% wool yarn. It comes in a lot of different colors. I choose a dark, greyish-blue hue: nr.65 'denim blue' which is not so baby-ish anymore.
I used 10 skeins of 50g (strangely my blanket weighs 525 g)
I always use smaller needles than recommended to prevent stretching after blocking and have no issues with 'growing' items after washing.
Using metric size 3.5 needles my gauge is 21 sts per 10 cm.
Size after washing/blocking approx. 90x100 cm
I haven't waisted more than a meter of the yarn. What I did was marking the beginning of a skein and the end of a skein with a piece of contrasting color wool at one side. This helped me to estimate where to start knitting the finishing edge pattern.

12 Nov 2014

Simple blocks baby blanket finished + pattern!


Here it is! Finally finished this knitted blanket. Though it took me 2 weeks I am very pleased with the results.

material & sizing:
The yarn I used is the drops 'Karisma'. It is a 4-strands, sport weight, superwash-treated, 100% wool yarn. It comes in a lot of different colors. I choose a light blue-grey hue (nr.70)
I used just a little short of 9 skeins of 50g (approx. 440 g)
Using metric size 4 needles my gauge is 21 sts per 10 cm.


simple blocks baby blanket pattern:


material: about 9 skeins of 'drops Karisma'
gauge: 21 sts to 10 cm (approx. 22 sts to 4 inches)
abbrevations:
K=knit    P=purl

Cast on a multiple of 8, + 4 stitches
(I started out with 156 stitches, this makes approx. 75 cm in width)

Border: Knit for 11 rows
Next row: continue in square pattern, from here on this is going to be the right side of the work. (This way the border has a nice ridge at the bottom)
You have now 6 'ridges'.

Main part:
The main part of the blanket alters the square pattern with garter stitch rows.
  • Block pattern:
Every uneven row (=right side): Knit
Every other row (=wrong side): K8, P8 * K4, P8 * K8
Repeat these two rows 5 times (you count now 5 ridges along the squares on the right side)
  • Garter stitch rows:
Knit for 6 rows (this will form 3 ridges on the right side)

Border at top:
Continue to the desired length and finish with the garter stitch rows.
Continue in garter stitch for 6 more rows, ending on wrong side.
(You have now 6 ridges on the right side)

Cast off loosely in the next, right side row.
To prevent a tight cast-off I used this method which I learned from my grandma many years ago:
Knit two together through back loops and place the stitch back onto the left needle.

6 Nov 2014

Baby blanket progress


It seems like this is the slowest progressing project ever! Although I'm a fast knitter, it seems like it takes forever to finish this blanket. Probably because I'm used to knit smaller pieces. Even a 40's jumper for myself seems to go faster...
On the positive side I'm already at 2/3rd in the length, so definitely getting closer to the finish!


With 10 more weeks left of the pregnancy the next project is going to be a sewing one: dressing up the family cradle bassinet! I finally made a choice for a cute fabric, which I'm going to use in combination with plain white cotton batiste for the liner at the sides and the canopy!

31 Oct 2014

new knitting project in progress: a baby blanket


Here it is, my latest knitting project: a woolen baby blanket. After a few quick baby garments with more than 150 stitches in width the progress is rather slow, although I'm already around 1/3rd now I think. This time I use another, for me new drops yarn, the 'Karisma'. It comes in a lot of different colors, I choose a pretty light blue-grey hue (nr.70) It is a 4-strands, sport weight, superwash-treated, 100% wool yarn, which could go into the washing machine.
This yarn doesn't have the softness of the baby merino but it is certainly not as 'itchy' as a regular woolen yarn would be. I'm planning to make a soft cotton back for the blanket anyway.


According to the reviews on ravelry garments knitted with this yarn tend to 'grow' after washing. I know this occurs often when a garment is knitted loosely and never experienced it with my garments knitted with drops baby merino yarn. (note: I never wash my knitted garments in the washing machine)
I use metric size 4 needles as suggested on the packaging and I'm happy with the texture right now, although it is not as tight as I really, really prefer. Next time I'm going to use metric size 3.5 needles.
I'm still planning to knit a small test-square to see how this blanket behaves when washed in the washing machine before deciding on the final length. Just in case any lengthwise stretching occurs. (I keep you posted on that)
Otherwise I'm aiming at a size of 70x100 cm (approx. 27 1/2 x 39 1/2 in) which I can use for the stroller in the spring.


The pattern is free-hand, inspired by pictures I came across on the internet. First I wanted a blanket with a more intricate pattern, but then decided that the graphic squares in stotcking-stitch with the garter-stitch rasters would look much cleaner and would also be easier to knit, since every other row is plain knitting. Plus, it has a bit of a retro-feel to it, which I prefer.

24 Oct 2014

How to knit and attach neckline/armhole ribbing separately


I used a for me new technique to attach the ribbing at the neckline and armholes on my latest baby-knit. Above a close-up of the finished ribbing. Looks neat, right?

The basic idea is to knit the ribbing separately and sew it on separately.
I've never used with this technique before. Seems like the Phildar booklets I've got use this method for their patterns, instead of picking up stitches along the edges.


pro:
- the edges are smoother, while you have a bulky edge in the back when picking up stitches
- the ideal solution for smoothly curved lines, because you work on the right side (it looks pretty much flawless when finished!)
- it is easier to distribute the stitches evenly
- the backstitch has elasticity
- though the sewing took some time, I found it quite satisfying work to do

contra:
- slow!
- you really need to take time to secure each loop separately (though the results are really rewarding)
- you need to have a basic understanding of construction, in case you make a mistake or 'loose' one of the loops
- you need to know the exact stitch-count to start with (most patterns instruct to pick up a certain amount of stitches anyway)
- you can't really manipulate and store the separately knitted pieces for a long time before attaching them because of the loose ends

how to:
- Here is what you start with: a ribbing knit to the desired width and length, finished with a row (I used two) of stocking stitch in a contrasting color, but same weight yarn.
- After knitting you just pull the pieces from the needle without casting off the stitches. I used cheap acrylic, since you need to rip out the extra rows while sewing
- I only attached the shoulders before sewing on the ribbing (this way I could work on a flat surface)


My tip: don't forget to leave a very long strand of yarn after the last row, you can use that for stitching! 
You secure the ribbing by stitching the loops down with a simple backstitch, working from the right to the left, after pinning it on the garment:
- bring the needle up through a loop:


- push it down through the loop of the stitch on the right:


- bring the needle up through the next loop on the left after pulling out the contrasting color yarn:

My tip: do 2 rows in another color instead of one. When sewing, pull the first row from 4 stitches and then the second one stitch by sitch. This way you avoid losing your loops by accident.
  

22 Oct 2014

How to knit a neat V-neck ribbing


When knitting a V-neck sweater you need a neat finish for the neck ribbing. Of course, you could do it in two pieces which overlap, but for the classic finish like above you need to decrease in a special way. I used this neckline finish on my Phildar 093/30 baby pullover.
To be honest, when doing some research I found most written instructions confusing, and the original Phildar instructions didn't work for me, while the technique itself is relatively easy.
  • You work from the bottom up (you can either pick up stitches along the edge of the V-neck or knit your ribbing separately and attach it later)
  • To make this finish you need to decrease one stitch in every row, both on the right side and the wrong side of the work
  • you need a cable needle or an extra needle (I used a short sock-needle)
step-by-step instructions:
It looks like there are a lot of steps, but basically you just need to twist your stitches before knitting, like you would do when knitting cables.
Important:
  • You need to pick up an uneven amount of stitches
  • You want to be the center stitch of your ribbing (on the right side) a knit stitch. To do this start the first and every row on the right side with two knit stitches and then rib, alternating purl 1, knit 1 
On the right side:
- rib until you reach the 3 center stitches, then slip the next stitch to the right needle:


- place the next (center) stitch on a cable needle in front of the work:

- slip the next (3rd) stitch to the right needle:

slip the center stitch back to the left needle:

- then slip the other stitches back on the left needle as well:

- knit the 3 stitches together:

On the wrong side:
- when you reach the 3 center stitches, slip the next stitch to the right needle:


- place the next (center) stitch on a cable needle at the back of the work:

- slip the first stitch from the right needle back to the left needle:

- finally slip the center stitch from the needle back on the left needle as well:

- purl the 3 stitches together:

Continue to the desired length, cast off loosely.
The result will be a straight line of neat knit stitches in the center front:


Here is how it looks from the wrong side:

Phildar 093/30 retro inspired baby pullover finished!


Here it is!
The only thing missing are the push-buttons for the neckline, but other than that finally an item that I not only knitted but actually assembled as well!


material:
I used drops baby merino, which is a baby-weight, 4-ply 100% merinos wool.
Needle metric size 2,5 for the borders and size 3 for the main pieces.
The amount of yarn I used is surprisingly little:

  • light beige (color nr.23): 65 gr
  • light turquoise (color nr.10): only 16 gr

sizing:
My stitch-count is different to the original, I have less stitches in the same width which means that the finished garment should be a little larger.
Using the 6 months old measurements I was aiming for something large enough for a 12-months old and when I compare the measurements it is almost spot on!

  • my finished width (measured from armpit to armpit): 26,5 cm
  • length from shoulder down: 29 cm