12 May 2015

Butterick 6183: project-delay and setting sleeves for beginners


This top could have been finished by now if I only had a machine foot to sew in a regular zipper. The problem: I hadn't. Somehow I've never realized the quiet absence of this accessory for my sewing machine. Thinking back I've only used blind zippers for years, and have never missed a regular zipper foot. I probably assumed it is a sort of standard accessory which comes with every sewing machine. Apparently mine came without...
Visited all sewing machine shops in town but none of them had one, so I had to turn to internet shopping once more. While waiting for the zipper foot to arrive I show you how I set in the sleeves. It is a sort of beginner tutorial, I guess besides setting in zippers this is the hardest thing to sew.
Back in my first sewing years I used to sew the sleevecaps to the armholes flat, before finishing the underarm and side seams. It was not an elegant method.
After a while I tried to set in sleeves like the pro's do and often ended up with a sleeve with the wrong side out.
Nowadays I do stitch the sleeve but set it into the armhole in two parts.


1. Ease sleevecap: sew between the dot markings
I usually sew 2 rows, sometimes 3 with a long stitch length.
Adjust the upper pressure of your machine (I normally use 4, now turn the button to 2) By doing this the machine won't pull the bobbin thread up. This allows you to gather the fabric by pulling the bobbin threads.


2. Stitch underarm seam, press and turn the sleeve right side out:


3. Put the sleeve into the armhole, with sleevecap on the outside. This way you put the right sides together. Look at the matching notches to see which sleeve goes which side (usually one notch marks the front and two the back)


4. match and pin notches and small dots
important: don't forget to adjust the upper pressure back to normal!


5. sew the lower half of the armhole seam between the small dots, from the eased part down

6. align the big circle on the sleeve (which marks the center line) with the shoulder seam and pin (I find it easier to put pins at the small dots as well, but you don't need it if you use a contrasting color for the ease stitches)


7. pull the double (or triple) bobbin thread you used to build in ease


8. distribute wrinkles between center circle and small dots and pin. Use as many pins as you want. I use a lot!
Sew upper part of armhole seam between the small dots from the sleeve side.
Overlap a bit with the previous seam you made on the lower part of the armhole.


9. cut and finish seam allowance (I used a second row of straight stitches and finished with a zigzag.


10. press!


1 May 2015

raglan sleeve baby cardigan pattern - EU size 56-62


What I like about this pattern I made up is that you can add any pattern, from fair isle to combination of stitches or just simple stripes. You can use the moss-stitch border, a garter stitch border or just ribbing.
It fits sizes 56-62 (tested!) The cardigan is knitted from the bottom up, front, back and sleeves separately, then all the pieces are joined to knit the raglan yoke all in one piece again. You only need to seam the sleeves and sides at the end.

material & sizing:
I used a baby-weight yarn, drops baby merino which I knit with metric size 3 needles. The tension is 26 sts to 10 cm.
Finished measurements (European size 62)
  • width measured between underarms: 23 cm (=9 in)
  • length from the shoulder down: 24 cm (=9.5 in)
  • underarm length: 14 cm (=5.5 in)


You can adjust the size by casting on more rows and adding length before starting the raglan yoke. In that case you need to widen the neck as well.
Of course, using a heavier wool and larger needles is the easiest way to size up!

my basic raglan pattern:
front (make 2):
- cast on for cardigan 37 sts (each half front includes a border of 4 sts!)
- Row 1-6: Work in the border stitch of your choice for 6 rows (ribbing, moss-stitch or garter-stitch) adding the first buttonhole in the 3rd row.
- buttonhole: knit 2, cast off 2. In next row in border cast on 2 stitches and knit 2.
- Row 7-57: continue in stocking-stitch (alternating 1 row knit and 1 row purl) while keeping the first 4 sts (right front) an last 4 stitches (left front) of each row in moss-stitch or garter-stitch.
- add buttonholes in 23-43-53th row as desired (left front border for boys or right front border for girls )
- Row 58: cast off 2 sts opposite to borders for underarms
- Put stitches on holder

back:
- cast on 68 sts
- Row 1-6: Work in the border stitch of your choice for 6 rows (ribbing, moss-stitch or garter-stitch)
- Row 7-56: continue in stocking-stitch (alternating 1 row knit and 1 row purl)
- row 57 + 58: cast off 2 sts at beginning of row for underarms
- Put stitches on holder

sleeves:
- cast on 37 sts in main color
- Row 1-6: Work in the border stitch of your choice for 6 rows (ribbing, moss-stitch or garter-stitch)
- Row 7-50: continue in stocking stitch (alternating 1 row knit and 1 row purl)
- increase 1 st on both ends in row 16 (=39 sts)
- inc. 1 st at both ends of 22nd row (=41 sts)
- inc. 1 st at both ends of 28th row (=43 sts)
- inc. 1 st at both ends of 44th row (=45 sts),
- inc. 1 st at both ends of 46th row  (=47 sts)
- 51 + 52th row cast off 2 sts at begin of row. (fronts: 35 sts, back 64 sts remain)

yoke:
- Continue front and back with sleeves altogether, place stitchmarkers. For each stitch marker on the right side of work:
- last 3 sts before stitchmarker: slip one, knit one, pass slipped stitch over and knit one.
- first 3 stitches after stitch markers: knit one, knit 2 together
- Purl alternating rows.
Continue until the 84th row (before the 5th buttonhole is made)
shape neck: 
- knit 4 sts of border and put these stitches on holder for neckband
- continue in stocking stitch, decrease at raglan every alternate row as before, at the same time decrease 1 st at neck edge every row until 9 sts remain after knitting right side row.
- put stitches on holder, break wool.

Pick up 3 sts, transfer another stitches on needle, pick up 3 sts in front and transfer the last 6 stitches.

neck band:
- Knit 6 rows in the border stitch of your choice
- in first row (wrong side) decrease once more at stitch markers as described above
- 7th row: cast off

29 Apr 2015

Butterick 6183 top: cutting!


Finally cutting out the pattern pieces!
While watching Project Runway season 11 love that each season has a few designers who are really strong in constructing and draping and come up with the most amazing garments in just a day or two.
The fabric I use is a thin jeans-type fabric with little bows... (the color is darker, it's like in the picture above) The pattern is not really regular or symmetric, so I don't have to match the pieces.

28 Apr 2015

Butterick 6183 pattern adjustments: sleeve + back pieces


Here are the sleeve patterns: original one (on top) and the adjusted one. I have used Nancy Zieman's method to make this adjustment and wrote about it in this blogpost. The nice thing is that both the sleeve hem and the sleevecap remains unchanged while you add width and more room for movement at the armpits.

The back has princess seams. Below are the adjustments I made to the back side pieces. There is a central panel which I simply shortened by cutting at the shorten/lengthen line for the swayback adjustment.
In the pics below you see the back side panel adjustments.
left: I added width at the hem: 1/2 of the seam adjustment below the waistline, tapering to nothing at the waistline. (I did the same at the sides of the center panel as well)
right: finished the swayback adjustment by taking out (1cm) at the center side tapering to nothing to the side seam of the side back panel.


I still need to add extra length at the hem since the pattern length is going to be the finished length of the top.
Haven't decided on the fabric yet, I need to dig into my stash I guess...

24 Apr 2015

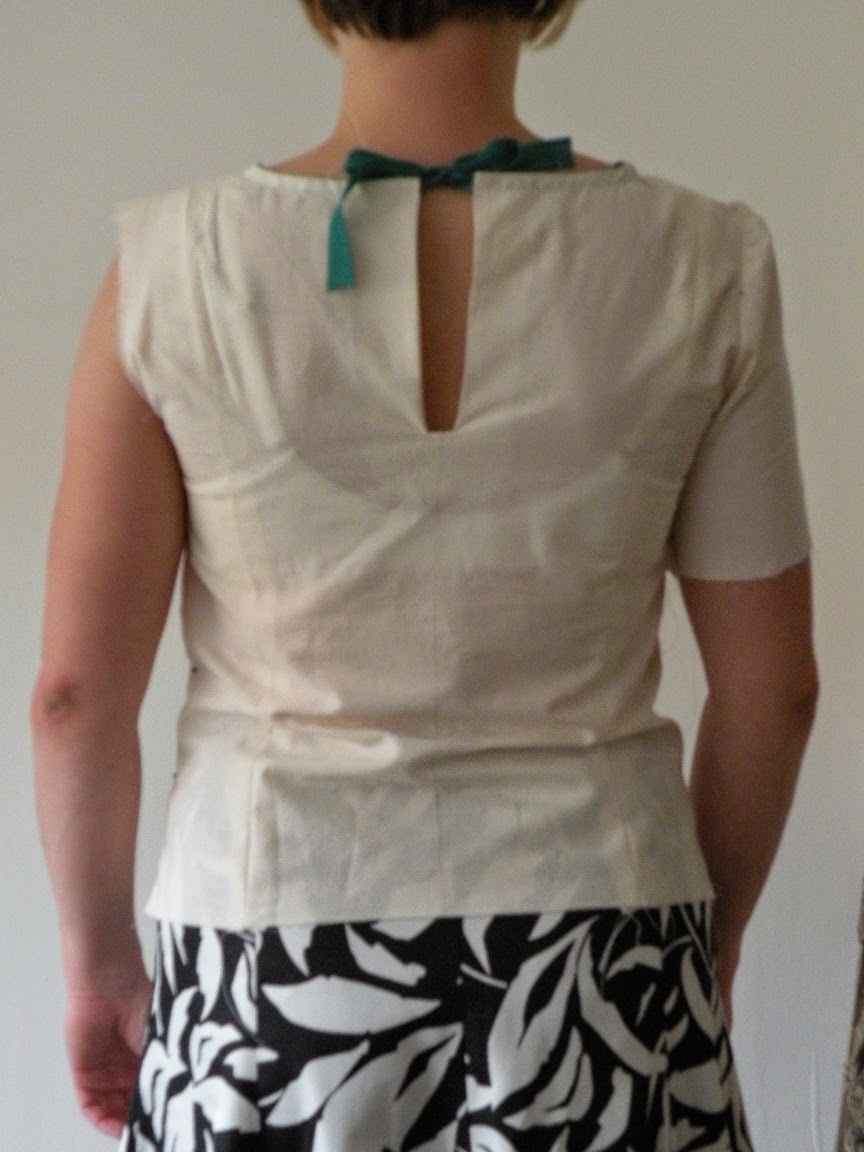
Butterick 6183 top muslin part 2 - fitting the back


Fitting the back is hard and is not much fun when you have to do it on your own. It is so much easier to do the fitting on a dress form or someone else!
For now I have to rely on what I see in the pictures and make new pics after each adjustment to see if the fit is improved.

fitting 1
This is the size 10 muslin:


- At first sight you see a snug fit, no ease at the upper back. I already determined that my muslin is a size too small, but the length seems to be good (placing of the apex and waist markings are good)
- There are diagonal wrinkles towards the shoulder - I guess sizing up will sold this problem due to more ease across shoulder blades. If it was a sleeveless top I'd do a forward shoulder adjustment as well, but for a top with sleeves I think it is not necessary.
- Looking at the pictures, what's more interesting is the waistline. There are horizontal fold wrinkles at the waistline. What you also see (especially from the side) is that the back hem is raised. Fold wrinkles means there is excess fabric. At first sight you'd think it is a swayback problem, right? But: this could be a sign of a too tight fit across the hips. Probably the combination of both.
To check this I decided to open up the back seams from the waistline down.

fitting 2.


- The back looks much more relaxed with the seams open and wrinkles are gone! More room in the hips is definitely part of the wrinkle-problem. It would be easier to deal with this if the finished measurements were printed somewhere on the envelope or the pattern pieces...now I have no idea how much ease is built in...
- I marked the waistline and another thing I notice is that the waistline marking (black line at the back) is sloping downwards. (note: the line at the front is not the waistline but the lengthen/shorten line of the pattern):


The waistline needs to be 'lifted', which means that my back waist length is shorter than the pattern's. This is a swayback adjustment.You can see here that the side seam is pretty much vertical, so I only need to add width at the back.


fitting 3.
alterations done:
- Pinched out 1 cm at the center back for swayback adjustment, tapered to nothing at the side panels
- closed the side seams, added 1x seam allowance at both seams


- the fit at the hemline seems to be fine now, even when wearing a jeans underneath
- the waistline sits at the right place and looks horizontal:


I'm happy with how the top looks now and not going to make another muslin. I'm going to transfer all the adjustments to the pattern pieces.

pattern adjustments to do:
- add 3 cm length at hemline
- alter sleevecap by adding width (2x1cm)
- cut size larger pattern pieces (probably need to shorten the bodice pieces a tad to keep placing the waistline at the same height)
- add width at the hips in the back (3 cm at hemline tapering to nothing at waistline)
- do a minimal swayback adjustment (raise waistline by 1 cm)

22 Apr 2015

Butterick 6183 top muslin - part 1


So, here is the muslin!
I must say, despite the amount of pattern pieces (4 front, 3 back + sleeves) this came together rather quickly.

sizing:
This pattern comes with pattern pieces for different cup sizes which is great, since in the past I was fine with the standard sizing and have never done a full bust adjustment. After checking the pattern instructions I calculated my 'new' bust size...which turned out to be the largest one, a d-cup.
I haven't really found the finished garment measurements so I thought I'd go with size 10, which with a semi-sitted garment fits most of the time, with just minor adjustments.

So, here is how it should look:


fitting:


  • the size 10 shoulder width looks perfect
  • the choice of the largest cup size was good (though size 10 is too tight)
  • the waistline sits at the right height and I like the fact it doesn't look too loose around the waist
  • I'd like to have this length for the finished length so I need to add extra length for hemming
  • if I want the top to be somewhat fitted around the waist with this bust size, I need to put a side zipper in (I've already left one side of the muslin open)
-
  • there are horizontal/diagonal wrinkles at the (finished) sleeve side of the yoke. The yoke is a tad too tight at the bottom seamline, so I need to go for a size larger there
  • obviously, the fit across the bust is too snug, I need to size up that as well. Note: the apex marking is sitting at the right height but not at the right place. (The seams are sitting at the right apex placing) 
  • the area below the bust in the front is slightly 'baggy'. Now baggy-ness is always caused by too much fabric. I could pinch a bit out along the seamlines, which would make the fit under the busts better. This can be done when assembling the top so I don't need to change that on the pattern pieces yet.
  • the sleeve width needs adjustment, just like I did on my Simplicity blouse (you see the wrinkles when I lift my arm up)

  • horizontal wrinkles at the lower back --> more about that next time!
  • also the tightness at the upper back will be better with the size 12 pattern pieces:


pattern adjustments to do:
- trace a size larger (size 12) pattern pieces
(there is enough ease in the sleeve cap, so this change will not affect the fit)
- adjust sleeve width by adding a total of 2 cm (I think this is necessary, even if the sleeve is going to be a size larger) I have used Nancy Zieman's method and wrote about it in this blogpost

Pretty straight forward, right?  Next post is all about the back. I keep you posted!

20 Apr 2015

currently obsessed with: Butterick 6183 top


Okay, here is the problem: because of breastfeeding I sadly can't wear any of my fitted blouses and tops. After the 9 long months of pregnancy I was anxiously waiting to be able to wear 'normal' clothes again. Though my normal b-cup size didn't grow larger than a small d-cup it is apparently enough to leave me with next to nothing to wear...except t-shirts (again, sigh) of course...
Lately I'm attracted to the minimalist trend and often wear a plain V-neck t-shirt with jeans. I am in desperate need of new, more 'dressed' stuff which I also can wear later (hopefully with my 'regular', smaller boobs, once I stop breastfeeding) Tops which go with jeans and skirts as well. The last item I made for myself was a retro, 40's blouse for the 'Sew for Victory' challenge, a year ago, just before I got pregnant. Ever since I've been sewing all kinds of practical things for the nursery but no garments at all.

I guess my biggest problem is that I really don't feel like myself, I really do not 'feel' this new-larger-boobs silhouette of mine. Trying to keep things simple right now. I know shaping below the bust is important, so really loose fitting items would end up looking boxy.
I think this top, which is part of the new Lisette capsule collection for Butterick really stands out.
What I like about is:
- the length (not too long)
- the flattering rounded neckline (not too low and not too high)
- the graphic lines
- the loosely fitted shape
- and of course the fact that the pattern comes with different cup sizes. Thank God, the (full) bust adjustment is already done here!

Unfortunately it took a while (like months after the US release!) before the pattern was available here in the Netherlands. Well, finally it came out last week and I bought it right away. I'm already dreaming of sewing it in different fabrics: clean and simple in crisp cotton or dupion silk, in pretty lace, maybe denim or even in a double knit, uni color or color blocking (more fabric inspiration from the Lisette pattern site here)


With such a simple silhouette having a perfect fit is essential. Here comes my favorite part: making a muslins!!! The shoulder width and the length both have to be perfect. To prevent a 'boxy' look I already know I have to do a swayback adjustment. (Hate fitting the back seams by myself!) I wonder how it is going to look with larger boobs... I can see some problems in that area as well.
Before you think I'm about to add yet another UFO-project to the pile, I have already managed to cut and sew a muslin! Stay tuned!