

Fast forward in time! This weeks vintage baby bootie pattern is 'only' 43 years old, a two colored bootie from 1970. Knitted from bottom to top you start with shaping the foot and finish with the patterned edge. This pattern features the 'knit 1 below' stitch which was new for me. The instep is shaped by knitting stitches together, so there is no need to pick up stitches! I guess a beginner could manage it well, if paying attention to the stitch count. As always, I tested the bootie pattern. If you like it scroll down for the pattern of a matching bonnet!


material & sizing:
- The original pattern uses fingering weight yarn in combination with no.10 needles (=metric 3.25)
- As always, my test yarn is a fingering weight acrylic, which I knit with metric 3 needles. The finished bootie measures about 3.5 in (8-9 cm) along the sole.
construction:
The bootie is knitted from the bottom up. I really like how this bootie is shaped. Usually you need to pick up stitches along the instep, but here you avoid that by K2TOG's along the instep. This makes a smooth and neat edge and the knitting goes really fast. As usual, there is a seam under the sole and in the back.

Below a picture of the sole and toe shaping before sewing:


front with the holes knitted in the rib pattern and the finished sole:


the two-tone pattern:
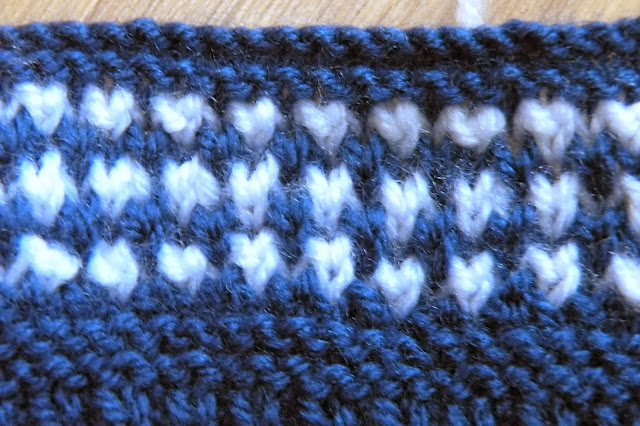
The two colored pattern is created by a 'knit one below' stitch. While it sounds weird, it is easy to knit. There are two altering rows. It uses the 'knit 1 below' stitch, which only makes sense once you see it.
knit one below stitch:
The pattern is made with altering K1 and K1 below in one row and only K in the other row.
- 1. Put your needle under the stitch below the next stitch on your left needle. That way you have two loops above your needle.
- 2. Knit the two loops the same way like you should knit one

source illustration: learn2knit.co.uk
material and sizing:
Tension: 8 sts to 1 inch over stocking-stitch, 7 sts to 1 inch over pattern, using no. 10 needles
bonnet round face: 10 (11) in
length foot: 3 1/2 in (3 3/4 in)


abbreviations for beginners:
k = knit
p = purl
st-st. = stocking stitch
g-st. = garter stitch
st-st. = stocking stitch
g-st. = garter stitch
k 2 tog. = knit two together
inc = increase one stitch in next
y.fwd. = yarn forward or yarn over
sl. 1 = slip one stitch over from left needle to right needle as if to knit
the pattern:inc = increase one stitch in next
y.fwd. = yarn forward or yarn over
sl. 1 = slip one stitch over from left needle to right needle as if to knit
The pattern is written for two sizes, from birth to two months the alternative stitch count is written between brackets. There are no print errors. Some of the instructions are written between brackets too, which works a bit confusing. As I figured out, those instructions belong to both sizes. I've written the pattern out for you until the instep decrease starts:
Cast on 25 sts in main color
R1+R2: Knit (25 sts)
R3: K1, inc, K8 inc, inc, K1, inc, inc, K8, inc, K1 (31 sts)
R4: Knit
R5: K1, inc, K11, inc, inc, K1, inc, inc, K11, inc, K1 (37 sts)
R6: Knit
R7: K1, inc, K14, inc, inc, K1, inc, inc, K14, inc, K1 (43 sts)
R8: Knit
R9: K1, inc, K17, inc, inc, K1, inc, inc, K17, inc, K1 (49 sts)
R10: K6 *inc, K3* repeat ** until 6 sts left: K6 (59 sts)
R11: Purl
R12: Knit
repeat R11 and R12 3 times
R19: Purl
Shape instep as instructed below:


No comments:
Post a Comment