Showing posts with label AustralianWomensWeekly. Show all posts

15 Sept 2014

1966 baby cardigan finished + the pattern!


So here it is, a baby cardigan worked from a vintage pattern. It's not quite finished yet, still have to block it and find the right buttons.
The patten is very straight forward and haven't find any errors. It is also a fast knit, when knitting in the evenings you should be ready in just one week.
I love the raglan sleeves! Although there are not many patterns using raglan sleeves, the fit seems to me always better. Maybe, because there is no well-defined shoulder line, which makes the sizing forgiving. I think it is a great basic pattern which you can adjust - knitting plain or adding stripes, motifs, or a cable pattern if you like.

main pattern:

Hard to spot if you look at the original picture, but here you can see the moss-stitch border along the yoke which is knitted in stocking stitch:


close-up of the raglan yoke, this could be knitted in one piece as well:


The pattern instructs to knit the K stitches of the ribbing t.b.l., which means through the back loop. This makes decorative turned stitches, and also a tighter finish which I only used on the neck ribbing:


material & sizing:
I used my trusted Drops baby merino yarn in the color light beige. I used 130 gramms of wool, which is just a bit more than 2.5 skeins. My tension was 28 sts to 10 cm,which is approximately the same as the suggested tension of 8 sts to 1 inch.
The finished measurements came out just a tad larger than the original:
chest (underarm circumference): 56 cm (=22 in)
length: 28 cm (=11 in)

changes I made:
  • ribbing:
I used 12 rows for the ribbing at front and back and just 10 rows at the sleeves.
  • buttonholes:
I found the buttonhole with just 1 sts too small so used 2 sts (3 sts at edge, cast off 2, remains 1, and in the next row knit 1 st, cast on 2 sts and knit the remaining 3 sts (all in moss stitch)

pattern notes & tips:
  • place remaining sts of back on holder
I didn't cast off after the last row of the back but have put sts on a stitch-holder instead. Why should you cast off only to pick up the same stitches later?
  • placing buttonholes:
Rows 6 - 25 - 44 - 63 - 82 and the last one as instructed at neckband
  • sleeves:
You need to increase 5 sts in the first row after the ribbing. Here is how I did it:
K4, inc, *K7, inc* repeat ** 3 more times, K3

the pattern:
You find the pattern HERE

17 Jul 2014

1934 summer cruise wardrobe - article


The summer is back! After a few very rainy days finally it's sunny outside, here in the Netherlands. I'm already back to work, but some of you might just start to enjoy weeks off, preparing for a trip far from home.
Last week I wrote about my tips for festival outfits, now get back in time for a crispy, fresh holiday wardrobe from the 30's! Back then, going on cruise was very fashionable. Enjoying the fresh air, sunbathing on the ship, fancy dinners with entertainment, trips to the shore to visit foreign towns and cultures.
Although this article is from 1934 there are a lot of tips you could use when packing for your holiday wardrobe, even when not going on a cruise.

This summer cruise wardrobe plan based on the classic and fresh white, red and navy color combination. If those are not your colors (white is certainly not mine) the article advises on other color options as well. How about string-color* combined with bright green, pale blue and some brown or grey with cornflower-blue, pale blue and white? Scroll down to read!
*string-color is beige


"don't wear these on cruises!
  • printed crepe-de-chine or crepe day dresses
  • any dresses that are 'frilly'
  • high-heeled shoes
  • black for daytime, unless it is linen
  • dresses of elaborate materials, such as satin
  • elaborate make-up by day
  • jwellery in the daytime
  • 'trimmed' hats
  • taffeta (it will split) or lame (it will tarnish)"

4 Apr 2014

beauty behind glasses: 1945 make-over


Are you a 40's gal wearing glasses? Let's take a closer look at this 1945 makeover session with the AWW's beauty-expert!
Popular make-overs magazines are not new. Take someone who is unhappy with the way she looks, and let the stylists and make-up artists do their job. Look, even the way pictures are taken is the same: 'before' a sad, clearly unhappy look, little or no make-up and even the light hits her face from above which makes her features look 'droopy', while the 'after' picture is happy and bright... The shadow of the glasses on her face is different and her hair looks shinier. I guess, some things never change.
Some things does though, because Gloria doesn't get a new outfit in this article. In 1945 the beauty expert chooses to recycle her old hat, and shows how to put it on to make it look more flattering. Still, I like the stye of the article, it is written fun and animated, giving exactly the same tips a contemporary stylist would:


the makeover step-by-step:


looking happy:

10 Mar 2014

1934 cruise wardrobe - article


This week back to the 1930's again. Today an article from 1934, which gives a detailed description of a cruise wardrobe when you decide to escape the cold weather. Later this week: in the baby bootie series the cutest 30's booties ever!!! Plus, the finishing touches on my Valerie jumper.
Suddenly, the weather has got warm here, in Western Europe. We are experiencing a quite warm winter this year. No sign of snow at all! When the temperatures are rising it is nice to think about planning the holidays. This week we finally sold our old house (yay!) so there will be more money left to get away for a few days. In the 30's cruises were the ultimate holiday get-aways for the rich. Entertainment, socializing and sunbathing on the ship and sightseeing ashore. With these items you are safe for colder weather on the way and ready for a summer holiday ashore!
"The experienced, well-dressed traveller, you will find, takes a few well-made clothes, the minimum amount of hats and shoes, and looks infinitely smarter than the amateur who is always changing her frocks and is encumbered by many trunks and suitcases."
tweed or flannel suit
  • Flannel in beige, grey, dark blue or brown; tweeds in checks and plaids. 
  • The  coat should be either hip length (nipped-in-at-the-waist) or full length (either fitted or swagger style) 
  • A skirt of the same fabric, with a big pleat back, and in front stitched down to knee-height to complete the suit. 
  • Complete with blouses, several wool sweaters a wool cardigan
long coat
  • A long coat with a high collar and deep pockets in natural colored tweed (flecked with brown and yellow) lined with yellow jersey to wear over sweater and skirt or frocks. 
  • The blouse is of the same jersey and the skirt is the same tweed tweed or flannel with matching long coat (to wear sweater or cardigan underneath) 
  • Grey flannel instead of tweed combines well with everything. 
  • White flannel and chinchilla cloth coat can be an option, but then you need another coat for colder weather.
lightweight wool frock
  • To wear on board. 
  • It should be very tailored looking, in a lighter shade fine wool jersey.
  • machine knitted or handknitted material, short sleeves, trimmed with buttons and pockets.
  • Color suggestion: pastel blue, grey, pink or yellow, beige, grey, white
wool frock 
  • To wear ashore. 
  • Sleeveless or short sleeved, with an accompanying brief jacket, which is made in the same fabric with short or 3/4 sleeves in plainly tailored crepe-de-chine or linen. 
  • Thin frocks should be of crepe-de-chine, pique, tweed, linen or any of the non-transparant cottons, tailored with a severe neckline, short sleeves and pleats in the skirt. 
  • Printed crepe with a flower, dotted or striped pattern in red and white, blue and white, yellow or green or brown and white can be an option.

evening dress with a cape or jacket
  • The simpler the better. 
  • Made out of printed crepe, lace or chiffon.
  • Add long coat of velveteen, velvet or sheer wool in a bright color for cooler nights on deck.
sports outfit
  • An outfit consisting of shorts, shirt and detachable skirt for deck sports, in linen, pique, jersey, sponge cloth or flannel. 
  • The shirt is made like a men's buttoned shirt with two patch pockets. the shorts can be tight fitting if you are slim. 
  • For the 'stouter' girls pleats over the stomach and full legs that hang linke knee-length skirts. 
  • A skirt with buttons at centre front (the bottom buttons are left undone and there is no need to wear stockings!)
bathing costume or beach dress 
  • To wear on deck.

shoes
  • Evening shoes which can be paired with several gowns and topcoat.
  • Two pair of day shoes: 
  • one pair of white or brown, and white low-heeled, rubber soled lace-ups for deck wear 
  • and a pair of white or brown and white court shoes with a high Cuban heel for ports. 
  • Add a dark pair of shoes if one of the ports is cold.
hats
  • Made of the same material as the tweed or flannel ensemble.
  • A medium brimmed thin white felt or panama for the thin frocks 
  • and a big white straw for the ports.
other:
  • a white or colored mackintosh (=trench coat) for rainy ports
  • scarves in dark or bright colors to wear with the thin frocks and sweaters.

source newspaper article and images: Australian Women's Weekly through Trove.

20 Feb 2014

1940 Valerie jumper - Introduction


Here it is, a new jumper post!
After knitting my first three 40's jumpers I must say I really enjoy the knitting process and love the fit. Can't wait to make more!


The first pattern above is from an online, 40's edition of the Australian Women's Weekly magazine, the second one was a free pattern, shared by a kind person on the internet and and the third one is from the website of the Victoria&Albert museum. After knitting those you might conclude that I love free patterns, bright colors and my current fav. yarn to use is the drops baby merino, knit with metric size 3 needles.
As you know I'm a bit torn between the 30's and the 40's for various reasons. For the next jumper pattern I went back to the AWW. Let me introduce you Valerie:

color: 33 'electric blue'
"Start knitting this attractive Valerie jumper now: a jumper that combines with your tailored tweeds to serve you smartly all winter through. Note the uncluttered neckline with it's quaint new trim. The pattern is a semi-open diamond stitch with ribbed neck tabs."
'Valerie' appeared in an early 1940 issue of the AWW, but it certainly could be a late 30's pattern. I think the unusual ribbed neck tabs (which I love!) are a rather 30's looking feature. 40's jumpers often have plain, rounded neck finished with ribbing and various versions of scarfs, ribbons, bows are one of the most common 30's feature i.m.o. Just think of Miss Lemon's style!
There are no puffy sleeves yet, and the sweater features a pretty overall diamond pattern too. The original color is blue, looking at the BW picture it could be a lighter shade, but I choose a vibrant 'electric blue' from drops baby merino which I've bought on sale. How about a pretty sweater for about 20 euro's?!!

the pattern chart: 

The pattern is rather simple but very decorative. You only need to use knit and purl stitches. You need to pay some attention, but after the first few repeats it is easy to memorize. You can spot mistakes right away and correcting them is easy as well.


the pattern diagram:
The AWW patterns don't include pattern diagrams though they can be helpful to understand the construction of a knitted garment. As you can see the sleeve-cap is quite different from the other two jumpers I made, because Valerie has a normal sleeve-cap with flat shoulders, without puff:


planned modifications:
- knit round (that way it is even easier to follow the pattern and there are more knit stitches which is faster for me)
- make the jumper with 3/4 sleeves
- use my 'standard stitchcount' for the bodice, since I need to enlarge the pattern a bit
- add more stitches towards the bustline if needed - the original pattern doesn't include increases

Next time I show you how pretty the diamond pattern looks!

3 Feb 2014

Vintage inspired shoes from...Clarks


very 30's: lace up shoes, shaped heels, slingback sandals, suede
very 40's: heavier heels, pumps, suede, platform soles, ankle straps, wedges, fabric & canvas

Continuing the vintage inspired shoes series I've recently found a few gems in the collection of Clarks. you find the other posts under the label 'shoes' To be honest, never looked at the Clarks shoes until now because my mom who has 'difficult feet' loves them. The good thing is, the fit must be good, but on the downside she tends to like really shapeless shoes lately. It took me some time to talk her into buying a few neat and feminine shoes with low heels instead of the Birkenstock-type sandals she likes to wear.
The shoes above have typical late 30's and 40's shapes, they would all look equally pretty worn with a skirt or trousers. Now, that we finally (almost) sold our old house I'm aloud to buy new shoes. Above there are quite a few from the 2013 autumn/winter collection which are amazing but sadly, already sold out here. How about the Alma Kendra? To die for!
From now on I really need to watch the Clarks collections for new, vintage inspired items for myself...

As a little extra, below a 1946 article on tips for buying the right shoes for your feet:

16 Jan 2014

Schiaparelli-chic 1937


"Originality, plus simplicity of line is the secret of chic."

Schiaparelli wearing her own design: a shoe-hat (black wool, winter 1937/38)

Elsa Schiaparelli (1890–1973) was an Italian fashion designer. She ruled the fashion world of the 1920's and 30's along with Coco Chanel. Like Chanel she retired soon after WW2. One of her most famous deaigns is Wallis Simpson's lobster dress which she created in collaboration with Salvador dali. She contributed to fashion articles from time to time, in several magazines/newspapers during the 30's. In 1937 she gave her 7 rules on how to dress chic.

Wallis Simpson wearing Schiaparelli's famous Lobster dress

schiaparelli's seven rules 
On how to dress chic:
1. simple, beautiful lines and good (quality) materials
2. spotlessly clean clothes
3. be tidy, take good care of every garment
4. in color matching garments
5. dress to suit the occasion
6. keep a small stock of matching clothes
7. spend to buy the very best quality of accessories (shoes, hats, bags) you can afford

1934 spring inspiration: the third and fourth models from Schiaparelli: blue wool suit and white cotton blouse with linen lace ending on the jabot, black wool coat with silver fox scarf

The key is to invest in small stock, but matching clothes, made of quality materials. Nowadays it is easy to forget the importance of quality, when we can buy new, cheap clothing for every season. Looking at myself I prefer to invest in just one or two better pieces (on sale) than filling my wardrobe with tons of cheap and 'fashionable' clothes each season. On the downside, I must say, I looooove colors, and little details so often forget to buy clothes that I can wear in different combinations.
I don't follow the newest fashion trends, and prefer to wear my own, authentic mix of vintage inspired and modern day garments, and I certainly invest in good quality accessories. How about you?


Schiaparelli blouses from 1938: pink Vyella fabric with brown leather buttons, crochet hat, Vyella jacket blouse with chinese collar and leather buttons.
did you know that...
...Vyella fabric was a twill weave blend of 55% merino's wool and 45% cotton in the early 20th century? Later they modified the fabric mix in 80% cotton and 20% wool. In the early years, the fabric’s unique selling point was its combination of lightness and fashion, whilst providing warmth and durability.

1939 beautiful felt hats, left a cocoa-brown forward jutting beret from Schiaparelli


Source newspaper image: AWW through trove

17 Dec 2013

Free vintage baby bootie & bonnet pattern from 1965


Okay, I'd take a short break, but then I remembered that I've already prepared this post a while ago, with items that could be made for the holiday season. They could make a great Christmas gift! It seems that free baby-knitting patterns remain popular on the internet. These small projects are quick to make, you can use your left-over wool and finish them just in a few evenings. I've already done a post on testing 3 free available baby bootee patterns from the internet here. Today I have another baby bootee and bonnet pattern from 1965, with a definite vintage air! Cute, isn't it?
 

These booties have shaped toes and heels. The original pattern uses the classic white/pink (pr white/light blue) combination. Unfortunately there is no contrast visible on the original, black-and-white picture below, it seems all white.
Actually the moss-stitch parts are knitted in the contrasting color (pattern instructions: pink) and the 'bobbles' are white. I think a bolder, modern color combination like bright blue and yellow or grey and yellow, grey and bright blue or pale green with pink could work just as great! Below details of the construction (made up a bootie) and a detailed explanation of how to knit the two-colored bobble-pattern! You find the original patterns at the end of this post.

stitches & patterns used


moss-stitch:
The edges and the sole of the booties are knit in Moss stitch (also referred as 'M-st.' in the instructions). Moss stitch is simply altering knit and purl stitches followed in the next row by purl above knit stitches and knit above the purl stitches:


two-colored bobble-pattern:
The main pattern is knitted in two colors. There are 'bobbles' in the main color (here white) and in between stripes in the contrasting color (here gray):


pattern chart:

One pattern unit is 6 rows tall and 3+1 sts wide.


bobble-pattern step-by-step:
1. the pattern starts with 4 rows in stocking stitch (knit on the right side and purl on the wrong side)


2. start the next row in the contrasting color. The pattern is formed by 3 knit stitches followed by a 'drop-stitch':
   

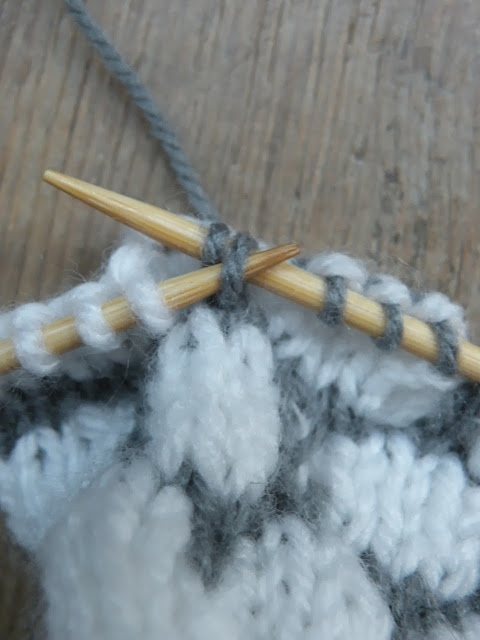
3. drop the stitch until the colored stitch and pick that one up (you will have 4 strands of wool above that stitch)
   

4. put your needle under the 4 strands, pick up the wool and pull it through as if to knit (now you have the new loop on your right needle and the original stitch next to that)
   

5 now pass the original stitch over the loop you just made: pick up the original stitch with your left needle and lift it over the loop
   

Your finished stitch (left) the wrong side of the work (right):
   

material and sizing:
  • The yarn specified in the instructions (see below bonnet pattern) is a fingering weight yarn, with no.10 needles (metric 3,25) and 7 sts per inch. My guess is, the finished items should definitely fit a 0-4 month old baby.
  • I used for my sample a slightly heavier, sport/baby weight yarn with metric size 3 needles. My gauge: 6 sts per in. My finished size from heel to toe: 9 cm (3,5 in). According to baby boot charts this should fit a 3-6 months old baby.
bootie-pattern:
   

These booties are knitted top down. First step is to knit the straight, patterned part above the ankle. After making a row of holes for the tie you separate the stitches in 3 sections. You continue working on middle section for the instep. The turn is made by picking up stitches at the sides, just like when knitting a sock. You finish after decreasing in an angle for the toes. The bootees have a seam along the length of the sole up to the back. As always, I suggest using a flat seam finish to avoid bulky seams inside. (See link under tab 'knitting hints')


my pattern modifications:
- instead of 'make one' (m1) by picking up a strand from the previous row I used 'yarn over' to make the holes around the ankle for the tie. A yarn over makes larger holes which are easier in use imo:

Warning: I'd strongly recommend to use a crochet chain or other elastic material instead of a ribbon for safety reasons. Though they look pretty, ribbons are not elastic. When pulled too hard they can be potentially dangerous!


bonnet pattern:
To make up: join back seam from fastening off to first decrease. Sew on ribbon.

Courtesy & source of all newspaper images: AWW through Trove.